강사: 오재혁
시간: 10년 10월 8일부터 총 10회, 금요일 오후 7시 30분 ~9시 30분
수강료: 300,000원
강좌 개요
iPhone의 매력은 사용 경험에 기반한다. 일상의 한 부분에 퍼즐 조각처럼 들어맞는, 어플리케이션을 사용하며 얻는
만족감은, 주변에서 쉽게 확인할 수 있다. 하지만, iPhone 플랫폼의 매력은 사용에 한정되지 않는다. iPhone
어플리케이션 제작은 더욱 농밀하고 치명적인 경험 기회를 제공한다. 직접 제작한, 자신만의 표현을 간직한 어플리케이션을, 전 세계에
배포할 수 있고, 그것을 매개로 소통할 수 있다는 가능성은, 제작자가 되기 위한 노력을 상쇄하고 남을 만큼의 가치를 제공한다.
본 강좌는 iPhone 어플리케이션 제작의 경험을 같이 하고자 하는 사용자를 대상으로 한다. 어플리케이션 제작을 위해 알아야 할 지식들을 살펴보고, 전반적인 기능을 연습해본다.
* 필요한 준비 사항
: 수강을 위해서는 Snow Leopard (Mac OS X 10.6.x) 이후 버전이 설치된 Mac 과 iPod Touch 혹은 iPhone이 필요합니다.
강사 소개
오재혁 / 프로그래머
서울대학교에서 컴퓨터공학을 전공하였으며 다수의 인터랙티브 설치 작업을 제작 및 지원해왔다. 현재 프리랜서로 설치 제작 및 team Gurunun 에서 아이폰 어플리케이션 제작에 주력하고 있다.
강좌 계획
1강: iPhone Framework
- iPhone SDK 내용 전반을 훑어본다.
- Xcode (어플리케이션 제작 환경) 사용법을 익힌다.
- SDK 에서 제공하는 template project 에서 간단한 어플리케이션을 만들고, 실행해본다.
2강:Objective-C, Cocoa
- Objective-C, Cocoa 의 역사, 특징을 이해한다.
- iPhone Application Project의 구성을 살펴본다.
- iPhone SDK 에서 원하는 부분을 찾아 사용하는 법을 배운다.
camera로부터의 입력 이미지를 OpenCV 함수로 받아 IplImage 형태로 저장한 것과 OpenGL 함수로 그린 그래픽 정보를 합성하기
Way #1.
OpenCV의 카메라 입력으로 받은 image frame을 texture로 만들어 OpenGL의 디스플레이 창에 배경 (평면에 texture mapping)으로 넣고 여기에 그래픽을 그려 display하는 방법
ref. http://cafe.naver.com/opencv/12266
테스팅 중 발견한 문제점: cvRetrieveFrame() 함수를 while 아래에서 돌려 cvShowImage() 함수로 보여 주는 대신 glutDisplayFunc() 함수에서 불러 glutMainLoop() 함수로 돌리면 시간이 많이 걸린다. (* cvGrabFrame() 함수의 경우는 괜찮음.)
Textures are simply rectangular arrays of data - for example, color data, luminance data, or color and alpha data. The individual values in a texture array are often called texels.
The data describing a texture may consist of one, two, three, or four elements per texel, representing anything from a modulation constant to an (R, G, B, A) quadruple.
A texture object stores texture data and makes it readily available. You can now control many textures and go back to textures that have been previously loaded into your texture resources.
(1) 고정되어 있는 것으로 가정한 카메라의 내부 파라미터 값들을 구하고 (2) 실시간으로 들어오는 이미지 프레임마다 카메라의 회전과 이동을 계산하기 위하여 Tsai 알고리즘을 쓰기로 하고, C 또는 C++로 구현된 소스코드 또는 라이브러리를 찾아서 붙여 보기로 한다.
Try #1.
처음에는 CMU의 Reg Willson가 C로 짠 Tsai Camera Calibration 코드 에서 필요한 부분을 include하여 쓰려고 했는데, C++ 문법에 맞지 않는 구식 C 문법으로 코딩된 부분이 많아서 고치는 데 애를 먹었다. (Xcode의 C++ 프로젝트에서 .c 파일을 include하면 compile은 되지만, linking error가 난다. 때문에 .c를 .cpp로 바꾸어야 함.) 그런데 결정적으로, "cal_main.cpp" 파일에 정의된, 캘리브레이션의 최종 결과값을 주는 함수들이 호출하는 optimization을 실행하는 함수 lmdif_()가 Fortan 파일 "lmdif.f"에 정의되어 있고, Fortran을 C로 변환해 주는 "f2c.h"에 의해 이것을 "lmdif.c"로 하여 가지고 있다는 문제가 있었다. lmdif.c를 lmdif.cpp 형태로 만들기 위해서는 Fortran 언어와 Fortran을 C++로 변환하는 방법을 알아야 하므로, 결국 포기했다.
Try #2.
Michigan State University Charles B. Owen의 Display-Relative
Calibration (DRC)을 구현한 DRC 프로그램( DRC.zip )에서 카메라 캘리브레이션에 Tsai의 알고리즘 libtsai.zip을 쓰고 있다. 이 라이브러리는 위의 C 코드를 C++로 수정하면서 "CTsai"라는 클래스를 사용하고 여러 함수들을 수정/보완/결합한 것인데, Visual Studio 용 프로젝트 프로그램을 만들면서 Windows 환경에 기반하여 MFC를 활용하였다. 그래서 이것을 나의 Mac OS X 기반 Xcode 프로젝트에서 그대로 가져다 쓸 수는 없다. 용법은 다음과 같다.
클래스 형태의 템플릿( CLmdif )으로 선언된 "lmdif"의 member function "Lmdif"를 호출할 때,
min/Lmdif.h:48
template<class T> class CLmdif : private CLmdif_
{
int Lmdif(T *p_user, bool (T::*p_func)(int m, int n, const double *parms, double *err),
int m, int n, double *x, double *fvec, double *diag, int *ipvt, double *qtf)
};
후자인 같은 member function, ncc_compute_exact_f_and_Tz_error()를 인자로 넣고 있고 (위 부분 코드들 중 오렌지 색 부분), 컴파일 하면 이 부분을 <unknown type>으로 인식하지 못 하겠다는 에러 메시지를 보낸다. 그리고 다음과 같은 형태를 추천한다고 한다.
function pointer의 형태가 틀린 모양인데, 오렌지색 부분을 그냥 함수가 아닌 어떤 class의 non-static member function을 가리키는 pointer로 &CTsai::ncc_compute_exact_f_and_Tz_error 이렇게 바꾸어 주면, 에러 메시지가 다음과 같이 바뀐다.
error: no matching function for call to 'CLmdif<CTsai>::Lmdif(CTsai* const, bool (*)(int, int, const double*, double*), int&, const int&, double [3], NULL, NULL, NULL, NULL)'
연두색 부분 대신 CTsai::ncc_compute_exact_f_and_Tz_error 이렇게 바꾸어 주면, 에러 메시지가 다음과 같다.
error: no matching function for call to 'CLmdif<CTsai>::Lmdif(CTsai* const, bool (&)(int, int, const double*, double*), int&, const int&, double [3], NULL, NULL, NULL, NULL)'
해결:
편법으로, class CLmdif를 클래스 형 템플릿이 아닌 그냥 클래스로 바꾸어서 선언하고 연두색 부분처럼 호출하면 에러는 안 나기에 일단 이렇게 넘어가기로 한다.
문제점#2.
코드에서 Windows OS 기반 MFC를 사용하고 있어 Mac OS X에서 에러가 난다.
해결:
MFC를 사용하는 "StdAfx.h"는 모두 주석 처리한다.
문제점#3.
Lmdif.h
... 기타 등등의 문제점들을 해결하고, 캘리브레이션을 수행한 결과가 맞는지 확인하자.
source code:
if (
CRimage.size() > 0 ) // if there is a valid point with its cross
ratio
{
correspondPoints(indexI, indexW, p, CRimage,
linesYorder.size(), linesXorder.size(), world, CRworld, dxList.size(),
dyList.size(), iplMatch, scale );
}
cvShowImage( "match", iplMatch );
cvSaveImage( "match.bmp", iplMatch );
아래 사진은 구해진 카메라 내부/외부 파라미터들을 가지고 (1) 실제 패턴의 점에 대응하는 이미지 프레임 (image coordinate) 상의 점을 찾아 (reprojection) 보라색 원으로 그리고, (2) 실제 패턴이 있는 좌표 (world coordinate)를 기준으로 한 graphic coordinate에 직육면체 cube를 노란색 선으로 그린 결과이다.
이미지 프레임과 실제 패턴 상의 점을 1 대 1로 비교하여 연결한 16쌍의 대응점
구한 카메라 파라미터를 가지고 실제 패턴 위의 점들을 이미지 프레임에 reproject한 결과 (보라색 점)와 실제 패턴의 좌표를 기준으로 한 그래픽이 이미지 프레임 상에 어떻게 나타나는지 그린 결과 (노란색 상자)
위 왼쪽 사진에서 보여지는 16쌍의 대응점들의 좌표값을 "이미지 좌표(x,y) : 패턴 좌표 (x,y,z)"로 출력한 결과:
camera parameter
focus = 3724.66
principal axis (x,y) = 168.216, 66.5731
kappa1 (lens distortion) = -6.19473e-07
skew_x = 1
대응점 연결에 오차가 없으면, 즉, 패턴 인식이 잘 되면, Tsai 알고리즘에 의한 카메라 파라미터 구하기가 제대로 되고 있음을 확인할 수 있다. 하지만, 현재 full optimization (모든 파라미터들에 대해 최적화 과정을 수행하는 것)으로 동작하게 되어 있고, 프레임마다 모든 파라미터들을 새로 구하고 있기 때문에, 속도가 매우 느리다. 시험 삼아 reprojection과 간단한 graphic을 그리는 과정은 속도에 큰 영향이 없지만, 그전에 카메라 캘리브레이션을 하는 데 필요한 계산 시간이 길다. 입력 프레임이 들어오는 시간보다 훨씬 많은 시간이 걸려 실시간 구현이 되지 못 하고 있다.
따라서, (1) 내부 파라미터는 첫 프레임에서 한 번만 계산하고 (2) 이후 매 프레임마다 외부 파라미터 (카메라의 회전과 이동)만을 따로 계산하는 것으로 코드를 수정해야 한다.
Kalman filter
: estimates system states that can only be observed indirectly or inaccurately by the system itself.
: estimates the variables of a wide range of processes.
: estimates the states of a linear system.
: minimizes the variance of the estimation error
Linear system
x: state of the system
u: known input to the system
y: measured output
w: process noise
z: measurement noise
http://wiki.answers.com/Q/What_is_a_feedback_system
A feedback system, in general engineering terms, is a system whose
output if fed back to the input, and depending on the output, your
input is adjusted so as to reach a steady-state. In colloquial
language, you adjust your input based on the output of your system so
as to achieve a certain end, like minimizing disturbance, cancelling
echo (in a speech system) and so on.
Criteria of an Estimator
1) The expected value of the estimate should be equal to the expected value of the state.
2) The estimator should be with the smallest possible error variance.
Requirement of Kalman filter
1) The average value of w is zero and average value of z is zero.
2) No correlation exists between w and z. w_k and z_k are independent random variables.
Kalman filter equations
K matrix: Kalman gain
P matrix: estimation error covariance
http://en.wikipedia.org/wiki/Three_sigma_rule
In statistics, the 68-95-99.7 rule, or three-sigma rule, or empirical rule, states that for a normal distribution, nearly all values lie within 3 standard deviations of the mean.
"steady state Kalman filter"
- K matrix & P matrix are constant
"extended Kalman filter"
: an extension of linear Kalman filter theory to nonlinear systems
"Kalman smoother"
: to estimate the state as a function of time so to reconstruct the trajectory after the fact
H infinity filter
=> correlated noise problem
=> unknown noise covariances problem
spacecraft navigation for the Apollo space program
> applications
all forms of navigation (aerospace, land, and marine)
nuclear power plant instrumentation
demographic modeling
manufacturing
the detection of underground radioactivity
fuzzy logic and neural network training
Gelb, A. Applied Optimal Estimation. Cambridge, MA: MIT Press, 1974.
Anderson, B. and J. Moore. Optimal Filtering. Englewood Cliffs, NJ: Prentice-Hall, 1979.
Grewal, M. and A. Andrews. Kalman Filtering Theory and Practice. Englewood Cliffs, NJ: Prentice-Hall, 1993.
Sorenson, H. Kalman Filtering: Theory and Application. Los Alamitos, CA: IEEE Press, 1985.
Peter Joseph’s Web site @http://ourworld.compuserve.com/homepages/PDJoseph/
내가 설치할 컴퓨터 사양:
Model Name: Mac mini
Model Identifier: Macmini3,1
Processor Name: Intel Core 2 Duo
Processor Speed: 2 GHz
Number Of Processors: 1
Total Number Of Cores: 2
L2 Cache: 3 MB
Memory: 1 GB
Bus Speed: 1.07 GHz
Boot ROM Version: MM31.0081.B00
그래픽 카드:
NVIDIA GeForce 9400
"Intel Core 2 Duo processors 2.4GHz+ are fine."이라고 했는데, 2.0이면 되지 않을까? 그래픽 카드는 동일한 것이니 문제 없고.
1. library dependency 확인
1. TooN - a header library for linear algebra
2. libCVD - a library for image handling, video capture and computer vision
3. Gvars3 - a run-time configuration/scripting library, this is a sub-project of libCVD.
%% cvs -z3 -d:pserver:anonymous@cvs.savannah.nongnu.org:/sources/toon co TooN
실행 결과:
cvs checkout: warning: failed to open /Users/lym/.cvspass for reading: No such file or directory
cvs checkout: Updating TooN
U TooN/Authors
U TooN/COPYING
U TooN/Cholesky.h
U TooN/Doxyfile
U TooN/GPL.txt
U TooN/LU.h
U TooN/Lapack_Cholesky.h
U TooN/Makefile.in
U TooN/README
U TooN/SVD.h
U TooN/SymEigen.h
U TooN/TODO
U TooN/TooN.h
U TooN/configure
U TooN/configure.ac
U TooN/determinant.h
U TooN/gauss_jordan.h
U TooN/gaussian_elimination.h
U TooN/generated.h
U TooN/helpers.h
U TooN/irls.h
U TooN/lapack.h
U TooN/make_make_vector.awk
U TooN/make_typeof.awk
U TooN/se2.h
U TooN/se3.h
U TooN/sl.h
U TooN/so2.h
U TooN/so3.h
U TooN/wls.h
cvs checkout: Updating TooN/Documentation
cvs checkout: Updating TooN/benchmark
U TooN/benchmark/generate_solvers.m
U TooN/benchmark/solve_ax_equals_b.cc
U TooN/benchmark/solvers.cc
cvs checkout: Updating TooN/doc
U TooN/doc/COPYING_FDL
U TooN/doc/Makefile
U TooN/doc/documentation.h
U TooN/doc/linoperatorsdoc.h
cvs checkout: Updating TooN/internal
U TooN/internal/allocator.hh
U TooN/internal/builtin_typeof.h
U TooN/internal/comma.hh
U TooN/internal/config.hh
U TooN/internal/config.hh.in
U TooN/internal/dchecktest.hh
U TooN/internal/debug.hh
U TooN/internal/deprecated.hh
U TooN/internal/diagmatrix.h
U TooN/internal/make_vector.hh
U TooN/internal/matrix.hh
U TooN/internal/mbase.hh
U TooN/internal/objects.h
U TooN/internal/operators.hh
U TooN/internal/overfill_error.hh
U TooN/internal/reference.hh
U TooN/internal/size_mismatch.hh
U TooN/internal/slice_error.hh
U TooN/internal/typeof.hh
U TooN/internal/vbase.hh
U TooN/internal/vector.hh
cvs checkout: Updating TooN/optimization
U TooN/optimization/brent.h
U TooN/optimization/conjugate_gradient.h
U TooN/optimization/downhill_simplex.h
U TooN/optimization/golden_section.h
cvs checkout: Updating TooN/test
U TooN/test/SXX_test.cc
U TooN/test/as_foo.cc
U TooN/test/brent_test.cc
U TooN/test/cg_test.cc
U TooN/test/cg_view.gnuplot
U TooN/test/chol.cc
U TooN/test/diagslice.cc
U TooN/test/dynamic_test.cc
U TooN/test/gauss_jordan.cc
U TooN/test/gaussian_elimination_test.cc
U TooN/test/golden_test.cc
U TooN/test/identity_test.cc
U TooN/test/lutest.cc
U TooN/test/make_vector.cc
U TooN/test/makevector.cc
U TooN/test/mat_test.cc
U TooN/test/mat_test2.cc
U TooN/test/mmult_test.cc
U TooN/test/normalize_test.cc
U TooN/test/normalize_test2.cc
U TooN/test/scalars.cc
U TooN/test/simplex_test.cc
U TooN/test/simplex_view.gnuplot
U TooN/test/sl.cc
U TooN/test/svd_test.cc
U TooN/test/sym.cc
U TooN/test/test2.cc
U TooN/test/test3.cc
U TooN/test/test_foreign.cc
U TooN/test/un_project.cc
U TooN/test/vec_test.cc
생성된 TooN 폴더에 들어가서
%%% ./configure
실행 결과:
checking for g++... g++
checking for C++ compiler default output file name... a.out
checking whether the C++ compiler works... yes
checking whether we are cross compiling... no
checking for suffix of executables...
checking for suffix of object files... o
checking whether we are using the GNU C++ compiler... yes
checking whether g++ accepts -g... yes
checking for dgesvd_ in -llapack... yes
checking for decltype... no
checking for __typeof__... yes
checking for __attribute__((deprecated))... yes
You're on the development branch of TooN 2.0. Everything will probably work, but
the interface is a bit different from TooN-1.x
If you want TooN-1, then get it using:
cvs -z3 -d:pserver:anoncvs@cvs.savannah.nongnu.org:/cvsroot/toon co -r Maintenance_Branch_1_x TooN
or update what you currently have using:
cvs up -r Maintenance_Branch_1_x
or head over to:
http://mi.eng.cam.ac.uk/~er258/cvd/
Otherwise, please report any bugs you come across.
%% cvs -z3 -d:pserver:anonymous@cvs.savannah.nongnu.org:/sources/toon co -D "Mon May 11 16:29:26 BST 2009" TooN
실행 결과:
cvs checkout: warning: failed to open /Users/lym/.cvspass for reading: No such file or directory
? TooN/Makefile
? TooN/config.log
? TooN/config.status
cvs checkout: Updating TooN
U TooN/Cholesky.h
U TooN/Doxyfile
U TooN/LU.h
U TooN/Makefile.in
U TooN/SVD.h
U TooN/SymEigen.h
U TooN/TooN.h
U TooN/configure
U TooN/configure.ac
cvs checkout: `TooN/determinant.h' is no longer in the repository
U TooN/gauss_jordan.h
U TooN/gaussian_elimination.h
U TooN/helpers.h
U TooN/irls.h
U TooN/se2.h
U TooN/se3.h
U TooN/sl.h
U TooN/so2.h
U TooN/so3.h
U TooN/util.h
U TooN/wls.h
cvs checkout: Updating TooN/Documentation
cvs checkout: Updating TooN/benchmark
U TooN/benchmark/generate_solvers.m
cvs checkout: Updating TooN/doc
U TooN/doc/documentation.h
U TooN/doc/matrixdoc.h
cvs checkout: Updating TooN/internal
U TooN/internal/allocator.hh
cvs checkout: `TooN/internal/comma.hh' is no longer in the repository
RCS file: /sources/toon/TooN/internal/config.hh,v
retrieving revision 1.12
retrieving revision 1.8
Merging differences between 1.12 and 1.8 into config.hh
TooN/internal/config.hh already contains the differences between 1.12 and 1.8
U TooN/internal/config.hh.in
cvs checkout: `TooN/internal/dchecktest.hh' is no longer in the repository
U TooN/internal/debug.hh
cvs checkout: `TooN/internal/deprecated.hh' is no longer in the repository
U TooN/internal/diagmatrix.h
U TooN/internal/matrix.hh
U TooN/internal/mbase.hh
U TooN/internal/objects.h
U TooN/internal/operators.hh
cvs checkout: `TooN/internal/overfill_error.hh' is no longer in the repository
U TooN/internal/reference.hh
U TooN/internal/slice_error.hh
U TooN/internal/vector.hh
cvs checkout: Updating TooN/optimization
U TooN/optimization/conjugate_gradient.h
U TooN/optimization/downhill_simplex.h
U TooN/optimization/golden_section.h
cvs checkout: Updating TooN/test
U TooN/test/identity_test.cc
cvs checkout: `TooN/test/simplex_test.cc' is no longer in the repository
cvs checkout: `TooN/test/simplex_view.gnuplot' is no longer in the repository
U TooN/test/vec_test.cc
%% cvs -z3 -d:pserver:anonymous@cvs.savannah.nongnu.org:/sources/libcvd co -D "Mon May 11 16:29:26 BST 2009" libcvd
실행 결과:
cvs checkout: warning: failed to open /Users/lym/.cvspass for reading: No such file or directory
cvs checkout: Updating libcvd
U libcvd/Authors
U libcvd/Doxyfile
U libcvd/LICENSE
U libcvd/Makefile.in
U libcvd/TODO
U libcvd/config.guess
U libcvd/config.sub
U libcvd/configure
U libcvd/configure.in
U libcvd/generate_dependencies.bash
U libcvd/install-sh
U libcvd/subimage_test.cc
cvs checkout: Updating libcvd/build
cvs checkout: Updating libcvd/build/vc2005
U libcvd/build/vc2005/config.h
U libcvd/build/vc2005/libcvd.sln
U libcvd/build/vc2005/libcvd.vcproj
cvs checkout: Updating libcvd/build/vc2008
U libcvd/build/vc2008/libcvd.sln
U libcvd/build/vc2008/libcvd.vcproj
cvs checkout: Updating libcvd/cvd
U libcvd/cvd/abs.h
U libcvd/cvd/bresenham.h
U libcvd/cvd/brezenham.h
U libcvd/cvd/byte.h
U libcvd/cvd/camera.h
U libcvd/cvd/colourspace.h
U libcvd/cvd/colourspace_convert.h
U libcvd/cvd/colourspace_frame.h
U libcvd/cvd/colourspacebuffer.h
U libcvd/cvd/colourspaces.h
U libcvd/cvd/connected_components.h
U libcvd/cvd/convolution.h
U libcvd/cvd/cpu_hacks.h
U libcvd/cvd/cvd_image.h
U libcvd/cvd/cvd_timer.h
U libcvd/cvd/deinterlacebuffer.h
U libcvd/cvd/deinterlaceframe.h
U libcvd/cvd/diskbuffer2.h
U libcvd/cvd/diskbuffer2_frame.h
U libcvd/cvd/documentation.h
U libcvd/cvd/draw.h
U libcvd/cvd/eventobject.h
U libcvd/cvd/exceptions.h
U libcvd/cvd/fast_corner.h
U libcvd/cvd/gl_helpers.h
U libcvd/cvd/glwindow.h
U libcvd/cvd/haar.h
U libcvd/cvd/harris_corner.h
U libcvd/cvd/helpers.h
U libcvd/cvd/image.h
U libcvd/cvd/image_convert.h
U libcvd/cvd/image_convert_fwd.h
U libcvd/cvd/image_interpolate.h
U libcvd/cvd/image_io.h
U libcvd/cvd/image_ref.h
U libcvd/cvd/integral_image.h
U libcvd/cvd/interpolate.h
U libcvd/cvd/irls.h
U libcvd/cvd/la.h
U libcvd/cvd/localvideobuffer.h
U libcvd/cvd/localvideoframe.h
U libcvd/cvd/message_queue.h
U libcvd/cvd/nonmax_suppression.h
U libcvd/cvd/random.h
U libcvd/cvd/readaheadvideobuffer.h
U libcvd/cvd/rgb.h
U libcvd/cvd/rgb8.h
U libcvd/cvd/rgba.h
U libcvd/cvd/ringbuffer.h
U libcvd/cvd/runnable.h
U libcvd/cvd/runnable_batch.h
U libcvd/cvd/se2.h
U libcvd/cvd/se3.h
U libcvd/cvd/serverpushjpegbuffer.h
U libcvd/cvd/serverpushjpegframe.h
U libcvd/cvd/so2.h
U libcvd/cvd/so3.h
U libcvd/cvd/synchronized.h
U libcvd/cvd/tensor_voting.h
U libcvd/cvd/thread.h
U libcvd/cvd/timeddiskbuffer.h
U libcvd/cvd/timer.h
U libcvd/cvd/utility.h
U libcvd/cvd/vector_image_ref.h
U libcvd/cvd/videobuffer.h
U libcvd/cvd/videobufferflags.h
U libcvd/cvd/videodisplay.h
U libcvd/cvd/videofilebuffer.h
U libcvd/cvd/videofilebuffer_frame.h
U libcvd/cvd/videoframe.h
U libcvd/cvd/videosource.h
U libcvd/cvd/vision.h
U libcvd/cvd/wls.h
U libcvd/cvd/wls_c.h
U libcvd/cvd/wls_cholesky.h
U libcvd/cvd/yc.h
cvs checkout: Updating libcvd/cvd/IRIX
U libcvd/cvd/IRIX/O2buffer.h
U libcvd/cvd/IRIX/O2videoframe.h
U libcvd/cvd/IRIX/sgi-video.h
cvs checkout: Updating libcvd/cvd/Linux
U libcvd/cvd/Linux/capture_logic.cxx
U libcvd/cvd/Linux/dvbuffer.h
U libcvd/cvd/Linux/dvbuffer3.h
U libcvd/cvd/Linux/dvframe.h
U libcvd/cvd/Linux/v4l1buffer.h
U libcvd/cvd/Linux/v4l1frame.h
U libcvd/cvd/Linux/v4l2buffer.h
U libcvd/cvd/Linux/v4l2frame.h
U libcvd/cvd/Linux/v4lbuffer.h
U libcvd/cvd/Linux/v4lcontrol.h
cvs checkout: Updating libcvd/cvd/OSX
U libcvd/cvd/OSX/qtbuffer.h
U libcvd/cvd/OSX/qtframe.h
cvs checkout: Updating libcvd/cvd/internal
U libcvd/cvd/internal/aligned_mem.h
U libcvd/cvd/internal/assembly.h
U libcvd/cvd/internal/builtin_components.h
U libcvd/cvd/internal/convert_pixel_types.h
U libcvd/cvd/internal/disk_image.h
U libcvd/cvd/internal/gl_types.h
U libcvd/cvd/internal/image_ref_implementation.hh
U libcvd/cvd/internal/is_pod.h
U libcvd/cvd/internal/load_and_save.h
U libcvd/cvd/internal/name_CVD_rgb_types.h
U libcvd/cvd/internal/name_builtin_types.h
U libcvd/cvd/internal/pixel_operations.h
U libcvd/cvd/internal/pixel_traits.h
U libcvd/cvd/internal/rgb_components.h
U libcvd/cvd/internal/scalar_convert.h
U libcvd/cvd/internal/simple_vector.h
cvs checkout: Updating libcvd/cvd/internal/io
U libcvd/cvd/internal/io/bmp.h
U libcvd/cvd/internal/io/fits.h
U libcvd/cvd/internal/io/jpeg.h
U libcvd/cvd/internal/io/png.h
U libcvd/cvd/internal/io/pnm_grok.h
U libcvd/cvd/internal/io/save_postscript.h
U libcvd/cvd/internal/io/text.h
U libcvd/cvd/internal/io/tiff.h
cvs checkout: Updating libcvd/cvd/internal/pnm
cvs checkout: Updating libcvd/cvd/lock
cvs checkout: Updating libcvd/cvd/python
U libcvd/cvd/python/interface.h
U libcvd/cvd/python/selector.h
U libcvd/cvd/python/types.h
cvs checkout: Updating libcvd/cvd_src
U libcvd/cvd_src/bayer.cxx
U libcvd/cvd_src/brezenham.cc
U libcvd/cvd_src/colourspace_convert.cxx
U libcvd/cvd_src/connected_components.cc
U libcvd/cvd_src/convolution.cc
U libcvd/cvd_src/corner_10.h
U libcvd/cvd_src/corner_12.h
U libcvd/cvd_src/corner_9.h
U libcvd/cvd_src/cvd_timer.cc
U libcvd/cvd_src/deinterlacebuffer.cc
U libcvd/cvd_src/diskbuffer2.cc
U libcvd/cvd_src/draw.cc
U libcvd/cvd_src/draw_toon.cc
U libcvd/cvd_src/eventobject.cpp
U libcvd/cvd_src/exceptions.cc
U libcvd/cvd_src/fast_corner.cxx
U libcvd/cvd_src/fast_corner_9_nonmax.cxx
U libcvd/cvd_src/faster_corner_10.cxx
U libcvd/cvd_src/faster_corner_12.cxx
U libcvd/cvd_src/faster_corner_9.cxx
U libcvd/cvd_src/faster_corner_utilities.h
U libcvd/cvd_src/globlist.cxx
U libcvd/cvd_src/gltext.cpp
U libcvd/cvd_src/glwindow.cc
U libcvd/cvd_src/half_sample.cc
U libcvd/cvd_src/image_io.cc
U libcvd/cvd_src/mono.h
U libcvd/cvd_src/nonmax_suppression.cxx
U libcvd/cvd_src/sans.h
U libcvd/cvd_src/serif.h
U libcvd/cvd_src/slower_corner_10.cxx
U libcvd/cvd_src/slower_corner_11.cxx
U libcvd/cvd_src/slower_corner_12.cxx
U libcvd/cvd_src/slower_corner_7.cxx
U libcvd/cvd_src/slower_corner_8.cxx
U libcvd/cvd_src/slower_corner_9.cxx
U libcvd/cvd_src/synchronized.cpp
U libcvd/cvd_src/tensor_voting.cc
U libcvd/cvd_src/thread.cpp
U libcvd/cvd_src/timeddiskbuffer.cc
U libcvd/cvd_src/utility_helpers.h
U libcvd/cvd_src/videodisplay.cc
U libcvd/cvd_src/videofilebuffer.cc
U libcvd/cvd_src/videosource.cpp
U libcvd/cvd_src/yuv411_to_stuff.cxx
U libcvd/cvd_src/yuv420.cpp
U libcvd/cvd_src/yuv422.cpp
U libcvd/cvd_src/yuv422.h
cvs checkout: Updating libcvd/cvd_src/IRIX
U libcvd/cvd_src/IRIX/O2buffer.cxx
U libcvd/cvd_src/IRIX/sgi-video.cxx
cvs checkout: Updating libcvd/cvd_src/Linux
U libcvd/cvd_src/Linux/dvbuffer.cc
U libcvd/cvd_src/Linux/dvbuffer3_dc1394v1.cc
U libcvd/cvd_src/Linux/dvbuffer3_dc1394v2.cc
U libcvd/cvd_src/Linux/kernel-video1394.h
U libcvd/cvd_src/Linux/v4l1buffer.cc
U libcvd/cvd_src/Linux/v4l2buffer.cc
U libcvd/cvd_src/Linux/v4lbuffer.cc
U libcvd/cvd_src/Linux/v4lcontrol.cc
cvs checkout: Updating libcvd/cvd_src/OSX
U libcvd/cvd_src/OSX/qtbuffer.cpp
cvs checkout: Updating libcvd/cvd_src/SSE2
cvs checkout: Updating libcvd/cvd_src/Win32
U libcvd/cvd_src/Win32/glwindow.cpp
U libcvd/cvd_src/Win32/win32.cpp
U libcvd/cvd_src/Win32/win32.h
cvs checkout: Updating libcvd/cvd_src/fast
U libcvd/cvd_src/fast/fast_10_detect.cxx
U libcvd/cvd_src/fast/fast_10_score.cxx
U libcvd/cvd_src/fast/fast_11_detect.cxx
U libcvd/cvd_src/fast/fast_11_score.cxx
U libcvd/cvd_src/fast/fast_12_detect.cxx
U libcvd/cvd_src/fast/fast_12_score.cxx
U libcvd/cvd_src/fast/fast_7_detect.cxx
U libcvd/cvd_src/fast/fast_7_score.cxx
U libcvd/cvd_src/fast/fast_8_detect.cxx
U libcvd/cvd_src/fast/fast_8_score.cxx
U libcvd/cvd_src/fast/fast_9_detect.cxx
U libcvd/cvd_src/fast/fast_9_score.cxx
U libcvd/cvd_src/fast/prototypes.h
cvs checkout: Updating libcvd/cvd_src/i686
U libcvd/cvd_src/i686/byte_to_double_gradient.s
U libcvd/cvd_src/i686/byte_to_float_gradient.s
U libcvd/cvd_src/i686/byte_to_short_difference.s
U libcvd/cvd_src/i686/convert_rgb_to_y.cc
U libcvd/cvd_src/i686/convolve_float.s
U libcvd/cvd_src/i686/convolve_float4.s
U libcvd/cvd_src/i686/convolve_gaussian.cc
U libcvd/cvd_src/i686/float_add_mul_add.s
U libcvd/cvd_src/i686/float_add_mul_add_unaligned.s
U libcvd/cvd_src/i686/float_assign_mul.s
U libcvd/cvd_src/i686/float_difference.s
U libcvd/cvd_src/i686/float_innerproduct.s
U libcvd/cvd_src/i686/gradient.cc
U libcvd/cvd_src/i686/halfsample.s
U libcvd/cvd_src/i686/int_difference.s
U libcvd/cvd_src/i686/median_3x3.cc
U libcvd/cvd_src/i686/rgb_to_gray.s
U libcvd/cvd_src/i686/short_difference.s
U libcvd/cvd_src/i686/testconf
U libcvd/cvd_src/i686/utility_byte_differences.cc
U libcvd/cvd_src/i686/utility_double_int.cc
U libcvd/cvd_src/i686/utility_float.cc
U libcvd/cvd_src/i686/yuv411_to_stuff_MMX.C
U libcvd/cvd_src/i686/yuv411_to_stuff_MMX_64.C
U libcvd/cvd_src/i686/yuv420p_to_rgb.s
U libcvd/cvd_src/i686/yuv422_to_grey.s
U libcvd/cvd_src/i686/yuv422_to_rgb.s
U libcvd/cvd_src/i686/yuv422_wrapper.cc
cvs checkout: Updating libcvd/cvd_src/noarch
U libcvd/cvd_src/noarch/convert_rgb_to_y.cc
U libcvd/cvd_src/noarch/convolve_gaussian.cc
U libcvd/cvd_src/noarch/default_memalign.cpp
U libcvd/cvd_src/noarch/gradient.cc
U libcvd/cvd_src/noarch/median_3x3.cc
U libcvd/cvd_src/noarch/posix_memalign.cpp
U libcvd/cvd_src/noarch/utility_byte_differences.cc
U libcvd/cvd_src/noarch/utility_double_int.cc
U libcvd/cvd_src/noarch/utility_float.cc
U libcvd/cvd_src/noarch/yuv422_wrapper.cc
cvs checkout: Updating libcvd/cvd_src/nothread
U libcvd/cvd_src/nothread/runnable_batch.cc
cvs checkout: Updating libcvd/cvd_src/posix
cvs checkout: Updating libcvd/cvd_src/thread
U libcvd/cvd_src/thread/runnable_batch.cc
cvs checkout: Updating libcvd/doc
U libcvd/doc/cameracalib2cm.pdf
U libcvd/doc/tutorial.h
cvs checkout: Updating libcvd/make
U libcvd/make/compile_deps.awk
U libcvd/make/log_to_changelog.awk
U libcvd/make/march_flags
cvs checkout: Updating libcvd/pnm_src
U libcvd/pnm_src/bmp.cxx
U libcvd/pnm_src/fits.cc
U libcvd/pnm_src/jpeg.cxx
U libcvd/pnm_src/png.cc
U libcvd/pnm_src/pnm_grok.cxx
U libcvd/pnm_src/save_postscript.cxx
U libcvd/pnm_src/text.cxx
U libcvd/pnm_src/text_write.cc
U libcvd/pnm_src/tiff.cxx
U libcvd/pnm_src/tiffwrite.cc
cvs checkout: Updating libcvd/progs
U libcvd/progs/calibrate.cxx
U libcvd/progs/cvd_display_image.cxx
U libcvd/progs/cvd_image_viewer.cxx
U libcvd/progs/img_play.cxx
U libcvd/progs/img_play_bw.cxx
U libcvd/progs/img_play_deinterlace.cxx
U libcvd/progs/img_play_generic.cxx
U libcvd/progs/se3_exp.cxx
U libcvd/progs/se3_inv.cxx
U libcvd/progs/se3_ln.cxx
U libcvd/progs/se3_post_mul.cxx
U libcvd/progs/se3_pre_mul.cxx
U libcvd/progs/video_play.cc
U libcvd/progs/video_play_bw.cc
U libcvd/progs/video_play_source.cc
cvs checkout: Updating libcvd/python
U libcvd/python/setup.py
cvs checkout: Updating libcvd/python/CVD
U libcvd/python/CVD/cvd.cpp
cvs checkout: Updating libcvd/test
U libcvd/test/diskbuffer2.cxx
U libcvd/test/dvbuffer3_bayerrgb.cxx
U libcvd/test/dvbuffer3_mono.cxx
U libcvd/test/dvbuffer_controls.cxx
U libcvd/test/dvbuffer_mono.cxx
U libcvd/test/dvbuffer_rgb.cxx
U libcvd/test/dvbuffer_yuvrgb.cxx
U libcvd/test/fast_test.cxx
U libcvd/test/floodfill_test.cc
U libcvd/test/font.cpp
U libcvd/test/o2buffer.cxx
U libcvd/test/test_images.cxx
U libcvd/test/v4l1buffer_bayer.cxx
U libcvd/test/v4l1buffer_mono.cxx
U libcvd/test/v4l1buffer_rgb.cxx
U libcvd/test/v4l2buffer.cxx
U libcvd/test/v4lbuffer_bayerrgb.cxx
U libcvd/test/v4lbuffer_mono.cxx
U libcvd/test/videoprog.cxx
cvs checkout: Updating libcvd/test/fast_test_image
U libcvd/test/fast_test_image/noise.pgm
cvs checkout: Updating libcvd/test/images
U libcvd/test/images/1-byte-bin.pgm
U libcvd/test/images/1-byte-bin.ppm
U libcvd/test/images/1-byte-txt.pgm
U libcvd/test/images/1-byte-txt.ppm
U libcvd/test/images/2-byte-bin.pgm
U libcvd/test/images/2-byte-bin.ppm
U libcvd/test/images/2-byte-txt.pgm
U libcvd/test/images/2-byte-txt.ppm
U libcvd/test/images/colour.jpg
U libcvd/test/images/grey.jpg
cvs checkout: Updating libcvd/test/images/tiff
U libcvd/test/images/tiff/grey-bool-inverted.tiff
U libcvd/test/images/tiff/grey-uint16-normal.tiff
U libcvd/test/images/tiff/grey-uint8-normal.tiff
U libcvd/test/images/tiff/rgb-uint16.tiff
U libcvd/test/images/tiff/rgb-uint8.tiff
cvs checkout: Updating libcvd/util
%% cvs -z3 -d:pserver:anonymous@cvs.savannah.nongnu.org:/sources/libcvd co -D "Mon May 11 16:29:26 BST 2009" gvars3
실행 결과:
cvs checkout: warning: failed to open /Users/lym/.cvspass for reading: No such file or directory
cvs checkout: Updating gvars3
U gvars3/Authors
U gvars3/GVars2.h.historic
U gvars3/LICENSE
U gvars3/Makefile.in
U gvars3/config.guess
U gvars3/config.sub
U gvars3/configure
U gvars3/configure.ac
U gvars3/fltk2_test
U gvars3/fltk_test
U gvars3/install-sh
U gvars3/main.cc
cvs checkout: Updating gvars3/build
cvs checkout: Updating gvars3/build/vc2005
U gvars3/build/vc2005/gvars3-headless.vcproj
U gvars3/build/vc2005/gvars3.sln
U gvars3/build/vc2005/gvars3.vcproj
cvs checkout: Updating gvars3/build/vc2008
U gvars3/build/vc2008/gvars3-headless.vcproj
U gvars3/build/vc2008/gvars3.sln
U gvars3/build/vc2008/gvars3.vcproj
cvs checkout: Updating gvars3/gvars2_compat
cvs checkout: Updating gvars3/gvars3
U gvars3/gvars3/GStringUtil.h
U gvars3/gvars3/GUI.h
U gvars3/gvars3/GUI_Fltk.h
U gvars3/gvars3/GUI_Fltk2.h
U gvars3/gvars3/GUI_Motif.h
U gvars3/gvars3/GUI_Widgets.h
U gvars3/gvars3/GUI_non_readline.h
U gvars3/gvars3/GUI_readline.h
U gvars3/gvars3/config.h.in
U gvars3/gvars3/default.h
U gvars3/gvars3/gv3_implementation.hh
U gvars3/gvars3/gvars3.h
U gvars3/gvars3/instances.h
U gvars3/gvars3/serialize.h
U gvars3/gvars3/type_name.h
cvs checkout: Updating gvars3/src
U gvars3/src/GStringUtil.cc
U gvars3/src/GUI.cc
U gvars3/src/GUI_Fltk.cc
U gvars3/src/GUI_Fltk2.cc
U gvars3/src/GUI_Motif.cc
U gvars3/src/GUI_impl.h
U gvars3/src/GUI_impl_headless.cc
U gvars3/src/GUI_impl_noreadline.cc
U gvars3/src/GUI_impl_readline.cc
U gvars3/src/GUI_language.cc
U gvars3/src/GUI_non_readline.cc
U gvars3/src/GUI_none.cc
U gvars3/src/GUI_readline.cc
U gvars3/src/gvars2.cc
U gvars3/src/gvars3.cc
U gvars3/src/inst.cc
U gvars3/src/inst_headless.cc
U gvars3/src/serialize.cc
checking for g++... g++
checking for C++ compiler default output file name... a.out
checking whether the C++ compiler works... yes
checking whether we are cross compiling... no
checking for suffix of executables...
checking for suffix of object files... o
checking whether we are using the GNU C++ compiler... yes
checking whether g++ accepts -g... yes
checking for decltype... no
checking for typeof... yes
You're on the development branch of TooN 2.0. Everything will probably work, but
the interface is a bit different from TooN-1.x
If you want TooN-1, then get it using:
cvs -z3 -d:pserver:anoncvs@cvs.savannah.nongnu.org:/cvsroot/toon co -r Maintenance_Branch_1_x TooN
or update what you currently have using:
cvs up -r Maintenance_Branch_1_x
or head over to:
http://mi.eng.cam.ac.uk/~er258/cvd/
Otherwise, please report any bugs you come across.
checking for gcc... gcc
checking for C compiler default output file name... a.out
checking whether the C compiler works... yes
checking whether we are cross compiling... no
checking for suffix of executables...
checking for suffix of object files... o
checking whether we are using the GNU C compiler... yes
checking whether gcc accepts -g... yes
checking for gcc option to accept ISO C89... none needed
checking how to run the C preprocessor... gcc -E
checking for grep that handles long lines and -e... /usr/bin/grep
checking for egrep... /usr/bin/grep -E
checking for ANSI C header files... yes
checking for gawk... no
checking for mawk... no
checking for nawk... no
checking for awk... awk
checking for g++... g++
checking whether we are using the GNU C++ compiler... yes
checking whether g++ accepts -g... yes
checking for a BSD-compatible install... /usr/bin/install -c
checking whether ln -s works... yes
checking for ranlib... ranlib
checking how to run the C++ preprocessor... g++ -E
checking if compiler flag -Wall works... yes
checking if compiler flag -Wextra works... yes
checking if compiler flag -pipe works... yes
checking if compiler flag -ggdb works... yes
checking if compiler flag -fPIC works... yes
checking build system type... i386-apple-darwin9.7.0
checking host system type... i386-apple-darwin9.7.0
checking for best optimize flags...
checking if compiler flag -O3 works... yes
checking CPU type... unknown
------------------------------------
Checking processor specific features
------------------------------------
checking for sys/types.h... yes
checking for sys/stat.h... yes
checking for stdlib.h... yes
checking for string.h... yes
checking for memory.h... yes
checking for strings.h... yes
checking for inttypes.h... yes
checking for stdint.h... yes
checking for unistd.h... yes
checking whether byte ordering is bigendian... no
checking for MMX support... yes
checking for MMXEXT support... yes
checking for SSE support... yes
checking for SSE2 support... yes
checking for SSE3 support... yes
checking for void*... yes
checking size of void*... 4
checking for inline asm statement... yes
checking assembler supports .type pseudo-op... no
-----------------------------------------------
Checking for operating system specific features
-----------------------------------------------
checking dc1394/dc1394.h usability... no
checking dc1394/dc1394.h presence... no
checking for dc1394/dc1394.h... no
checking for main in -ldc1394... no
checking for /opt/local... yes
checking for /sw... no
configure: Adding /usr/X11R6/include to the build path.
checking Carbon and QuickTime framework... yes
-------------------------------
Checking for optional libraries
-------------------------------
checking for X... libraries /usr/X11/lib, headers /usr/X11/include
checking for glDrawPixels in -lGL... yes
checking GL/glu.h usability... yes
checking GL/glu.h presence... yes
checking for GL/glu.h... yes
checking for gluGetString in -lGLU... yes
checking for tr1::shared_ptr... yes
checking for TooN... yes
checking Old TooN... no
checking for dgesvd_ in -lacml... no
checking if Accelerate framework is needed for LAPACK...
checking for dgesvd_... yes
checking for working pthreads... yes
checking for pthread_yield... no
checking for pthread_yield_np... yes
checking png.h usability... yes
checking png.h presence... yes
checking for png.h... yes
checking for png_init_io in -lpng... yes
checking jpeglib.h usability... yes
checking jpeglib.h presence... yes
checking for jpeglib.h... yes
checking for jpeg_destroy_decompress in -ljpeg... yes
checking JPEG read buffer size... 1 (safe reading)
checking tiffio.h usability... yes
checking tiffio.h presence... yes
checking for tiffio.h... yes
checking for TIFFReadRGBAImage in -ltiff... yes
checking for TIFFReadRGBAImageOriented in -ltiff... yes
checking for doxygen... no
-----------------------------------
Checking for platform compatibility
-----------------------------------
checking glob.h usability... yes
checking glob.h presence... yes
checking for glob.h... yes
checking for glob... yes
checking for GLOB_BRACE and GLOB_TILDE in glob.h... yes
checking whether feenableexcept is declared... no
checking for posix_memalign... no
--------------------------------
Checking for extra build options
--------------------------------
checking for gawk... no
checking for mawk... no
checking for nawk... no
checking for awk... awk
checking for g++... g++
checking for C++ compiler default output file name... a.out
checking whether the C++ compiler works... yes
checking whether we are cross compiling... no
checking for suffix of executables...
checking for suffix of object files... o
checking whether we are using the GNU C++ compiler... yes
checking whether g++ accepts -g... yes
checking how to run the C++ preprocessor... g++ -E
checking for grep that handles long lines and -e... /usr/bin/grep
checking for egrep... /usr/bin/grep -E
checking for ANSI C header files... yes
checking for sys/types.h... yes
checking for sys/stat.h... yes
checking for stdlib.h... yes
checking for string.h... yes
checking for memory.h... yes
checking for strings.h... yes
checking for inttypes.h... yes
checking for stdint.h... yes
checking for unistd.h... yes
checking iostream usability... yes
checking iostream presence... yes
checking for iostream... yes
checking build system type... i386-apple-darwin9.7.0
checking host system type... i386-apple-darwin9.7.0
configure: Adding /sw to the build path.
configure: Adding /opt/local to the build path.
checking if compiler flag -Wall works... yes
checking if compiler flag -Wextra works... yes
--------------------------
Checking for options
--------------------------
checking for TooN... yes
checking for TooN-2... yes
checking if compiler flag -pthread works... yes
checking for rl_done in -lreadline... yes
------------------------------------------------
Checking for widget libraries (provides GUI_...)
------------------------------------------------
configure: WARNING: No GUI functionality enabled
Options:
toon readline
내 (OS X의) 경우, PTAM/Build/OS X에 있는 모든 (두 개의) 파일 Makefile과 VideoSource_OSX.cc를 PTAM 폴더에 옮겼다.
3-2. video source 셋업
카메라에 맞는 video input file을 컴파일하도록 Makefile을 수정해 주어야 한다.
맥의 경우, (아마도 Logitech Quickcam Pro 5000 을 기준으로 하는) 하나의 소스 파일만이 존재하므로 그대로 두면 될 듯.
3-3. video source 추가
다른 비디오 소스들은 libCVD에 클래스로 만들어져 있다고 한다. 여기에 포함되어 있지 않은 경우에는 VideoSource_XYZ.cc 라는 식의 이름을 갖는 파일을 만들어서 넣어 주어야 한다.
3-4. compile
PTAM 폴더에 들어가서
%% make
실행 결과:
g++ -g -O3 main.cc -o main.o -c -I /MY_CUSTOM_INCLUDE_PATH/ -D_OSX -D_REENTRANT
g++ -g -O3 VideoSource_OSX.cc -o VideoSource_OSX.o -c -I /MY_CUSTOM_INCLUDE_PATH/ -D_OSX -D_REENTRANT
g++ -g -O3 GLWindow2.cc -o GLWindow2.o -c -I /MY_CUSTOM_INCLUDE_PATH/ -D_OSX -D_REENTRANT
In file included from OpenGL.h:20,
from GLWindow2.cc:1:
/usr/local/include/cvd/gl_helpers.h:38:19: error: GL/gl.h: No such file or directory
/usr/local/include/cvd/gl_helpers.h:39:20: error: GL/glu.h: No such file or directory
/usr/local/include/cvd/gl_helpers.h: In function 'void CVD::glPrintErrors()':
/usr/local/include/cvd/gl_helpers.h:569: error: 'gluGetString' was not declared in this scope
make: *** [GLWindow2.o] Error 1
PTAM이 OpenGL을 사용하고 있는데, OpenGL이 Mac에 기본으로 설치되어 있으므로 신경쓰지 않았던 부분이다. 물론 system의 public framework으로 들어가 있음을 확인할 수 있다. 그런데 UNIX 프로그램에서 접근할 수는 없는가? (인터넷에서 검색해 보아도 따로 설치할 수 있는 다운로드 링크나 방법을 찾을 수 없다.)
에러 메시지에 대한 정확한 진단 ->
philphys: 일단 OpenGL은 분명히 있을 건데 그 헤더파일과 라이브러리가 있는 곳을 지정해 주지 않아서 에러가 나는 것 같아. 보통 Makefile에 이게 지정되어 있어야 하는데 실행결과를 보니까 전혀 지정되어 있지 않네. 중간에 보면 -I /MY_CUSTOM_INCLUDE_PATH/ 라는 부분이 헤더 파일의 위치를 지정해 주는 부분이고 또 라이브러리는 뒤에 링크할 때 지정해 주게 되어 있는데 거기까지는 가지도 못 했네.
즉, "링커가 문제가 아니라, 컴파일러 옵션에 OpenGL의 헤더파일이 있는 디렉토리를 지정해 주어야 할 것 같다"고 한다.
문제의 Makefile을 들여다보고
# DO NOT DELETE THIS LINE -- make depend depends on it.
# Edit the lines below to point to any needed include and link paths
# Or to change the compiler's optimization flags CC = g++ -g -O3 COMPILEFLAGS = -I /MY_CUSTOM_INCLUDE_PATH/ -D_OSX -D_REENTRANT LINKFLAGS = -framework OpenGL -framework VecLib -L/MY_CUSTOM_LINK_PATH/ -lGVars3 -lcvd
(다음은 philphys 인용) 파란색 부분 - 각 소스코드를 컴파일한 다음 컴파일된 오브젝트 코드를 실행파일로 링크하는 부분. 여기서는 $(LINKFLAGS)에 링커 프로그램에 전달되는 옵션이 들어간다. 초록색 부분 - 컴파일할 오브젝트 코드의 리스트 분홍색 부분 - CC는 컴파일러 프로그램과 기본 옵션. COMPILEFLAGS는 컴파일러에 전달하는 옵션들, 여기에 헤더 파일의 위치를 정할 수 있다. LINKFLAGS는 컴파일된 오브젝트 코드를 실행파일로 링크하는 링커에 들어가는 옵션. 여기에 라이브러리의 위치와 사용할 라이브러리를 지정해 준다. 라이브러리의 위치는 -L 옵션으로, 구체적인 라이브러리 이름은 -l 옵션으로.
maetel: 사실 프레임웍 안에 gl.h 파일이 있는 위치는 다음과 같다.
/System/Library/Frameworks/OpenGL.framework/Versions/A/Headers
philphys: "근데 코드에서는 그 헤더를 "GL/gl.h"로 찾는다는 게 문제. 이건 프레임웍 방식이 아닌 고전적인 유닉스 Xwindows의 OpenGL 방식이다. 즉 방금 보인 gl.h, glu.h 등이 있는 /usr/X11R6/include 를 COMPILERFLAGS에 -I 옵션으로 넣어 줘야 하는 게 아닐까."
philphys: /usr/X11R6/include 밑에 GL 폴더가 있고 거기에 필요한 헤더파일들이 모두 들어 있다. 그래서 코드에선 "GL/gl.h" 하는 식으로 explicit하게 GL 폴더를 찾게 된다.
그러고 보면 아래와 같은 설명이 있었던 것이다.
Since the Linux code compiles directly against the nVidia driver's GL headers, use of a different GL driver may require some modifications to the code.
CameraCalibrator 파일을 실행시켜 카메라 캘리브레이션을 시도했더니 GUI 창이 뜨는데 연결된 웹캠(Logitech QuickCam Pro 4000)으로부터 입력을 받지 못 한다.
4-0. 증상
CameraCalibrator 실행파일을 열면, 다음과 같은 터미널 창이 새로 열린다.
Last login: Fri Aug 7 01:14:05 on ttys001
%% /Users/lym/PTAM/CameraCalibrator ; exit;
Welcome to CameraCalibrator
--------------------------------------
Parallel tracking and mapping for Small AR workspaces
Copyright (C) Isis Innovation Limited 2008
Parsing calibrator_settings.cfg ....
! GUI_impl::Loadfile: Failed to load script file "calibrator_settings.cfg".
VideoSource_OSX: Creating QTBuffer....
IMPORTANT
This will open a quicktime settings planel.
You should use this settings dialog to turn the camera's
sharpness to a minimum, or at least so small that no sharpening
artefacts appear! In-camera sharpening will seriously degrade the
performance of both the camera calibrator and the tracking system.
>
그리고 Video란 이름의 GUI 창이 열리는데, 이때 아무런 설정을 바꾸지 않고 그대로 OK를 누르면 위의 터미널 창에 다음과 같은 메시지가 이어지면서 자동 종료된다.
.. created QTBuffer of size [640 480]
2009-08-07 01:20:57.231 CameraCalibrator[40836:10b] ***_NSAutoreleaseNoPool(): Object 0xf70e2c0 of class NSThread autoreleasedwith no pool in place - just leaking
Stack: (0x96827f0f 0x96734442 0x9673a1b4 0xbc2db7 0xbc7e9a 0xbc69d30xbcacbd 0xbca130 0x964879c9 0x90f8dfb8 0x90e69618 0x90e699840x964879c9 0x90f9037c 0x90e7249c 0x90e69984 0x964879c9 0x90f8ec800x90e55e05 0x90e5acd5 0x90e5530f 0x964879c9 0x94179eb9 0x282b48 0xd9f40xd6a6 0x2f16b 0x2fea4 0x26b6)
! Code for converting from format "Raw RGB data"
not implemented yet, check VideoSource_OSX.cc.
logout
[Process completed]
그러므로 3-3의 문제 -- set up video source (비디오 소스 셋업) --로 돌아가야 한다.
즉, VideoSource_OSX.cc 파일을 수정해서 다시 컴파일한 후 실행해야 한다.
Other video source classes are available with libCVD. Finally, if a custom video source not supported by libCVD is required, the code for it will have to be put into some VideoSource_XYZ.cc file (the interface for this file is very simple.)
삽질...
터미널에서 calibrator_settings.cfg 파일을 로드하지 못 했다고 하기에, 그 파일을 찾아보았다.
%% find . -name "calibrator_settings.cfg" -print
./calibrator_settings.cfg
알고 보니 ./는 현재 디렉토리를 말하나 보다. PTAM 폴더 밑에 바로 있다. 왜 못 봤을까...
열어 보니 다음과 같다.
// This file is parsed by the CameraCalibrator executable
// Put any custom gvars settings you want in here
// For example: to increase the camera calibrator's blur parameter,
// uncomment the following line
// CameraCalibrator.BlurSigma=2.0
VideoSource::VideoSource()
{
cout << " VideoSource_OSX: Creating QTBuffer...." << endl;
cout << " IMPORTANT " << endl;
cout << " This will open a quicktime settings planel. " << endl
<< " You should use this settings dialog to turn the camera's " << endl
<< " sharpness to a minimum, or at least so small that no sharpening " << endl
<< " artefacts appear! In-camera sharpening will seriously degrade the " << endl
<< " performance of both the camera calibrator and the tracking system. " << endl;
QTBuffer<yuv422>* pvb;
try
{
pvb= new QTBuffer<yuv422>(ImageRef(640,480), 0, true);
}
catch (CVD::Exceptions::All a)
{
cerr << " Error creating QTBuffer; expection: " << a.what << endl;
exit(1);
}
mptr = pvb;
mirSize = pvb->size();
cout << " .. created QTBuffer of size " << mirSize << endl;
};
그러나 위에서 보듯 size가 맞지 않고 frame이 겹치는 등 넘어갈 수 없는 문제가 있다. (오른쪽 이미지는 같은 상황에서의 비교를 위해 맥용 드라이버 macam에서의 입력을 캡쳐한 것.)
터미널에서의 결과:
%% /Users/lym/PTAM/CameraCalibrator ; exit;
Welcome to CameraCalibrator
--------------------------------------
Parallel tracking and mapping for Small AR workspaces
Copyright (C) Isis Innovation Limited 2008
Parsing calibrator_settings.cfg ....
! GUI_impl::Loadfile: Failed to load script file "calibrator_settings.cfg".
VideoSource_OSX: Creating QTBuffer....
IMPORTANT
This will open a quicktime settings planel.
You should use this settings dialog to turn the camera's
sharpness to a minimum, or at least so small that no sharpening
artefacts appear! In-camera sharpening will seriously degrade the
performance of both the camera calibrator and the tracking system.
> .. created QTBuffer of size [640 480]
2009-08-12 23:10:38.309 CameraCalibrator[5110:10b] *** _NSAutoreleaseNoPool(): Object 0xf8054e0 of class NSThread autoreleased with no pool in place - just leaking
Stack: (0x96670f4f 0x9657d432 0x965831a4 0xc17db7 0xc1ce9a 0xc1b9d3 0xc1fcbd 0xc1f130 0x924b09c9 0x958e8fb8 0x957c4618 0x957c4984 0x924b09c9 0x958eb37c 0x957cd49c 0x957c4984 0x924b09c9 0x958e9c80 0x957b0e05 0x957b5cd5 0x957b030f 0x924b09c9 0x90bd4eb9 0x282b48 0xd9e4 0xd5a6 0x2f15b 0x2fe94 0x25b6)
4-1-2. YUV format 확인
Logitech QuickCam Pro 4000는 YUV420P라는 글을 어디선가 보고, 코드의 yuv422 부분을 yuv420p로 바꾸었으나 증상은 그대로이다.
skype forum:
There is another problem here with Xgl unfortunately, as it
isn'tsupporting the YUV420P (I420) overlay colour/pixel format either.
Soeven if the camera captures successfully (which looks okay on
thosesettings), then you still won't see anything.
왼쪽: macam에서 캡쳐한 이미지 / 오른쪽: PTAM CameraCalibrator에서 보여지는 이미지
Logitech QuickCam Pro 4000
Welcome to CameraCalibrator
--------------------------------------
Parallel tracking and mapping for Small AR workspaces
Copyright (C) Isis Innovation Limited 2008
Parsing calibrator_settings.cfg ....
VideoSource_OSX: Creating QTBuffer....
IMPORTANT
This will open a quicktime settings planel.
You should use this settings dialog to turn the camera's
sharpness to a minimum, or at least so small that no sharpening
artefacts appear! In-camera sharpening will seriously degrade the
performance of both the camera calibrator and the tracking system.
> .. created QTBuffer of size [640 480]
2009-08-13 04:02:50.464 CameraCalibrator[6251:10b] ***
_NSAutoreleaseNoPool(): Object 0x9df180 of class NSThread autoreleased
with no pool in place - just leaking
Stack: (0x96670f4f 0x9657d432 0x965831a4 0xbc2db7 0xbc7e9a 0xbc69d3
0xbcacbd 0xbca130 0x924b09c9 0x958e8fb8 0x957c4618 0x957c4984
0x924b09c9 0x958eb37c 0x957cd49c 0x957c4984 0x924b09c9 0x958e9c80
0x957b0e05 0x957b5cd5 0x957b030f 0x924b09c9 0x90bd4eb9 0x282b48 0xd414
0xcfd6 0x2f06b 0x2fda4)
4-2. Camera Calibrator 실행
Camera calib is [ 1.51994 2.03006 0.499577 0.536311 -0.0005 ]
Saving camera calib to camera.cfg...
.. saved.
5. PTAM 실행
Welcome to PTAM
---------------
Parallel tracking and mapping for Small AR workspaces
Copyright (C) Isis Innovation Limited 2008
Parsing settings.cfg ....
VideoSource_OSX: Creating QTBuffer....
IMPORTANT
This will open a quicktime settings planel.
You should use this settings dialog to turn the camera's
sharpness to a minimum, or at least so small that no sharpening
artefacts appear! In-camera sharpening will seriously degrade the
performance of both the camera calibrator and the tracking system.
> .. created QTBuffer of size [640 480]
2009-08-13 20:17:54.162 ptam[1374:10b] *** _NSAutoreleaseNoPool(): Object 0x8f5850 of class NSThread autoreleased with no pool in place - just leaking
Stack: (0x96670f4f 0x9657d432 0x965831a4 0xbb9db7 0xbbee9a 0xbbd9d3 0xbc1cbd 0xbc1130 0x924b09c9 0x958e8fb8 0x957c4618 0x957c4984 0x924b09c9 0x958eb37c 0x957cd49c 0x957c4984 0x924b09c9 0x958e9c80 0x957b0e05 0x957b5cd5 0x957b030f 0x924b09c9 0x90bd4eb9 0x282b48 0x6504 0x60a6 0x11af2 0x28da 0x2766)
ARDriver: Creating FBO... .. created FBO.
MapMaker: made initial map with 135 points.
MapMaker: made initial map with 227 points.
CameraCalibrator를 실행하면 뜨는 GUI 창에서 다음과 같이 기본 설정이 적용되고,
Source: iSight
Compression type: Component Video - CCIR-601 uyvy
rms error 0.3 이하로 깔끔하게 수렴된 카메라 파라미터의 계산값이 다음과 같은 식으로 나올 때,
Camera calib is [ 1.22033 1.62577 0.489375 0.641251 0.544352 ]
PTAM을 실행하면 위의 Logitech QuickCam 두 기종보다는 features를 보다 잘 잡는다. (아직은 많이 부족하지만...)
Welcome to PTAM
---------------
Parallel tracking and mapping for Small AR workspaces
Copyright (C) Isis Innovation Limited 2008
Parsing settings.cfg ....
VideoSource_OSX: Creating QTBuffer....
IMPORTANT
This will open a quicktime settings planel.
You should use this settings dialog to turn the camera's
sharpness to a minimum, or at least so small that no sharpening
artefacts appear! In-camera sharpening will seriously degrade the
performance of both the camera calibrator and the tracking system.
> .. created QTBuffer of size [640 480]
ARDriver: Creating FBO... .. created FBO.
MapMaker: made initial map with 242 points.
MapMaker: made initial map with 259 points.
MapMaker: made initial map with 323 points.
MapMaker: made initial map with 626 points.
---> Fetching apr
---> Attempting to fetch apr-1.3.5.tar.bz2 from ftp://ftp.infoscience.co.jp/pub/net/apache/dist/apr
---> Attempting to fetch apr-1.3.5.tar.bz2 from http://apache.mirror.phpchina.com/apr
---> Verifying checksum(s) for apr
---> Extracting apr
---> Configuring apr
---> Building apr
---> Staging apr into destroot
---> Installing apr @1.3.5_0
---> Activating apr @1.3.5_0
---> Cleaning apr
---> Fetching db46
---> Attempting to fetch patch.4.6.21.1 from http://distfiles.macports.org/db4/4.6.21_5
---> Attempting to fetch patch.4.6.21.2 from http://distfiles.macports.org/db4/4.6.21_5
---> Attempting to fetch patch.4.6.21.3 from http://distfiles.macports.org/db4/4.6.21_5
---> Attempting to fetch db-4.6.21.tar.gz from http://distfiles.macports.org/db4/4.6.21_5
---> Verifying checksum(s) for db46
---> Extracting db46
---> Applying patches to db46
---> Configuring db46
---> Building db46
---> Staging db46 into destroot
---> Installing db46 @4.6.21_5
---> Activating db46 @4.6.21_5
---> Cleaning db46
---> Fetching expat
---> Attempting to fetch expat-2.0.1.tar.gz from http://nchc.dl.sourceforge.net/expat
---> Verifying checksum(s) for expat
---> Extracting expat
---> Configuring expat
---> Building expat
---> Staging expat into destroot
---> Installing expat @2.0.1_0
---> Activating expat @2.0.1_0
---> Cleaning expat
---> Fetching gperf
---> Attempting to fetch gperf-3.0.4.tar.gz from http://distfiles.macports.org/gperf
---> Verifying checksum(s) for gperf
---> Extracting gperf
---> Configuring gperf
---> Building gperf
---> Staging gperf into destroot
---> Installing gperf @3.0.4_0
---> Activating gperf @3.0.4_0
---> Cleaning gperf
---> Fetching libiconv
---> Attempting to fetch libiconv-1.13.tar.gz from http://distfiles.macports.org/libiconv
---> Verifying checksum(s) for libiconv
---> Extracting libiconv
---> Applying patches to libiconv
---> Configuring libiconv
---> Building libiconv
---> Staging libiconv into destroot
---> Installing libiconv @1.13_0
---> Activating libiconv @1.13_0
---> Cleaning libiconv
---> Fetching ncursesw
---> Attempting to fetch ncurses-5.7.tar.gz from http://distfiles.macports.org/ncurses
---> Verifying checksum(s) for ncursesw
---> Extracting ncursesw
---> Configuring ncursesw
---> Building ncursesw
---> Staging ncursesw into destroot
---> Installing ncursesw @5.7_0
---> Activating ncursesw @5.7_0
---> Cleaning ncursesw
---> Fetching ncurses
---> Verifying checksum(s) for ncurses
---> Extracting ncurses
---> Configuring ncurses
---> Building ncurses
---> Staging ncurses into destroot
---> Installing ncurses @5.7_0
---> Activating ncurses @5.7_0
---> Cleaning ncurses
---> Fetching readline
---> Attempting to fetch readline-6.0.tar.gz from http://distfiles.macports.org/readline
---> Verifying checksum(s) for readline
---> Extracting readline
---> Applying patches to readline
---> Configuring readline
---> Building readline
---> Staging readline into destroot
---> Installing readline @6.0.000_1
---> Activating readline @6.0.000_1
---> Cleaning readline
---> Fetching sqlite3
---> Attempting to fetch sqlite-3.6.16.tar.gz from http://distfiles.macports.org/sqlite3/3.6.16
---> Verifying checksum(s) for sqlite3
---> Extracting sqlite3
---> Configuring sqlite3
---> Building sqlite3
---> Staging sqlite3 into destroot
---> Installing sqlite3 @3.6.16_0
---> Activating sqlite3 @3.6.16_0
---> Cleaning sqlite3
---> Fetching apr-util
---> Attempting to fetch apr-util-1.3.7.tar.bz2 from ftp://ftp.infoscience.co.jp/pub/net/apache/dist/apr
---> Attempting to fetch apr-util-1.3.7.tar.bz2 from http://distfiles.macports.org/apr-util
---> Verifying checksum(s) for apr-util
---> Extracting apr-util
---> Configuring apr-util
---> Building apr-util
---> Staging apr-util into destroot
---> Installing apr-util @1.3.7_0
---> Activating apr-util @1.3.7_0
---> Cleaning apr-util
---> Fetching zlib
---> Attempting to fetch zlib-1.2.3.tar.bz2 from http://distfiles.macports.org/zlib
---> Verifying checksum(s) for zlib
---> Extracting zlib
---> Applying patches to zlib
---> Configuring zlib
---> Building zlib
---> Staging zlib into destroot
---> Installing zlib @1.2.3_2
---> Activating zlib @1.2.3_2
---> Cleaning zlib
---> Fetching openssl
---> Attempting to fetch openssl-0.9.8k.tar.gz from http://distfiles.macports.org/openssl
---> Verifying checksum(s) for openssl
---> Extracting openssl
---> Applying patches to openssl
---> Configuring openssl
---> Building openssl
---> Staging openssl into destroot
---> Installing openssl @0.9.8k_0
---> Activating openssl @0.9.8k_0
---> Cleaning openssl
---> Fetching cyrus-sasl2
---> Attempting to fetch cyrus-sasl-2.1.23.tar.gz from http://distfiles.macports.org/cyrus-sasl2
---> Verifying checksum(s) for cyrus-sasl2
---> Extracting cyrus-sasl2
---> Applying patches to cyrus-sasl2
---> Configuring cyrus-sasl2
---> Building cyrus-sasl2
---> Staging cyrus-sasl2 into destroot
---> Installing cyrus-sasl2 @2.1.23_0+kerberos
---> Activating cyrus-sasl2 @2.1.23_0+kerberos
---> Cleaning cyrus-sasl2
---> Fetching gettext
---> Attempting to fetch gettext-0.17.tar.gz from http://distfiles.macports.org/gettext
---> Verifying checksum(s) for gettext
---> Extracting gettext
---> Applying patches to gettext
---> Configuring gettext
---> Building gettext
---> Staging gettext into destroot
---> Installing gettext @0.17_4
---> Activating gettext @0.17_4
---> Cleaning gettext
---> Fetching neon
---> Attempting to fetch neon-0.28.4.tar.gz from http://distfiles.macports.org/neon
---> Verifying checksum(s) for neon
---> Extracting neon
---> Configuring neon
---> Building neon
---> Staging neon into destroot
---> Installing neon @0.28.4_0
---> Activating neon @0.28.4_0
---> Cleaning neon
---> Fetching serf
---> Attempting to fetch serf-0.3.0.tar.bz2 from http://distfiles.macports.org/serf
---> Verifying checksum(s) for serf
---> Extracting serf
---> Configuring serf
---> Building serf
---> Staging serf into destroot
---> Installing serf @0.3.0_0
---> Activating serf @0.3.0_0
---> Cleaning serf
---> Fetching subversion
---> Attempting to fetch subversion-1.6.3.tar.bz2 from http://distfiles.macports.org/subversion
---> Verifying checksum(s) for subversion
---> Extracting subversion
---> Applying patches to subversion
---> Configuring subversion
---> Building subversion
---> Staging subversion into destroot
---> Installing subversion @1.6.3_0
---> Activating subversion @1.6.3_0
---> Cleaning subversion
2. OpenCV 다운로드
%% svn co http://opencvlibrary.svn.sourceforge.net/svnroot/opencvlibrary/trunk opencv
실행 결과:
A opencv/opencv
A opencv/opencv/opencv.pc.cmake.in
A opencv/opencv/Package.cmake.in
A opencv/opencv/configure
A opencv/opencv/Makefile.in
A opencv/opencv/interfaces
A opencv/opencv/interfaces/Makefile.in
A opencv/opencv/interfaces/ffopencv
A opencv/opencv/interfaces/ffopencv/ffopencv.cpp
A opencv/opencv/interfaces/ffopencv/ffopencv.h
A opencv/opencv/interfaces/ffopencv/CMakeLists.txt
A opencv/opencv/interfaces/Makefile.am
A opencv/opencv/interfaces/swig
A opencv/opencv/interfaces/swig/octave
A opencv/opencv/interfaces/swig/octave/octerror.cpp
A opencv/opencv/interfaces/swig/octave/ml_wrap.cpp
A opencv/opencv/interfaces/swig/octave/Makefile.in
A opencv/opencv/interfaces/swig/octave/cv_wrap.cpp
A opencv/opencv/interfaces/swig/octave/DESCRIPTION
A opencv/opencv/interfaces/swig/octave/PKG_ADD_template
A opencv/opencv/interfaces/swig/octave/opencv.m
A opencv/opencv/interfaces/swig/octave/octerror.h
A opencv/opencv/interfaces/swig/octave/octhelpers.cpp
A opencv/opencv/interfaces/swig/octave/adapters.i
A opencv/opencv/interfaces/swig/octave/octhelpers.h
A opencv/opencv/interfaces/swig/octave/highgui_wrap.cpp
A opencv/opencv/interfaces/swig/octave/octhelpers.i
A opencv/opencv/interfaces/swig/octave/ml.i
A opencv/opencv/interfaces/swig/octave/cv.i
A opencv/opencv/interfaces/swig/octave/cvshadow.cpp
A opencv/opencv/interfaces/swig/octave/octtypemaps.i
A opencv/opencv/interfaces/swig/octave/cvaliases.i
A opencv/opencv/interfaces/swig/octave/imagedata.i
A opencv/opencv/interfaces/swig/octave/cvshadow.h
A opencv/opencv/interfaces/swig/octave/cvarr.i
A opencv/opencv/interfaces/swig/octave/cvshadow.i
A opencv/opencv/interfaces/swig/octave/INDEX
A opencv/opencv/interfaces/swig/octave/cvseq.i
A opencv/opencv/interfaces/swig/octave/COPYING
A opencv/opencv/interfaces/swig/octave/Makefile.am
A opencv/opencv/interfaces/swig/octave/highgui.i
A opencv/opencv/interfaces/swig/octave/CMakeLists.txt
A opencv/opencv/interfaces/swig/octave/octcvseq.hpp
A opencv/opencv/interfaces/swig/python
A opencv/opencv/interfaces/swig/python/pycvseq.hpp
A opencv/opencv/interfaces/swig/python/Makefile.in
A opencv/opencv/interfaces/swig/python/__init__.py
A opencv/opencv/interfaces/swig/python/_cv.cpp
A opencv/opencv/interfaces/swig/python/_ml.cpp
A opencv/opencv/interfaces/swig/python/pyhelpers.cpp
A opencv/opencv/interfaces/swig/python/matlab_syntax.py
A opencv/opencv/interfaces/swig/python/ml.i
A opencv/opencv/interfaces/swig/python/cv.i
A opencv/opencv/interfaces/swig/python/cvshadow.cpp
A opencv/opencv/interfaces/swig/python/cvaliases.i
A opencv/opencv/interfaces/swig/python/pytypemaps.i
A opencv/opencv/interfaces/swig/python/_highgui.cpp
A opencv/opencv/interfaces/swig/python/cvseq.i
A opencv/opencv/interfaces/swig/python/highgui.py
A opencv/opencv/interfaces/swig/python/CMakeLists.txt
A opencv/opencv/interfaces/swig/python/.cvsignore
A opencv/opencv/interfaces/swig/python/error.h
A opencv/opencv/interfaces/swig/python/cvaliases_autogen.i
A opencv/opencv/interfaces/swig/python/cvswigmacros.i
A opencv/opencv/interfaces/swig/python/cv.py
A opencv/opencv/interfaces/swig/python/ml.py
A opencv/opencv/interfaces/swig/python/nointpb.i
A opencv/opencv/interfaces/swig/python/pyhelpers.h
A opencv/opencv/interfaces/swig/python/pyhelpers.i
A opencv/opencv/interfaces/swig/python/imagedata.i
A opencv/opencv/interfaces/swig/python/cvarr.i
A opencv/opencv/interfaces/swig/python/adaptors.py
A opencv/opencv/interfaces/swig/python/cvshadow.h
A opencv/opencv/interfaces/swig/python/cvshadow.i
A opencv/opencv/interfaces/swig/python/setup-for-win.py
A opencv/opencv/interfaces/swig/python/Makefile.am
A opencv/opencv/interfaces/swig/python/error.cpp
A opencv/opencv/interfaces/swig/python/highgui.i
A opencv/opencv/interfaces/swig/Makefile.in
A opencv/opencv/interfaces/swig/Makefile.am
A opencv/opencv/interfaces/swig/CMakeLists.txt
A opencv/opencv/interfaces/swig/README
A opencv/opencv/interfaces/swig/general
A opencv/opencv/interfaces/swig/general/cv.i
A opencv/opencv/interfaces/swig/general/memory.i
A opencv/opencv/interfaces/swig/general/Makefile.in
A opencv/opencv/interfaces/swig/general/cvarr_operators.i
A opencv/opencv/interfaces/swig/general/cvmacros.i
A opencv/opencv/interfaces/swig/general/doublepointers.i
A opencv/opencv/interfaces/swig/general/extensions.i
A opencv/opencv/interfaces/swig/general/sizeof.i
A opencv/opencv/interfaces/swig/general/Makefile.am
A opencv/opencv/interfaces/swig/general/typemaps.i
A opencv/opencv/interfaces/swig/general/highgui.i
A opencv/opencv/interfaces/swig/filtered
A opencv/opencv/interfaces/swig/filtered/Makefile.in
A opencv/opencv/interfaces/swig/filtered/constants.h
A opencv/opencv/interfaces/swig/filtered/Makefile.am
A opencv/opencv/interfaces/swig/filtered/cv.h
A opencv/opencv/interfaces/CMakeLists.txt
A opencv/opencv/AUTHORS
A opencv/opencv/doc2
A opencv/opencv/doc2/plastex
A opencv/opencv/doc2/plastex/find_function_names.sh
A opencv/opencv/doc2/plastex/_themes
A opencv/opencv/doc2/plastex/_themes/blue
A opencv/opencv/doc2/plastex/_themes/blue/layout.html
A opencv/opencv/doc2/plastex/_themes/blue/theme.conf
A opencv/opencv/doc2/plastex/_themes/blue/static
A opencv/opencv/doc2/plastex/_themes/blue/static/default.css_t
A opencv/opencv/doc2/plastex/myopencv.py
A opencv/opencv/doc2/plastex/faq_technical.rst
A opencv/opencv/doc2/plastex/opencv-logo2.png
A opencv/opencv/doc2/plastex/renderer.py
A opencv/opencv/doc2/plastex/index-c.rst
A opencv/opencv/doc2/plastex/function_names.py
A opencv/opencv/doc2/plastex/index-py.rst
A opencv/opencv/doc2/plastex/TODO
A opencv/opencv/doc2/plastex/go
A opencv/opencv/doc2/plastex/faq_general.rst
A opencv/opencv/doc2/plastex/conf.py
A opencv/opencv/doc2/plastex/Makefile
A opencv/opencv/doc2/plastex/mymath.sty
A opencv/opencv/doc2/plastex/faq.rst
A opencv/opencv/doc2/helvetica.sty
A opencv/opencv/doc2/HighGui.tex
A opencv/opencv/doc2/MachineLearning.tex
A opencv/opencv/doc2/CvAux.tex
A opencv/opencv/doc2/opencv.bib
A opencv/opencv/doc2/opencv.tex
A opencv/opencv/doc2/verbdef.sty
A opencv/opencv/doc2/online-opencv-c.tex
A opencv/opencv/doc2/pics
A opencv/opencv/doc2/pics/subdiv.png
A opencv/opencv/doc2/pics/errmsg.png
A opencv/opencv/doc2/pics/sigmoid_bipolar.png
A opencv/opencv/doc2/pics/defects.png
A opencv/opencv/doc2/pics/em1.png
A opencv/opencv/doc2/pics/cornersubpix.png
A opencv/opencv/doc2/pics/em3.png
A opencv/opencv/doc2/pics/em4.png
A opencv/opencv/doc2/pics/neuron_model.png
A opencv/opencv/doc2/pics/left.jpg
A opencv/opencv/doc2/pics/em5.png
A opencv/opencv/doc2/pics/em6.png
A opencv/opencv/doc2/pics/em7.png
A opencv/opencv/doc2/pics/building.jpg
A opencv/opencv/doc2/pics/em8.png
A opencv/opencv/doc2/pics/em9.png
A opencv/opencv/doc2/pics/houghp.png
A opencv/opencv/doc2/pics/threshold.png
A opencv/opencv/doc2/pics/ellipse.png
A opencv/opencv/doc2/pics/face.png
A opencv/opencv/doc2/pics/pointpolygon.png
A opencv/opencv/doc2/pics/maxrect.png
A opencv/opencv/doc2/pics/backprojectpatch.png
A opencv/opencv/doc2/pics/disparity.png
A opencv/opencv/doc2/pics/right.jpg
A opencv/opencv/doc2/pics/haarfeatures.png
A opencv/opencv/doc2/pics/logpolar.jpg
A opencv/opencv/doc2/pics/contoursecarea.png
A opencv/opencv/doc2/pics/quadedge.png
A opencv/opencv/doc2/pics/boundingrect.png
A opencv/opencv/doc2/pics/memstorage1.png
A opencv/opencv/doc2/pics/minareabox.png
A opencv/opencv/doc2/pics/memstorage2.png
A opencv/opencv/doc2/pics/mlp_.png
A opencv/opencv/doc2/pics/inv_logpolar.jpg
A opencv/opencv/doc2/CxCore.tex.m4
A opencv/opencv/doc2/online-opencv-py.tex
A opencv/opencv/doc2/CvReference.tex.m4
A opencv/opencv/doc2/go
A opencv/opencv/doc2/FAQ.tex
A opencv/opencv/doc2/common.m4
A opencv/opencv/doc2/opencv.sty
A opencv/opencv/doc2/readme.txt
A opencv/opencv/src
A opencv/opencv/src/Makefile.in
A opencv/opencv/src/cxcore
A opencv/opencv/src/cxcore/cxmatrix.cpp
A opencv/opencv/src/cxcore/cxprecomp.cpp
A opencv/opencv/src/cxcore/cxtables.cpp
A opencv/opencv/src/cxcore/cxcopy.cpp
A opencv/opencv/src/cxcore/cxstat.cpp
A opencv/opencv/src/cxcore/cxarray.cpp
A opencv/opencv/src/cxcore/cxconvert.cpp
A opencv/opencv/src/cxcore/cximage.cpp
A opencv/opencv/src/cxcore/cxsystem.cpp
A opencv/opencv/src/cxcore/cxrand.cpp
A opencv/opencv/src/cxcore/cxarithm.cpp
A opencv/opencv/src/cxcore/cxpersistence.cpp
A opencv/opencv/src/cxcore/cxmathfuncs.cpp
A opencv/opencv/src/cxcore/cxalloc.cpp
A opencv/opencv/src/cxcore/cxdrawing.cpp
A opencv/opencv/src/cxcore/cxlapack.cpp
A opencv/opencv/src/cxcore/_cxcore.h
A opencv/opencv/src/cxcore/cxmatmul.cpp
A opencv/opencv/src/cxcore/cxdxt.cpp
A opencv/opencv/src/cxcore/cxdatastructs.cpp
A opencv/opencv/src/cxcore/CMakeLists.txt
A opencv/opencv/src/highgui
A opencv/opencv/src/highgui/loadsave.cpp
A opencv/opencv/src/highgui/makeswig.sh
A opencv/opencv/src/highgui/cvcap_cmu.cpp
A opencv/opencv/src/highgui/cvcap_dshow.cpp
A opencv/opencv/src/highgui/window_w32.cpp
A opencv/opencv/src/highgui/grfmt_pxm.cpp
A opencv/opencv/src/highgui/cvcap_gstreamer.cpp
A opencv/opencv/src/highgui/utils.h
A opencv/opencv/src/highgui/grfmts.h
A opencv/opencv/src/highgui/window.cpp
A opencv/opencv/src/highgui/grfmt_base.cpp
A opencv/opencv/src/highgui/window_gtk.cpp
A opencv/opencv/src/highgui/grfmt_bmp.cpp
A opencv/opencv/src/highgui/grfmt_imageio.h
A opencv/opencv/src/highgui/cvcap_xine.cpp
A opencv/opencv/src/highgui/grfmt_sunras.h
A opencv/opencv/src/highgui/cvcap_ffmpeg.cpp
A opencv/opencv/src/highgui/grfmt_jpeg.cpp
A opencv/opencv/src/highgui/grfmt_jpeg2000.cpp
A opencv/opencv/src/highgui/cvcap_w32.cpp
A opencv/opencv/src/highgui/gstappsink.h
A opencv/opencv/src/highgui/grfmt_png.h
A opencv/opencv/src/highgui/bitstrm.h
A opencv/opencv/src/highgui/window_carbon.cpp
A opencv/opencv/src/highgui/grfmt_tiff.h
A opencv/opencv/src/highgui/cvcap.cpp
A opencv/opencv/src/highgui/CMakeLists.txt
A opencv/opencv/src/highgui/utils.cpp
A opencv/opencv/src/highgui/cvcap_qt.cpp
A opencv/opencv/src/highgui/grfmt_exr.h
A opencv/opencv/src/highgui/precomp.cpp
A opencv/opencv/src/highgui/cvcap_libv4l.cpp
A opencv/opencv/src/highgui/grfmt_pxm.h
A opencv/opencv/src/highgui/grfmt_imageio.cpp
A opencv/opencv/src/highgui/grfmt_sunras.cpp
A opencv/opencv/src/highgui/grfmt_base.h
A opencv/opencv/src/highgui/cvcap_vfw.cpp
A opencv/opencv/src/highgui/cvcap_v4l.cpp
A opencv/opencv/src/highgui/cvcap_images.cpp
A opencv/opencv/src/highgui/grfmt_bmp.h
A opencv/opencv/src/highgui/image.cpp
A opencv/opencv/src/highgui/cvcap_dc1394.cpp
A opencv/opencv/src/highgui/grfmt_png.cpp
A opencv/opencv/src/highgui/gstappsink.cpp
A opencv/opencv/src/highgui/bitstrm.cpp
A opencv/opencv/src/highgui/grfmt_tiff.cpp
A opencv/opencv/src/highgui/_highgui.h
A opencv/opencv/src/highgui/grfmt_jpeg.h
A opencv/opencv/src/highgui/cvcap_dc1394_v2.cpp
A opencv/opencv/src/highgui/cvcap_tyzx.cpp
A opencv/opencv/src/highgui/cvcap_unicap.cpp
A opencv/opencv/src/highgui/grfmt_jpeg2000.h
A opencv/opencv/src/highgui/grfmt_exr.cpp
A opencv/opencv/src/highgui/cvcap_mil.cpp
A opencv/opencv/src/cvaux
A opencv/opencv/src/cvaux/camshift.cpp
A opencv/opencv/src/cvaux/cvocttree.cpp
A opencv/opencv/src/cvaux/_cvvectrack.h
A opencv/opencv/src/cvaux/cvplanardetect.cpp
A opencv/opencv/src/cvaux/cvepilines.cpp
A opencv/opencv/src/cvaux/cvbgfg_codebook.cpp
A opencv/opencv/src/cvaux/cvadaptiveskindetector.cpp
A opencv/opencv/src/cvaux/cvauxutils.cpp
A opencv/opencv/src/cvaux/extendededges.cpp
A opencv/opencv/src/cvaux/cvclique.cpp
A opencv/opencv/src/cvaux/cv3dtracker.cpp
A opencv/opencv/src/cvaux/cvmorphcontours.cpp
A opencv/opencv/src/cvaux/cvauxprecomp.cpp
A opencv/opencv/src/cvaux/cvbgfg_acmmm2003.cpp
A opencv/opencv/src/cvaux/cvhmmobs.cpp
A opencv/opencv/src/cvaux/cvlevmar.cpp
A opencv/opencv/src/cvaux/_cvvm.h
A opencv/opencv/src/cvaux/cvlevmarprojbandle.cpp
A opencv/opencv/src/cvaux/cvfacetemplate.cpp
A opencv/opencv/src/cvaux/cvcorrimages.cpp
A opencv/opencv/src/cvaux/cvface.cpp
A opencv/opencv/src/cvaux/_cvfacedetection.h
A opencv/opencv/src/cvaux/_cvaux.h
A opencv/opencv/src/cvaux/cvfacedetection.h
A opencv/opencv/src/cvaux/cvfuzzymeanshifttracker.cpp
A opencv/opencv/src/cvaux/cvtrifocal.cpp
A opencv/opencv/src/cvaux/CMakeLists.txt
A opencv/opencv/src/cvaux/cvlee.cpp
A opencv/opencv/src/cvaux/cvvideo.cpp
A opencv/opencv/src/cvaux/cvhmm1d.cpp
A opencv/opencv/src/cvaux/cvlines.cpp
A opencv/opencv/src/cvaux/cvcreatehandmask.cpp
A opencv/opencv/src/cvaux/cvlcm.cpp
A opencv/opencv/src/cvaux/cvlevmartrif.cpp
A opencv/opencv/src/cvaux/cvbgfg_common.cpp
A opencv/opencv/src/cvaux/cvhog.cpp
A opencv/opencv/src/cvaux/enmin.cpp
A opencv/opencv/src/cvaux/cvcorrespond.cpp
A opencv/opencv/src/cvaux/cvsubdiv2.cpp
A opencv/opencv/src/cvaux/vs
A opencv/opencv/src/cvaux/vs/blobtrackanalysishist.cpp
A opencv/opencv/src/cvaux/vs/bgfg_estimation.cpp
A opencv/opencv/src/cvaux/vs/blobtrackingmsfgs.cpp
A opencv/opencv/src/cvaux/vs/blobtrackanalysis.cpp
A opencv/opencv/src/cvaux/vs/blobtrackingcc.cpp
A opencv/opencv/src/cvaux/vs/enteringblobdetection.cpp
A opencv/opencv/src/cvaux/vs/enteringblobdetectionreal.cpp
A opencv/opencv/src/cvaux/vs/blobtrackgen1.cpp
A opencv/opencv/src/cvaux/vs/blobtrackingmsfg.cpp
A opencv/opencv/src/cvaux/vs/blobtrackgenyml.cpp
A opencv/opencv/src/cvaux/vs/blobtrackanalysistrackdist.cpp
A opencv/opencv/src/cvaux/vs/blobtrackanalysisior.cpp
A opencv/opencv/src/cvaux/vs/blobtrackpostprockalman.cpp
A opencv/opencv/src/cvaux/vs/blobtrackingkalman.cpp
A opencv/opencv/src/cvaux/vs/blobtrackingccwithcr.cpp
A opencv/opencv/src/cvaux/vs/blobtrackpostproclinear.cpp
A opencv/opencv/src/cvaux/vs/testseq.cpp
A opencv/opencv/src/cvaux/vs/blobtrackpostproclist.cpp
A opencv/opencv/src/cvaux/vs/blobtrackingauto.cpp
A opencv/opencv/src/cvaux/vs/blobtrackinglist.cpp
A opencv/opencv/src/cvaux/cvfindhandregion.cpp
A opencv/opencv/src/cvaux/cvscanlines.cpp
A opencv/opencv/src/cvaux/cvvecfacetracking.cpp
A opencv/opencv/src/cvaux/cvcalibfilter.cpp
A opencv/opencv/src/cvaux/cvprewarp.cpp
A opencv/opencv/src/cvaux/cvhmm.cpp
A opencv/opencv/src/cvaux/cvmat.cpp
A opencv/opencv/src/cvaux/decomppoly.cpp
A opencv/opencv/src/cvaux/cvmorphing.cpp
A opencv/opencv/src/cvaux/cvdpstereo.cpp
A opencv/opencv/src/cvaux/cvbgfg_gaussmix.cpp
A opencv/opencv/src/cvaux/cvfacedetection.cpp
A opencv/opencv/src/cvaux/cvaux.cpp
A opencv/opencv/src/cvaux/cvfindface.cpp
A opencv/opencv/src/cvaux/cvfacetemplate.h
A opencv/opencv/src/cvaux/cvspinimages.cpp
A opencv/opencv/src/cvaux/cvselfsimilarity.cpp
A opencv/opencv/src/cvaux/cvtexture.cpp
A opencv/opencv/src/cvaux/cveigenobjects.cpp
A opencv/opencv/src/cvaux/cvsegment.cpp
A opencv/opencv/src/cvaux/cvface.h
A opencv/opencv/src/cvaux/cvlmeds.cpp
A opencv/opencv/src/cv
A opencv/opencv/src/cv/cvimgwarp.cpp
A opencv/opencv/src/cv/cvcanny.cpp
A opencv/opencv/src/cv/cvapprox.cpp
A opencv/opencv/src/cv/cvoptflowbm.cpp
A opencv/opencv/src/cv/cvfundam.cpp
A opencv/opencv/src/cv/cvsurf.cpp
A opencv/opencv/src/cv/_cvfeaturetree.h
A opencv/opencv/src/cv/_cvlist.h
A opencv/opencv/src/cv/_cvmodelest.h
A opencv/opencv/src/cv/_cvkdtree.hpp
A opencv/opencv/src/cv/cvmoments.cpp
A opencv/opencv/src/cv/cvcornersubpix.cpp
A opencv/opencv/src/cv/cvsnakes.cpp
A opencv/opencv/src/cv/cvmorph.cpp
A opencv/opencv/src/cv/cvsamplers.cpp
A opencv/opencv/src/cv/cvcondens.cpp
A opencv/opencv/src/cv/cvsumpixels.cpp
A opencv/opencv/src/cv/cvlinefit.cpp
A opencv/opencv/src/cv/_cvgeom.h
A opencv/opencv/src/cv/cvundistort.cpp
A opencv/opencv/src/cv/cvlkpyramid.cpp
A opencv/opencv/src/cv/cvkalman.cpp
A opencv/opencv/src/cv/_cvimgproc.h
A opencv/opencv/src/cv/cvemd.cpp
A opencv/opencv/src/cv/cvmser.cpp
A opencv/opencv/src/cv/cvoptflowgf.cpp
A opencv/opencv/src/cv/cvhough.cpp
A opencv/opencv/src/cv/cvfloodfill.cpp
A opencv/opencv/src/cv/cvhaar.cpp
A opencv/opencv/src/cv/cvpgh.cpp
A opencv/opencv/src/cv/cvstereobm.cpp
A opencv/opencv/src/cv/_cv.h
A opencv/opencv/src/cv/cvsubdivision2d.cpp
A opencv/opencv/src/cv/cvlsh.cpp
A opencv/opencv/src/cv/cvcalibration.cpp
A opencv/opencv/src/cv/cvcorner.cpp
A opencv/opencv/src/cv/cvpyramids.cpp
A opencv/opencv/src/cv/cvtemplmatch.cpp
A opencv/opencv/src/cv/cvutils.cpp
A opencv/opencv/src/cv/cvstardetector.cpp
A opencv/opencv/src/cv/cvprecomp.cpp
A opencv/opencv/src/cv/_cvmatrix.h
A opencv/opencv/src/cv/cvsmooth.cpp
A opencv/opencv/src/cv/cvtables.cpp
A opencv/opencv/src/cv/cvstereogc.cpp
A opencv/opencv/src/cv/cvmodelest.cpp
A opencv/opencv/src/cv/cvmotempl.cpp
A opencv/opencv/src/cv/cvoptflowlk.cpp
A opencv/opencv/src/cv/cvfilter.cpp
A opencv/opencv/src/cv/cvoptflowhs.cpp
A opencv/opencv/src/cv/cvaccum.cpp
A opencv/opencv/src/cv/cvpyrsegmentation.cpp
A opencv/opencv/src/cv/cvmatchcontours.cpp
A opencv/opencv/src/cv/cvfeatureselect.cpp
A opencv/opencv/src/cv/cvthresh.cpp
A opencv/opencv/src/cv/cvinpaint.cpp
A opencv/opencv/src/cv/CMakeLists.txt
A opencv/opencv/src/cv/cvderiv.cpp
A opencv/opencv/src/cv/cvcontourtree.cpp
A opencv/opencv/src/cv/cvfeaturetree.cpp
A opencv/opencv/src/cv/cvdistransform.cpp
A opencv/opencv/src/cv/cvcontours.cpp
A opencv/opencv/src/cv/cvcolor.cpp
A opencv/opencv/src/cv/cvkdtree.cpp
A opencv/opencv/src/cv/cvtriangulate.cpp
A opencv/opencv/src/cv/cvshapedescr.cpp
A opencv/opencv/src/cv/cvrotcalipers.cpp
A opencv/opencv/src/cv/cvconvhull.cpp
A opencv/opencv/src/cv/cvgeometry.cpp
A opencv/opencv/src/cv/_cvipp.h
A opencv/opencv/src/cv/cvdominants.cpp
A opencv/opencv/src/cv/cvsegmentation.cpp
A opencv/opencv/src/cv/cvhistogram.cpp
A opencv/opencv/src/cv/cvposit.cpp
A opencv/opencv/src/cv/cvcalibinit.cpp
A opencv/opencv/src/cv/cvcalccontrasthistogram.cpp
A opencv/opencv/src/cv/cvcamshift.cpp
A opencv/opencv/src/cv/cvcalcimagehomography.cpp
A opencv/opencv/src/cv/cvspilltree.cpp
A opencv/opencv/src/ml
A opencv/opencv/src/ml/mlsvm.cpp
A opencv/opencv/src/ml/mldata.cpp
A opencv/opencv/src/ml/mlertrees.cpp
A opencv/opencv/src/ml/mlestimate.cpp
A opencv/opencv/src/ml/mlknearest.cpp
A opencv/opencv/src/ml/mlcnn.cpp
A opencv/opencv/src/ml/ml.cpp
A opencv/opencv/src/ml/mlnbayes.cpp
A opencv/opencv/src/ml/_ml.h
A opencv/opencv/src/ml/mlann_mlp.cpp
A opencv/opencv/src/ml/mlboost.cpp
A opencv/opencv/src/ml/mltestset.cpp
A opencv/opencv/src/ml/mltree.cpp
A opencv/opencv/src/ml/mlem.cpp
A opencv/opencv/src/ml/ml_inner_functions.cpp
A opencv/opencv/src/ml/CMakeLists.txt
A opencv/opencv/src/ml/mlrtrees.cpp
A opencv/opencv/src/Makefile.am
A opencv/opencv/src/dummy.cpp
A opencv/opencv/src/CMakeLists.txt
A opencv/opencv/THANKS
A opencv/opencv/opencv.spec.in
A opencv/opencv/cvconfig.h.in
A opencv/opencv/autotools
A opencv/opencv/autotools/mkinstalldirs
A opencv/opencv/autotools/darwin
A opencv/opencv/autotools/darwin/OpenCV.h
A opencv/opencv/autotools/darwin/Info.plist
A opencv/opencv/autotools/depcomp
A opencv/opencv/autotools/missing
A opencv/opencv/autotools/config.guess
A opencv/opencv/autotools/config.sub
A opencv/opencv/autotools/ltmain.sh
A opencv/opencv/autotools/aclocal
A opencv/opencv/autotools/aclocal/pkg.m4
A opencv/opencv/autotools/aclocal/swig_complete.m4
A opencv/opencv/autotools/aclocal/version_at_least.m4
A opencv/opencv/autotools/aclocal/libtool1.m4
A opencv/opencv/autotools/aclocal/ax_ext.m4
A opencv/opencv/autotools/aclocal/ax_check_compiler_flags.m4
A opencv/opencv/autotools/aclocal/az_python.m4
A opencv/opencv/autotools/aclocal/ax_gcc_x86_cpuid.m4
A opencv/opencv/autotools/install-sh
A opencv/opencv/autotools/py-compile
A opencv/opencv/cmake_uninstall.cmake.in
A opencv/opencv/OpenCVFindPkgConfig.cmake
A opencv/opencv/tests
A opencv/opencv/tests/cxts
A opencv/opencv/tests/cxts/cxts.cpp
A opencv/opencv/tests/cxts/_cxts.h
A opencv/opencv/tests/cxts/cxts_arrtest.cpp
A opencv/opencv/tests/cxts/precomp.cpp
A opencv/opencv/tests/cxts/cxts.h
A opencv/opencv/tests/cxts/cxts_math.cpp
A opencv/opencv/tests/cxts/CMakeLists.txt
A opencv/opencv/tests/octave
A opencv/opencv/tests/octave/test_adaptors.m
A opencv/opencv/tests/octave/frame.jpg
A opencv/opencv/tests/python
A opencv/opencv/tests/python/lsh_tests.py
A opencv/opencv/tests/python/roots_tests.py
A opencv/opencv/tests/python/testall.py
A opencv/opencv/tests/python/cvtestutils.py
A opencv/opencv/tests/python/feature_tree_tests.py
A opencv/opencv/tests/python/test_adaptors.py
A opencv/opencv/tests/python/highgui
A opencv/opencv/tests/python/highgui/cvLoadImagePPM.py
A opencv/opencv/tests/python/highgui/cvSaveImage.py
A opencv/opencv/tests/python/highgui/seek_frame_divx.py
A opencv/opencv/tests/python/highgui/seek_time_divx.py
A opencv/opencv/tests/python/highgui/query_divx.py
A opencv/opencv/tests/python/highgui/cvInitSystem.py
A opencv/opencv/tests/python/highgui/size_cinepak.py
A opencv/opencv/tests/python/highgui/query_test.py
A opencv/opencv/tests/python/highgui/works.py
A opencv/opencv/tests/python/highgui/size_mpeg4.py
A opencv/opencv/tests/python/highgui/cvCreateTrackbar.py
A opencv/opencv/tests/python/highgui/cvQueryFrame.py
A opencv/opencv/tests/python/highgui/cvSetMouseCallback.py
A opencv/opencv/tests/python/highgui/cvCreateFileCaptureRGB.py
A opencv/opencv/tests/python/highgui/cvCaptureFromFileYVU9.py
A opencv/opencv/tests/python/highgui/seek_frame_dv_pal_progressive_avi.py
A opencv/opencv/tests/python/highgui/cvCaptureFromFileUYVY.py
A opencv/opencv/tests/python/highgui/cvGetWindowHandleName.py
A opencv/opencv/tests/python/highgui/size_bmp32.py
A opencv/opencv/tests/python/highgui/cvLoadImageSR.py
A opencv/opencv/tests/python/highgui/size_dv_pal_progressive_dv.py
A opencv/opencv/tests/python/highgui/query_dv_pal_progressive_avi.py
A opencv/opencv/tests/python/highgui/seek_time_dv_pal_progressive_avi.py
A opencv/opencv/tests/python/highgui/size_3gp.py
A opencv/opencv/tests/python/highgui/seek_test.py
A opencv/opencv/tests/python/highgui/size_dv_pal_progressive_avi.py
A opencv/opencv/tests/python/highgui/seek_frame_uncompressed.py
A opencv/opencv/tests/python/highgui/cvRetrieveFrame.py
A opencv/opencv/tests/python/highgui/query_uncompressed.py
A opencv/opencv/tests/python/highgui/seek_time_uncompressed.py
A opencv/opencv/tests/python/highgui/seek_frame_mpeg4.py
A opencv/opencv/tests/python/highgui/seek_time_mpeg4.py
A opencv/opencv/tests/python/highgui/cvGetCaptureProperty.py
A opencv/opencv/tests/python/highgui/cvCreateFileCaptureY8.py
A opencv/opencv/tests/python/highgui/query_mpeg4.py
A opencv/opencv/tests/python/highgui/cvCreateFileCaptureYV12.py
A opencv/opencv/tests/python/highgui/seek_frame_bmp32.py
A opencv/opencv/tests/python/highgui/cvCreateFileCaptureYV16.py
A opencv/opencv/tests/python/highgui/seek_frame_dv_pal_progressive_dv.py
A opencv/opencv/tests/python/highgui/seek_time_bmp32.py
A opencv/opencv/tests/python/highgui/query_bmp32.py
A opencv/opencv/tests/python/highgui/cvCreateFileCaptureYUY2.py
A opencv/opencv/tests/python/highgui/seek_time_dv_pal_progressive_dv.py
A opencv/opencv/tests/python/highgui/cvLoadImage.py
A opencv/opencv/tests/python/highgui/cvCaptureFromFileRGB.py
A opencv/opencv/tests/python/highgui/query_dv_pal_progressive_dv.py
A opencv/opencv/tests/python/highgui/cvCreateFileCaptureRGBA.py
A opencv/opencv/tests/python/highgui/seek_frame_huffyuv.py
A opencv/opencv/tests/python/highgui/cvGrabFrame.py
A opencv/opencv/tests/python/highgui/cvLoadImagePNG.py
A opencv/opencv/tests/python/highgui/cvGetSetTrackbarPos.py
A opencv/opencv/tests/python/highgui/seek_time_huffyuv.py
A opencv/opencv/tests/python/highgui/query_huffyuv.py
A opencv/opencv/tests/python/highgui/cvLoadImageTIFF.py
A opencv/opencv/tests/python/highgui/size_indeo.py
A opencv/opencv/tests/python/highgui/size_wmv9.py
A opencv/opencv/tests/python/highgui/match.py
A opencv/opencv/tests/python/highgui/cvCaptureFromFileY8.py
A opencv/opencv/tests/python/highgui/cvCaptureFromFileYV12.py
A opencv/opencv/tests/python/highgui/size_divx.py
A opencv/opencv/tests/python/highgui/cvNamedWindow.py
A opencv/opencv/tests/python/highgui/cvCaptureFromFileYV16.py
A opencv/opencv/tests/python/highgui/cvWaitKey.py
A opencv/opencv/tests/python/highgui/cvCaptureFromFileYUY2.py
A opencv/opencv/tests/python/highgui/cvMoveResizeWindow.py
A opencv/opencv/tests/python/highgui/size_test.py
A opencv/opencv/tests/python/highgui/cvLoadImageBMP.py
A opencv/opencv/tests/python/highgui/cvCaptureFromFileRGBA.py
A opencv/opencv/tests/python/highgui/frames.py
A opencv/opencv/tests/python/highgui/size_bmp24.py
A opencv/opencv/tests/python/highgui/seek_frame_indeo.py
A opencv/opencv/tests/python/highgui/cvCreateFileCapture.py
A opencv/opencv/tests/python/highgui/query_indeo.py
A opencv/opencv/tests/python/highgui/seek_time_indeo.py
A opencv/opencv/tests/python/highgui/size_huffyuv.py
A opencv/opencv/tests/python/highgui/seek_frame_cinepak.py
A opencv/opencv/tests/python/highgui/query_cinepak.py
A opencv/opencv/tests/python/highgui/seek_time_cinepak.py
A opencv/opencv/tests/python/highgui/size_uncompressed.py
A opencv/opencv/tests/python/highgui/seek_frame_bmp24.py
A opencv/opencv/tests/python/highgui/query_bmp24.py
A opencv/opencv/tests/python/highgui/seek_time_bmp24.py
A opencv/opencv/tests/python/highgui/seek_frame_3gp.py
A opencv/opencv/tests/python/highgui/cvShowImage.py
A opencv/opencv/tests/python/highgui/cvLoadImageJPG.py
A opencv/opencv/tests/python/highgui/cvCreateFileCaptureUYVY.py
A opencv/opencv/tests/python/highgui/cvCreateFileCaptureYVU9.py
A opencv/opencv/tests/python/highgui/query_3gp.py
A opencv/opencv/tests/python/highgui/seek_time_3gp.py
A opencv/opencv/tests/python/highgui/cvCaptureFromFile.py
A opencv/opencv/tests/python/highgui/seek_frame_wmv9.py
A opencv/opencv/tests/python/highgui/query_wmv9.py
A opencv/opencv/tests/python/highgui/seek_time_wmv9.py
A opencv/opencv/tests/python/histogram_tests.py
A opencv/opencv/tests/python/homography_tests.py
A opencv/opencv/tests/python/cmp_tests.py
A opencv/opencv/tests/python/moments_tests.py
A opencv/opencv/tests/Makefile.in
A opencv/opencv/tests/cxcore
A opencv/opencv/tests/cxcore/src
A opencv/opencv/tests/cxcore/src/adatastruct.cpp
A opencv/opencv/tests/cxcore/src/adxt.cpp
A opencv/opencv/tests/cxcore/src/aarithm.cpp
A opencv/opencv/tests/cxcore/src/precomp.cpp
A opencv/opencv/tests/cxcore/src/cxcoretest_main.cpp
A opencv/opencv/tests/cxcore/src/cxcoretest.h
A opencv/opencv/tests/cxcore/src/amath.cpp
A opencv/opencv/tests/cxcore/src/asolvepoly.cpp
A opencv/opencv/tests/cxcore/CMakeLists.txt
A opencv/opencv/tests/cv
A opencv/opencv/tests/cv/src
A opencv/opencv/tests/cv/src/acreatecontourtree.cpp
A opencv/opencv/tests/cv/src/athresh.cpp
A opencv/opencv/tests/cv/src/akalman.cpp
A opencv/opencv/tests/cv/src/aemd.cpp
A opencv/opencv/tests/cv/src/astereocorrespondencegc.cpp
A opencv/opencv/tests/cv/src/cvtest.cpp
A opencv/opencv/tests/cv/src/amatchcontourtrees.cpp
A opencv/opencv/tests/cv/src/afloodfill.cpp
A opencv/opencv/tests/cv/src/acontours.cpp
A opencv/opencv/tests/cv/src/akmeans.cpp
A opencv/opencv/tests/cv/src/akdtree.cpp
A opencv/opencv/tests/cv/src/acolor.cpp
A opencv/opencv/tests/cv/src/adistancetransform.cpp
A opencv/opencv/tests/cv/src/aeigenobjects.inc
A opencv/opencv/tests/cv/src/acontoursmatch.cpp
A opencv/opencv/tests/cv/src/aconvhull.cpp
A opencv/opencv/tests/cv/src/acontourmoments.cpp
A opencv/opencv/tests/cv/src/atemplmatch.cpp
A opencv/opencv/tests/cv/src/aposit.cpp
A opencv/opencv/tests/cv/src/amotseg.cpp
A opencv/opencv/tests/cv/src/acamshift.cpp
A opencv/opencv/tests/cv/src/acameracalibration.cpp
A opencv/opencv/tests/cv/src/achesscorners.cpp
A opencv/opencv/tests/cv/src/aeigenobjects.cpp
A opencv/opencv/tests/cv/src/tsysa.cpp
A opencv/opencv/tests/cv/src/aspilltree.cpp
A opencv/opencv/tests/cv/src/ahoughtransform.cpp
A opencv/opencv/tests/cv/src/aimgwarp.cpp
A opencv/opencv/tests/cv/src/aadaptthresh.cpp
A opencv/opencv/tests/cv/src/acanny.cpp
A opencv/opencv/tests/cv/src/afundam.cpp
A opencv/opencv/tests/cv/src/aoptflowpyrlk.cpp
A opencv/opencv/tests/cv/src/cvtest.h
A opencv/opencv/tests/cv/src/aapproxpoly.cpp
A opencv/opencv/tests/cv/src/ahistograms.cpp
A opencv/opencv/tests/cv/src/aoptflowlk.cpp
A opencv/opencv/tests/cv/src/asubdivisions.cpp
A opencv/opencv/tests/cv/src/amoments.cpp
A opencv/opencv/tests/cv/src/aimage.cpp
A opencv/opencv/tests/cv/src/amotiontemplates.cpp
A opencv/opencv/tests/cv/src/asnakes.cpp
A opencv/opencv/tests/cv/src/ahmmobs.cpp
A opencv/opencv/tests/cv/src/afilter.cpp
A opencv/opencv/tests/cv/src/adrawing_regress.cpp
A opencv/opencv/tests/cv/src/aoptflowhs.cpp
A opencv/opencv/tests/cv/src/aaccum.cpp
A opencv/opencv/tests/cv/src/apyrsegmentation.cpp
A opencv/opencv/tests/cv/src/acondens.cpp
A opencv/opencv/tests/cv/CMakeLists.txt
A opencv/opencv/tests/ml
A opencv/opencv/tests/ml/src
A opencv/opencv/tests/ml/src/adtree.cpp
A opencv/opencv/tests/ml/src/artrees.cpp
A opencv/opencv/tests/ml/src/precomp.cpp
A opencv/opencv/tests/ml/src/aboost.cpp
A opencv/opencv/tests/ml/src/aertrees.cpp
A opencv/opencv/tests/ml/src/mltest_main.cpp
A opencv/opencv/tests/ml/src/mltest.h
A opencv/opencv/tests/ml/src/treesbase.cpp
A opencv/opencv/tests/ml/Readme.txt
A opencv/opencv/tests/ml/CMakeLists.txt
A opencv/opencv/tests/Makefile.am
A opencv/opencv/tests/CMakeLists.txt
A opencv/opencv/apps
A opencv/opencv/apps/Makefile.in
A opencv/opencv/apps/haartraining
A opencv/opencv/apps/haartraining/cvboost.cpp
A opencv/opencv/apps/haartraining/cvhaartraining.cpp
A opencv/opencv/apps/haartraining/cvcommon.cpp
A opencv/opencv/apps/haartraining/performance.cpp
A opencv/opencv/apps/haartraining/cvclassifier.h
A opencv/opencv/apps/haartraining/_cvhaartraining.h
A opencv/opencv/apps/haartraining/_cvcommon.h
A opencv/opencv/apps/haartraining/cvhaartraining.h
A opencv/opencv/apps/haartraining/haartraining.cpp
A opencv/opencv/apps/haartraining/createsamples.cpp
A opencv/opencv/apps/haartraining/cvhaarclassifier.cpp
A opencv/opencv/apps/haartraining/CMakeLists.txt
A opencv/opencv/apps/haartraining/cvsamples.cpp
A opencv/opencv/apps/Makefile.am
A opencv/opencv/apps/CMakeLists.txt
A opencv/opencv/doc
A opencv/opencv/doc/Makefile.in
A opencv/opencv/doc/cvcam.rtf
A opencv/opencv/doc/pattern.pdf
A opencv/opencv/doc/papers
A opencv/opencv/doc/papers/camshift.pdf
A opencv/opencv/doc/papers/algo_tracking.pdf
A opencv/opencv/doc/papers/avbpa99.ps
A opencv/opencv/doc/opencv-logo2.png
A opencv/opencv/doc/faq.htm
A opencv/opencv/doc/haartraining.htm
A opencv/opencv/doc/index.htm
A opencv/opencv/doc/python.txt
A opencv/opencv/doc/license.txt
A opencv/opencv/doc/vidsurv
A opencv/opencv/doc/vidsurv/Blob_Tracking_Tests.doc
A opencv/opencv/doc/vidsurv/Blob_Tracking_Modules.doc
A opencv/opencv/doc/vidsurv/TestSeq.doc
A opencv/opencv/doc/Makefile.am
A opencv/opencv/doc/opencv.jpg
A opencv/opencv/doc/opencv-logo.png
A opencv/opencv/doc/ref
A opencv/opencv/doc/ref/opencvref_cxcore.htm
A opencv/opencv/doc/ref/opencvref_highgui.htm
A opencv/opencv/doc/ref/opencvref_cvaux.htm
A opencv/opencv/doc/ref/opencvref_cv.htm
A opencv/opencv/doc/ref/opencvref_ml.htm
A opencv/opencv/doc/ref/opencvref.css
A opencv/opencv/doc/ref/pics
A opencv/opencv/doc/ref/pics/subdiv.png
A opencv/opencv/doc/ref/pics/errmsg.png
A opencv/opencv/doc/ref/pics/sigmoid_bipolar.png
A opencv/opencv/doc/ref/pics/defects.png
A opencv/opencv/doc/ref/pics/em1.png
A opencv/opencv/doc/ref/pics/cornersubpix.png
A opencv/opencv/doc/ref/pics/em3.png
A opencv/opencv/doc/ref/pics/em4.png
A opencv/opencv/doc/ref/pics/neuron_model.png
A opencv/opencv/doc/ref/pics/left.jpg
A opencv/opencv/doc/ref/pics/em5.png
A opencv/opencv/doc/ref/pics/em6.png
A opencv/opencv/doc/ref/pics/em7.png
A opencv/opencv/doc/ref/pics/building.jpg
A opencv/opencv/doc/ref/pics/em8.png
A opencv/opencv/doc/ref/pics/em9.png
A opencv/opencv/doc/ref/pics/houghp.png
A opencv/opencv/doc/ref/pics/threshold.png
A opencv/opencv/doc/ref/pics/ellipse.png
A opencv/opencv/doc/ref/pics/face.png
A opencv/opencv/doc/ref/pics/pointpolygon.png
A opencv/opencv/doc/ref/pics/maxrect.png
A opencv/opencv/doc/ref/pics/backprojectpatch.png
A opencv/opencv/doc/ref/pics/disparity.png
A opencv/opencv/doc/ref/pics/right.jpg
A opencv/opencv/doc/ref/pics/haarfeatures.png
A opencv/opencv/doc/ref/pics/logpolar.jpg
A opencv/opencv/doc/ref/pics/contoursecarea.png
A opencv/opencv/doc/ref/pics/quadedge.png
A opencv/opencv/doc/ref/pics/boundingrect.png
A opencv/opencv/doc/ref/pics/memstorage1.png
A opencv/opencv/doc/ref/pics/minareabox.png
A opencv/opencv/doc/ref/pics/memstorage2.png
A opencv/opencv/doc/ref/pics/mlp_.png
A opencv/opencv/doc/ref/pics/inv_logpolar.jpg
A opencv/opencv/doc/CMakeLists.txt
A opencv/opencv/INSTALL
A opencv/opencv/COPYING
A opencv/opencv/data
A opencv/opencv/data/Makefile.in
A opencv/opencv/data/haarcascades
A opencv/opencv/data/haarcascades/haarcascade_mcs_eyepair_big.xml
A opencv/opencv/data/haarcascades/haarcascade_eye.xml
A opencv/opencv/data/haarcascades/haarcascade_mcs_righteye.xml
A opencv/opencv/data/haarcascades/haarcascade_frontalface_alt.xml
A opencv/opencv/data/haarcascades/haarcascade_eye_tree_eyeglasses.xml
A opencv/opencv/data/haarcascades/haarcascade_frontalface_default.xml
A opencv/opencv/data/haarcascades/haarcascade_mcs_eyepair_small.xml
A opencv/opencv/data/haarcascades/haarcascade_mcs_mouth.xml
A opencv/opencv/data/haarcascades/haarcascade_mcs_lefteye.xml
A opencv/opencv/data/haarcascades/haarcascade_righteye_2splits.xml
A opencv/opencv/data/haarcascades/haarcascade_frontalface_alt_tree.xml
A opencv/opencv/data/haarcascades/haarcascade_frontalface_alt2.xml
A opencv/opencv/data/haarcascades/haarcascade_lowerbody.xml
A opencv/opencv/data/haarcascades/haarcascade_mcs_nose.xml
A opencv/opencv/data/haarcascades/haarcascade_upperbody.xml
A opencv/opencv/data/haarcascades/haarcascade_mcs_upperbody.xml
A opencv/opencv/data/haarcascades/haarcascade_lefteye_2splits.xml
A opencv/opencv/data/haarcascades/haarcascade_profileface.xml
A opencv/opencv/data/haarcascades/haarcascade_fullbody.xml
A opencv/opencv/data/Makefile.am
A opencv/opencv/data/readme.txt
A opencv/opencv/data/CMakeLists.txt
A opencv/opencv/NEWS
A opencv/opencv/CMakeLists.txt
A opencv/opencv/include
A opencv/opencv/include/Makefile.in
A opencv/opencv/include/Makefile.am
A opencv/opencv/include/opencv
A opencv/opencv/include/opencv/cvvidsurv.hpp
A opencv/opencv/include/opencv/cvtypes.h
A opencv/opencv/include/opencv/cxtypes.h
A opencv/opencv/include/opencv/cvwimage.h
A opencv/opencv/include/opencv/cvstreams.h
A opencv/opencv/include/opencv/ml.h
A opencv/opencv/include/opencv/cv.h
A opencv/opencv/include/opencv/cv.hpp
A opencv/opencv/include/opencv/cvcompat.h
A opencv/opencv/include/opencv/cxmat.hpp
A opencv/opencv/include/opencv/cxoperations.hpp
A opencv/opencv/include/opencv/cxcore.h
A opencv/opencv/include/opencv/cxcore.hpp
A opencv/opencv/include/opencv/highgui.hpp
A opencv/opencv/include/opencv/highgui.h
A opencv/opencv/include/opencv/cxerror.h
A opencv/opencv/include/opencv/cvver.h
A opencv/opencv/include/opencv/cxmisc.h
A opencv/opencv/include/opencv/cvaux.hpp
A opencv/opencv/include/opencv/cvaux.h
A opencv/opencv/configure.in
A opencv/opencv/make_frameworks.sh
A opencv/opencv/ChangeLog
A opencv/opencv/README
A opencv/opencv/utils
A opencv/opencv/utils/extract_doublepointers.py
A opencv/opencv/utils/Makefile.in
A opencv/opencv/utils/cvarr_operators.py
A opencv/opencv/utils/extract_aliases.py
A opencv/opencv/utils/opencv.ico
A opencv/opencv/utils/extract_macros.py
A opencv/opencv/utils/opencv.iss
A opencv/opencv/utils/splash.bmp
A opencv/opencv/utils/Makefile.am
A opencv/opencv/utils/check_doc.py
A opencv/opencv/utils/make_index.py
A opencv/opencv/utils/extract_constants.py
A opencv/opencv/opencv.pc.in
A opencv/opencv/OpenCVPCHSupport.cmake
A opencv/opencv/cvconfig.h.cmake
A opencv/opencv/OpenCVConfig.cmake.in
A opencv/opencv/samples
A opencv/opencv/samples/octave
A opencv/opencv/samples/octave/cam-histo.m
A opencv/opencv/samples/octave/watershed.m
A opencv/opencv/samples/octave/convexhull.m
A opencv/opencv/samples/octave/distrans.m
A opencv/opencv/samples/octave/facedetect.m
A opencv/opencv/samples/octave/drawing.m
A opencv/opencv/samples/octave/demhist.m
A opencv/opencv/samples/octave/morphology.m
A opencv/opencv/samples/octave/fitellipse.m
A opencv/opencv/samples/octave/minidemo.m
A opencv/opencv/samples/octave/laplace.m
A opencv/opencv/samples/octave/capture-cam.m
A opencv/opencv/samples/octave/ffilldemo.m
A opencv/opencv/samples/octave/inpaint.m
A opencv/opencv/samples/octave/delaunay.m
A opencv/opencv/samples/octave/kalman.m
A opencv/opencv/samples/octave/edge.m
A opencv/opencv/samples/octave/houghlines.m
A opencv/opencv/samples/octave/lkdemo.m
A opencv/opencv/samples/octave/contours.m
A opencv/opencv/samples/octave/minarea.m
A opencv/opencv/samples/octave/dft.m
A opencv/opencv/samples/octave/chessboard.m
A opencv/opencv/samples/octave/motempl.m
A opencv/opencv/samples/octave/kmeans.m
A opencv/opencv/samples/octave/logpolar.m
A opencv/opencv/samples/octave/CMakeLists.txt
A opencv/opencv/samples/octave/pyramid_segmentation.m
A opencv/opencv/samples/octave/squares.m
A opencv/opencv/samples/python
A opencv/opencv/samples/python/drawing.py
A opencv/opencv/samples/python/demhist.py
A opencv/opencv/samples/python/morphology.py
A opencv/opencv/samples/python/fitellipse.py
A opencv/opencv/samples/python/minidemo.py
A opencv/opencv/samples/python/laplace.py
A opencv/opencv/samples/python/capture-cam.py
A opencv/opencv/samples/python/ffilldemo.py
A opencv/opencv/samples/python/inpaint.py
A opencv/opencv/samples/python/delaunay.py
A opencv/opencv/samples/python/kalman.py
A opencv/opencv/samples/python/edge.py
A opencv/opencv/samples/python/houghlines.py
A opencv/opencv/samples/python/lkdemo.py
A opencv/opencv/samples/python/minarea.py
A opencv/opencv/samples/python/contours.py
A opencv/opencv/samples/python/dft.py
A opencv/opencv/samples/python/chessboard.py
A opencv/opencv/samples/python/motempl.py
A opencv/opencv/samples/python/kmeans.py
A opencv/opencv/samples/python/logpolar.py
A opencv/opencv/samples/python/pyramid_segmentation.py
A opencv/opencv/samples/python/squares.py
A opencv/opencv/samples/python/cam-histo.py
A opencv/opencv/samples/python/CMakeLists.txt
A opencv/opencv/samples/python/watershed.py
A opencv/opencv/samples/python/facedetect.py
A opencv/opencv/samples/python/distrans.py
A opencv/opencv/samples/python/convexhull.py
A opencv/opencv/samples/Makefile.in
A opencv/opencv/samples/c
A opencv/opencv/samples/c/left06.jpg
A opencv/opencv/samples/c/pic1.png
A opencv/opencv/samples/c/left07.jpg
A opencv/opencv/samples/c/pic2.png
A opencv/opencv/samples/c/left08.jpg
A opencv/opencv/samples/c/pic3.png
A opencv/opencv/samples/c/left09.jpg
A opencv/opencv/samples/c/pic4.png
A opencv/opencv/samples/c/pic5.png
A opencv/opencv/samples/c/pic6.png
A opencv/opencv/samples/c/blobtrack.cpp
A opencv/opencv/samples/c/kalman.c
A opencv/opencv/samples/c/letter-recognition.data
A opencv/opencv/samples/c/find_obj.cpp
A opencv/opencv/samples/c/adaptiveskindetector.cpp
A opencv/opencv/samples/c/motempl.c
A opencv/opencv/samples/c/build_all.sh
A opencv/opencv/samples/c/tree_engine.cpp
A opencv/opencv/samples/c/convexhull.c
A opencv/opencv/samples/c/calibration.cpp
A opencv/opencv/samples/c/distrans.c
A opencv/opencv/samples/c/facedetect.c
A opencv/opencv/samples/c/left11.jpg
A opencv/opencv/samples/c/box.png
A opencv/opencv/samples/c/left12.jpg
A opencv/opencv/samples/c/drawing.c
A opencv/opencv/samples/c/stereo_calib.cpp
A opencv/opencv/samples/c/left13.jpg
A opencv/opencv/samples/c/left14.jpg
A opencv/opencv/samples/c/morphology.c
A opencv/opencv/samples/c/delaunay.c
A opencv/opencv/samples/c/camshiftdemo.c
A opencv/opencv/samples/c/houghlines.c
A opencv/opencv/samples/c/fruits.jpg
A opencv/opencv/samples/c/lkdemo.c
A opencv/opencv/samples/c/waveform.data
A opencv/opencv/samples/c/squares.c
A opencv/opencv/samples/c/convert_cascade.c
A opencv/opencv/samples/c/box_in_scene.png
A opencv/opencv/samples/c/baboon.jpg
A opencv/opencv/samples/c/inpaint.cpp
A opencv/opencv/samples/c/facedetect.cmd
A opencv/opencv/samples/c/mushroom.cpp
A opencv/opencv/samples/c/example_cmake
A opencv/opencv/samples/c/example_cmake/README.txt
A opencv/opencv/samples/c/example_cmake/CMakeLists.txt
A opencv/opencv/samples/c/example_cmake/minarea.c
A opencv/opencv/samples/c/right01.jpg
A opencv/opencv/samples/c/contours.c
A opencv/opencv/samples/c/minarea.c
A opencv/opencv/samples/c/right02.jpg
A opencv/opencv/samples/c/dft.c
A opencv/opencv/samples/c/lena.jpg
A opencv/opencv/samples/c/right03.jpg
A opencv/opencv/samples/c/cvsample.dsp
A opencv/opencv/samples/c/kmeans.c
A opencv/opencv/samples/c/right04.jpg
A opencv/opencv/samples/c/right05.jpg
A opencv/opencv/samples/c/agaricus-lepiota.data
A opencv/opencv/samples/c/bgfg_segm.cpp
A opencv/opencv/samples/c/right06.jpg
A opencv/opencv/samples/c/right07.jpg
A opencv/opencv/samples/c/pyramid_segmentation.c
A opencv/opencv/samples/c/right08.jpg
A opencv/opencv/samples/c/right09.jpg
A opencv/opencv/samples/c/stuff.jpg
A opencv/opencv/samples/c/airplane.jpg
A opencv/opencv/samples/c/polar_transforms.c
A opencv/opencv/samples/c/CMakeLists.txt
A opencv/opencv/samples/c/fitellipse.cpp
A opencv/opencv/samples/c/laplace.c
A opencv/opencv/samples/c/ffilldemo.c
A opencv/opencv/samples/c/edge.c
A opencv/opencv/samples/c/bgfg_codebook.cpp
A opencv/opencv/samples/c/peopledetect.cpp
A opencv/opencv/samples/c/right11.jpg
A opencv/opencv/samples/c/letter_recog.cpp
A opencv/opencv/samples/c/right12.jpg
A opencv/opencv/samples/c/right13.jpg
A opencv/opencv/samples/c/right14.jpg
A opencv/opencv/samples/c/image.cpp
A opencv/opencv/samples/c/watershed.cpp
A opencv/opencv/samples/c/stereo_calib.txt
A opencv/opencv/samples/c/left01.jpg
A opencv/opencv/samples/c/cvsample.vs2005.vcproj
A opencv/opencv/samples/c/left02.jpg
A opencv/opencv/samples/c/left03.jpg
A opencv/opencv/samples/c/left04.jpg
A opencv/opencv/samples/c/tree.avi
A opencv/opencv/samples/c/left05.jpg
A opencv/opencv/samples/c/demhist.c
A opencv/opencv/samples/Makefile.am
A opencv/opencv/samples/MacOSX
A opencv/opencv/samples/MacOSX/FaceTracker
A opencv/opencv/samples/MacOSX/FaceTracker/FaceTracker.xcodeproj
A opencv/opencv/samples/MacOSX/FaceTracker/FaceTracker.xcodeproj/project.pbxproj
A opencv/opencv/samples/MacOSX/FaceTracker/FaceTracker.cpp
A opencv/opencv/samples/MacOSX/FaceTracker/README.txt
A opencv/opencv/samples/MacOSX/FaceTracker/FaceTracker-Info.plist
A opencv/opencv/samples/CMakeLists.txt
A opencv/opencv/TODO
A opencv/opencv/3rdparty
A opencv/opencv/3rdparty/libtiff
A opencv/opencv/3rdparty/libtiff/tif_predict.h
A opencv/opencv/3rdparty/libtiff/tif_apple.c
A opencv/opencv/3rdparty/libtiff/tif_strip.c
A opencv/opencv/3rdparty/libtiff/tiffconf.h
A opencv/opencv/3rdparty/libtiff/tiffiop.h
A opencv/opencv/3rdparty/libtiff/tif_warning.c
A opencv/opencv/3rdparty/libtiff/tif_thunder.c
A opencv/opencv/3rdparty/libtiff/tif_dumpmode.c
A opencv/opencv/3rdparty/libtiff/tif_dirread.c
A opencv/opencv/3rdparty/libtiff/tif_lzw.c
A opencv/opencv/3rdparty/libtiff/tif_color.c
A opencv/opencv/3rdparty/libtiff/tif_dir.c
A opencv/opencv/3rdparty/libtiff/tif_getimage.c
A opencv/opencv/3rdparty/libtiff/tif_dir.h
A opencv/opencv/3rdparty/libtiff/tif_version.c
A opencv/opencv/3rdparty/libtiff/uvcode.h
A opencv/opencv/3rdparty/libtiff/tif_dirwrite.c
A opencv/opencv/3rdparty/libtiff/tif_write.c
A opencv/opencv/3rdparty/libtiff/tif_dirinfo.c
A opencv/opencv/3rdparty/libtiff/CMakeLists.txt
A opencv/opencv/3rdparty/libtiff/tif_swab.c
A opencv/opencv/3rdparty/libtiff/tif_print.c
A opencv/opencv/3rdparty/libtiff/tif_tile.c
A opencv/opencv/3rdparty/libtiff/tif_aux.c
A opencv/opencv/3rdparty/libtiff/tif_packbits.c
A opencv/opencv/3rdparty/libtiff/Makefile.vc
A opencv/opencv/3rdparty/libtiff/tif_fax3.c
A opencv/opencv/3rdparty/libtiff/tif_fax3sm.c
A opencv/opencv/3rdparty/libtiff/tif_open.c
A opencv/opencv/3rdparty/libtiff/tif_zip.c
A opencv/opencv/3rdparty/libtiff/tif_win32.c
A opencv/opencv/3rdparty/libtiff/tiffio.hxx
A opencv/opencv/3rdparty/libtiff/tif_ojpeg.c
A opencv/opencv/3rdparty/libtiff/tif_close.c
A opencv/opencv/3rdparty/libtiff/tif_luv.c
A opencv/opencv/3rdparty/libtiff/tif_fax3.h
A opencv/opencv/3rdparty/libtiff/tif_config.h
A opencv/opencv/3rdparty/libtiff/tif_read.c
A opencv/opencv/3rdparty/libtiff/tif_stream.cxx
A opencv/opencv/3rdparty/libtiff/tif_extension.c
A opencv/opencv/3rdparty/libtiff/tif_codec.c
A opencv/opencv/3rdparty/libtiff/tif_next.c
A opencv/opencv/3rdparty/libtiff/tif_flush.c
A opencv/opencv/3rdparty/libtiff/tif_unix.c
A opencv/opencv/3rdparty/libtiff/tif_pixarlog.c
A opencv/opencv/3rdparty/libtiff/tif_jpeg.c
A opencv/opencv/3rdparty/libtiff/tif_error.c
A opencv/opencv/3rdparty/libtiff/libtiff.def
A opencv/opencv/3rdparty/libtiff/t4.h
A opencv/opencv/3rdparty/libtiff/tif_predict.c
A opencv/opencv/3rdparty/libtiff/tif_compress.c
A opencv/opencv/3rdparty/zlib
A opencv/opencv/3rdparty/zlib/inffast.h
A opencv/opencv/3rdparty/zlib/configure
A opencv/opencv/3rdparty/zlib/inffixed.h
A opencv/opencv/3rdparty/zlib/deflate.c
A opencv/opencv/3rdparty/zlib/zutil.c
A opencv/opencv/3rdparty/zlib/gzio.c
A opencv/opencv/3rdparty/zlib/deflate.h
A opencv/opencv/3rdparty/zlib/zutil.h
A opencv/opencv/3rdparty/zlib/README
A opencv/opencv/3rdparty/zlib/crc32.c
A opencv/opencv/3rdparty/zlib/inftrees.c
A opencv/opencv/3rdparty/zlib/crc32.h
A opencv/opencv/3rdparty/zlib/trees.c
A opencv/opencv/3rdparty/zlib/inflate.c
A opencv/opencv/3rdparty/zlib/uncompr.c
A opencv/opencv/3rdparty/zlib/inftrees.h
A opencv/opencv/3rdparty/zlib/inflate.h
A opencv/opencv/3rdparty/zlib/trees.h
A opencv/opencv/3rdparty/zlib/inffast.c
A opencv/opencv/3rdparty/zlib/example.c
A opencv/opencv/3rdparty/zlib/compress.c
A opencv/opencv/3rdparty/zlib/adler32.c
A opencv/opencv/3rdparty/zlib/CMakeLists.txt
A opencv/opencv/3rdparty/zlib/.cvsignore
A opencv/opencv/3rdparty/zlib/infback.c
A opencv/opencv/3rdparty/Makefile.in
A opencv/opencv/3rdparty/include
A opencv/opencv/3rdparty/include/OpenEXR
A opencv/opencv/3rdparty/include/OpenEXR/ImfXdr.h
A opencv/opencv/3rdparty/include/OpenEXR/ImfTiledRgbaFile.h
A opencv/opencv/3rdparty/include/OpenEXR/IexErrnoExc.h
A opencv/opencv/3rdparty/include/OpenEXR/ImathVec.h
A opencv/opencv/3rdparty/include/OpenEXR/ImfThreading.h
A opencv/opencv/3rdparty/include/OpenEXR/ImathVecAlgo.h
A opencv/opencv/3rdparty/include/OpenEXR/ImfChromaticities.h
A opencv/opencv/3rdparty/include/OpenEXR/ImfIO.h
A opencv/opencv/3rdparty/include/OpenEXR/ImfRgbaYca.h
A opencv/opencv/3rdparty/include/OpenEXR/ImfPreviewImageAttribute.h
A opencv/opencv/3rdparty/include/OpenEXR/ImfEnvmapAttribute.h
A opencv/opencv/3rdparty/include/OpenEXR/ImfRgbaFile.h
A opencv/opencv/3rdparty/include/OpenEXR/ImfRgba.h
A opencv/opencv/3rdparty/include/OpenEXR/ImathPlatform.h
A opencv/opencv/3rdparty/include/OpenEXR/ImfCRgbaFile.h
A opencv/opencv/3rdparty/include/OpenEXR/ImfIntAttribute.h
A opencv/opencv/3rdparty/include/OpenEXR/ImathBox.h
A opencv/opencv/3rdparty/include/OpenEXR/ImfTestFile.h
A opencv/opencv/3rdparty/include/OpenEXR/ImathBoxAlgo.h
A opencv/opencv/3rdparty/include/OpenEXR/ImfTiledOutputFile.h
A opencv/opencv/3rdparty/include/OpenEXR/halfFunction.h
A opencv/opencv/3rdparty/include/OpenEXR/ImfCompressionAttribute.h
A opencv/opencv/3rdparty/include/OpenEXR/ImfTileDescriptionAttribute.h
A opencv/opencv/3rdparty/include/OpenEXR/ImfVersion.h
A opencv/opencv/3rdparty/include/OpenEXR/ImathShear.h
A opencv/opencv/3rdparty/include/OpenEXR/ImathGL.h
A opencv/opencv/3rdparty/include/OpenEXR/ImfTimeCode.h
A opencv/opencv/3rdparty/include/OpenEXR/ImfDoubleAttribute.h
A opencv/opencv/3rdparty/include/OpenEXR/IexMacros.h
A opencv/opencv/3rdparty/include/OpenEXR/ImfOutputFile.h
A opencv/opencv/3rdparty/include/OpenEXR/ImfInt64.h
A opencv/opencv/3rdparty/include/OpenEXR/ImfChannelList.h
A opencv/opencv/3rdparty/include/OpenEXR/ImathExc.h
A opencv/opencv/3rdparty/include/OpenEXR/ImfKeyCodeAttribute.h
A opencv/opencv/3rdparty/include/OpenEXR/ImfLineOrderAttribute.h
A opencv/opencv/3rdparty/include/OpenEXR/OpenEXRConfig.h
A opencv/opencv/3rdparty/include/OpenEXR/ImfBoxAttribute.h
A opencv/opencv/3rdparty/include/OpenEXR/IlmThread.h
A opencv/opencv/3rdparty/include/OpenEXR/ImathLine.h
A opencv/opencv/3rdparty/include/OpenEXR/ImfName.h
A opencv/opencv/3rdparty/include/OpenEXR/ImathLineAlgo.h
A opencv/opencv/3rdparty/include/OpenEXR/ImfPixelType.h
A opencv/opencv/3rdparty/include/OpenEXR/ImathHalfLimits.h
A opencv/opencv/3rdparty/include/OpenEXR/IexThrowErrnoExc.h
A opencv/opencv/3rdparty/include/OpenEXR/ImfKeyCode.h
A opencv/opencv/3rdparty/include/OpenEXR/ImfLineOrder.h
A opencv/opencv/3rdparty/include/OpenEXR/IexBaseExc.h
A opencv/opencv/3rdparty/include/OpenEXR/ImfEnvmap.h
A opencv/opencv/3rdparty/include/OpenEXR/ImfChannelListAttribute.h
A opencv/opencv/3rdparty/include/OpenEXR/ImathFrustum.h
A opencv/opencv/3rdparty/include/OpenEXR/ImathRoots.h
A opencv/opencv/3rdparty/include/OpenEXR/ImfInputFile.h
A opencv/opencv/3rdparty/include/OpenEXR/halfLimits.h
A opencv/opencv/3rdparty/include/OpenEXR/IlmThreadMutex.h
A opencv/opencv/3rdparty/include/OpenEXR/ImfVecAttribute.h
A opencv/opencv/3rdparty/include/OpenEXR/ImathQuat.h
A opencv/opencv/3rdparty/include/OpenEXR/ImathEuler.h
A opencv/opencv/3rdparty/include/OpenEXR/ImfAttribute.h
A opencv/opencv/3rdparty/include/OpenEXR/ImathColor.h
A opencv/opencv/3rdparty/include/OpenEXR/ImathColorAlgo.h
A opencv/opencv/3rdparty/include/OpenEXR/ImfTimeCodeAttribute.h
A opencv/opencv/3rdparty/include/OpenEXR/ImathFun.h
A opencv/opencv/3rdparty/include/OpenEXR/ImathMath.h
A opencv/opencv/3rdparty/include/OpenEXR/ImfConvert.h
A opencv/opencv/3rdparty/include/OpenEXR/IlmThreadSemaphore.h
A opencv/opencv/3rdparty/include/OpenEXR/ImathFrame.h
A opencv/opencv/3rdparty/include/OpenEXR/ImfHuf.h
A opencv/opencv/3rdparty/include/OpenEXR/ImfFrameBuffer.h
A opencv/opencv/3rdparty/include/OpenEXR/ImfHeader.h
A opencv/opencv/3rdparty/include/OpenEXR/ImfMatrixAttribute.h
A opencv/opencv/3rdparty/include/OpenEXR/ImfFloatAttribute.h
A opencv/opencv/3rdparty/include/OpenEXR/Iex.h
A opencv/opencv/3rdparty/include/OpenEXR/ImathMatrix.h
A opencv/opencv/3rdparty/include/OpenEXR/ImfWav.h
A opencv/opencv/3rdparty/include/OpenEXR/ImathMatrixAlgo.h
A opencv/opencv/3rdparty/include/OpenEXR/ImfCompression.h
A opencv/opencv/3rdparty/include/OpenEXR/ImfTileDescription.h
A opencv/opencv/3rdparty/include/OpenEXR/IexMathExc.h
A opencv/opencv/3rdparty/include/OpenEXR/ImfLut.h
A opencv/opencv/3rdparty/include/OpenEXR/ImathRandom.h
A opencv/opencv/3rdparty/include/OpenEXR/IlmThreadPool.h
A opencv/opencv/3rdparty/include/OpenEXR/ImfStandardAttributes.h
A opencv/opencv/3rdparty/include/OpenEXR/ImathInterval.h
A opencv/opencv/3rdparty/include/OpenEXR/ImathSphere.h
A opencv/opencv/3rdparty/include/OpenEXR/ImfArray.h
A opencv/opencv/3rdparty/include/OpenEXR/ImathGLU.h
A opencv/opencv/3rdparty/include/OpenEXR/ImfOpaqueAttribute.h
A opencv/opencv/3rdparty/include/OpenEXR/half.h
A opencv/opencv/3rdparty/include/OpenEXR/ImfTiledInputFile.h
A opencv/opencv/3rdparty/include/OpenEXR/ImfStdIO.h
A opencv/opencv/3rdparty/include/OpenEXR/ImfPreviewImage.h
A opencv/opencv/3rdparty/include/OpenEXR/ImathPlane.h
A opencv/opencv/3rdparty/include/OpenEXR/ImathLimits.h
A opencv/opencv/3rdparty/include/OpenEXR/ImfStringAttribute.h
A opencv/opencv/3rdparty/include/OpenEXR/ImfChromaticitiesAttribute.h
A opencv/opencv/3rdparty/include/pngconf.h
A opencv/opencv/3rdparty/include/jmorecfg.h
A opencv/opencv/3rdparty/include/clapack.h
A opencv/opencv/3rdparty/include/jasper
A opencv/opencv/3rdparty/include/jasper/jas_icc.h
A opencv/opencv/3rdparty/include/jasper/jas_cm.h
A opencv/opencv/3rdparty/include/jasper/jas_getopt.h
A opencv/opencv/3rdparty/include/jasper/jas_tmr.h
A opencv/opencv/3rdparty/include/jasper/jas_init.h
A opencv/opencv/3rdparty/include/jasper/jas_types.h
A opencv/opencv/3rdparty/include/jasper/jas_config.h
A opencv/opencv/3rdparty/include/jasper/jas_string.h
A opencv/opencv/3rdparty/include/jasper/jas_malloc.h
A opencv/opencv/3rdparty/include/jasper/jas_tvp.h
A opencv/opencv/3rdparty/include/jasper/jas_config.h.in
A opencv/opencv/3rdparty/include/jasper/jas_image.h
A opencv/opencv/3rdparty/include/jasper/jas_version.h
A opencv/opencv/3rdparty/include/jasper/jas_debug.h
A opencv/opencv/3rdparty/include/jasper/jas_fix.h
A opencv/opencv/3rdparty/include/jasper/jas_config2.h
A opencv/opencv/3rdparty/include/jasper/jasper.h
A opencv/opencv/3rdparty/include/jasper/jas_seq.h
A opencv/opencv/3rdparty/include/jasper/jas_math.h
A opencv/opencv/3rdparty/include/jasper/jas_stream.h
A opencv/opencv/3rdparty/include/zlib.h
A opencv/opencv/3rdparty/include/msc_stdint.h
A opencv/opencv/3rdparty/include/f2c.h
A opencv/opencv/3rdparty/include/jpeglib.h
A opencv/opencv/3rdparty/include/ffmpeg_
A opencv/opencv/3rdparty/include/ffmpeg_/sha1.h
A opencv/opencv/3rdparty/include/ffmpeg_/adler32.h
A opencv/opencv/3rdparty/include/ffmpeg_/avstring.h
A opencv/opencv/3rdparty/include/ffmpeg_/integer.h
A opencv/opencv/3rdparty/include/ffmpeg_/avio.h
A opencv/opencv/3rdparty/include/ffmpeg_/mathematics.h
A opencv/opencv/3rdparty/include/ffmpeg_/opt.h
A opencv/opencv/3rdparty/include/ffmpeg_/avcodec.h
A opencv/opencv/3rdparty/include/ffmpeg_/avutil.h
A opencv/opencv/3rdparty/include/ffmpeg_/lzo.h
A opencv/opencv/3rdparty/include/ffmpeg_/rtp.h
A opencv/opencv/3rdparty/include/ffmpeg_/rtspcodes.h
A opencv/opencv/3rdparty/include/ffmpeg_/pixfmt.h
A opencv/opencv/3rdparty/include/ffmpeg_/crc.h
A opencv/opencv/3rdparty/include/ffmpeg_/rational.h
A opencv/opencv/3rdparty/include/ffmpeg_/imgconvert.h
A opencv/opencv/3rdparty/include/ffmpeg_/xvmc.h
A opencv/opencv/3rdparty/include/ffmpeg_/mem.h
A opencv/opencv/3rdparty/include/ffmpeg_/avformat.h
A opencv/opencv/3rdparty/include/ffmpeg_/vdpau.h
A opencv/opencv/3rdparty/include/ffmpeg_/random.h
A opencv/opencv/3rdparty/include/ffmpeg_/log.h
A opencv/opencv/3rdparty/include/ffmpeg_/fifo.h
A opencv/opencv/3rdparty/include/ffmpeg_/base64.h
A opencv/opencv/3rdparty/include/ffmpeg_/md5.h
A opencv/opencv/3rdparty/include/ffmpeg_/intfloat_readwrite.h
A opencv/opencv/3rdparty/include/ffmpeg_/avdevice.h
A opencv/opencv/3rdparty/include/ffmpeg_/rgb2rgb.h
A opencv/opencv/3rdparty/include/ffmpeg_/common.h
A opencv/opencv/3rdparty/include/ffmpeg_/rtsp.h
A opencv/opencv/3rdparty/include/zconf.h
A opencv/opencv/3rdparty/include/jconfig.h
A opencv/opencv/3rdparty/include/tiffio.h
A opencv/opencv/3rdparty/include/msc_inttypes.h
A opencv/opencv/3rdparty/include/cblas.h
A opencv/opencv/3rdparty/include/png.h
A opencv/opencv/3rdparty/include/videoInput.h
A opencv/opencv/3rdparty/include/tiffvers.h
A opencv/opencv/3rdparty/include/tiff.h
A opencv/opencv/3rdparty/lib
A opencv/opencv/3rdparty/lib/Half.lib
A opencv/opencv/3rdparty/lib/IlmImf.lib
A opencv/opencv/3rdparty/lib/libmsvcrt_.a
A opencv/opencv/3rdparty/lib/libmingwex_.a
A opencv/opencv/3rdparty/lib/libavformat.a
A opencv/opencv/3rdparty/lib/libmsvcrtd_.a
A opencv/opencv/3rdparty/lib/libcoldname_.a
A opencv/opencv/3rdparty/lib/Iex.lib
A opencv/opencv/3rdparty/lib/videoInput.lib
A opencv/opencv/3rdparty/lib/libavdevice.a
A opencv/opencv/3rdparty/lib/libwsock32_.a
A opencv/opencv/3rdparty/lib/libgcc_.a
A opencv/opencv/3rdparty/lib/Imath.lib
A opencv/opencv/3rdparty/lib/libmsvcr71_.a
A opencv/opencv/3rdparty/lib/libmsvcr80_.a
A opencv/opencv/3rdparty/lib/libmsvcr90_.a
A opencv/opencv/3rdparty/lib/libavutil.a
A opencv/opencv/3rdparty/lib/libavcodec.a
A opencv/opencv/3rdparty/lib/libmsvcr80d_.a
A opencv/opencv/3rdparty/lib/libmsvcr71d_.a
A opencv/opencv/3rdparty/lib/libmsvcr90d_.a
A opencv/opencv/3rdparty/lib/IlmThread.lib
A opencv/opencv/3rdparty/Makefile.am
A opencv/opencv/3rdparty/lapack
A opencv/opencv/3rdparty/lapack/dpotrf.c
A opencv/opencv/3rdparty/lapack/slals0.c
A opencv/opencv/3rdparty/lapack/dlalsd.c
A opencv/opencv/3rdparty/lapack/slassq.c
A opencv/opencv/3rdparty/lapack/slasq5.c
A opencv/opencv/3rdparty/lapack/dsytd2.c
A opencv/opencv/3rdparty/lapack/dsytrd.c
A opencv/opencv/3rdparty/lapack/sstebz.c
A opencv/opencv/3rdparty/lapack/dlaeda.c
A opencv/opencv/3rdparty/lapack/slaed5.c
A opencv/opencv/3rdparty/lapack/sorm2l.c
A opencv/opencv/3rdparty/lapack/slarfg.c
A opencv/opencv/3rdparty/lapack/slas2.c
A opencv/opencv/3rdparty/lapack/slamrg.c
A opencv/opencv/3rdparty/lapack/dscal.c
A opencv/opencv/3rdparty/lapack/dlasq2.c
A opencv/opencv/3rdparty/lapack/slasd1.c
A opencv/opencv/3rdparty/lapack/slarre.c
A opencv/opencv/3rdparty/lapack/sgetrf.c
A opencv/opencv/3rdparty/lapack/dlaswp.c
A opencv/opencv/3rdparty/lapack/dlaed2.c
A opencv/opencv/3rdparty/lapack/slaev2.c
A opencv/opencv/3rdparty/lapack/dormlq.c
A opencv/opencv/3rdparty/lapack/dlazq4.c
A opencv/opencv/3rdparty/lapack/dorml2.c
A opencv/opencv/3rdparty/lapack/dlarrb.c
A opencv/opencv/3rdparty/lapack/dlabad.c
A opencv/opencv/3rdparty/lapack/drot.c
A opencv/opencv/3rdparty/lapack/dlarft.c
A opencv/opencv/3rdparty/lapack/dlartg.c
A opencv/opencv/3rdparty/lapack/dlasd6.c
A opencv/opencv/3rdparty/lapack/sstemr.c
A opencv/opencv/3rdparty/lapack/dlarrj.c
A opencv/opencv/3rdparty/lapack/ssyr2.c
A opencv/opencv/3rdparty/lapack/dtrtrs.c
A opencv/opencv/3rdparty/lapack/dgeqr2.c
A opencv/opencv/3rdparty/lapack/dlarrr.c
A opencv/opencv/3rdparty/lapack/sgesv.c
A opencv/opencv/3rdparty/lapack/dgetrs.c
A opencv/opencv/3rdparty/lapack/dpotf2.c
A opencv/opencv/3rdparty/lapack/dsymv.c
A opencv/opencv/3rdparty/lapack/dormqr.c
A opencv/opencv/3rdparty/lapack/slanst.c
A opencv/opencv/3rdparty/lapack/sorglq.c
A opencv/opencv/3rdparty/lapack/slasda.c
A opencv/opencv/3rdparty/lapack/sorgl2.c
A opencv/opencv/3rdparty/lapack/dtrti2.c
A opencv/opencv/3rdparty/lapack/slasq6.c
A opencv/opencv/3rdparty/lapack/dlaset.c
A opencv/opencv/3rdparty/lapack/slaed6.c
A opencv/opencv/3rdparty/lapack/dger.c
A opencv/opencv/3rdparty/lapack/dnrm2.c
A opencv/opencv/3rdparty/lapack/dlasyf.c
A opencv/opencv/3rdparty/lapack/slasr.c
A opencv/opencv/3rdparty/lapack/daxpy.c
A opencv/opencv/3rdparty/lapack/dlasq3.c
A opencv/opencv/3rdparty/lapack/slasdq.c
A opencv/opencv/3rdparty/lapack/slasd2.c
A opencv/opencv/3rdparty/lapack/dgemm.c
A opencv/opencv/3rdparty/lapack/slarrf.c
A opencv/opencv/3rdparty/lapack/dlansy.c
A opencv/opencv/3rdparty/lapack/sgetf2.c
A opencv/opencv/3rdparty/lapack/dlaed3.c
A opencv/opencv/3rdparty/lapack/s_copy.c
A opencv/opencv/3rdparty/lapack/scopy.c
A opencv/opencv/3rdparty/lapack/dlaruv.c
A opencv/opencv/3rdparty/lapack/s_cmp.c
A opencv/opencv/3rdparty/lapack/dlagtf.c
A opencv/opencv/3rdparty/lapack/strmm.c
A opencv/opencv/3rdparty/lapack/dorm2r.c
A opencv/opencv/3rdparty/lapack/dlarrc.c
A opencv/opencv/3rdparty/lapack/slasrt.c
A opencv/opencv/3rdparty/lapack/slarrv.c
A opencv/opencv/3rdparty/lapack/sorgqr.c
A opencv/opencv/3rdparty/lapack/dlasd7.c
A opencv/opencv/3rdparty/lapack/slalsa.c
A opencv/opencv/3rdparty/lapack/dlarrk.c
A opencv/opencv/3rdparty/lapack/isamax.c
A opencv/opencv/3rdparty/lapack/dstein.c
A opencv/opencv/3rdparty/lapack/dlaisnan.c
A opencv/opencv/3rdparty/lapack/dlaneg.c
A opencv/opencv/3rdparty/lapack/spotrs.c
A opencv/opencv/3rdparty/lapack/sgelq2.c
A opencv/opencv/3rdparty/lapack/sswap.c
A opencv/opencv/3rdparty/lapack/dsteqr.c
A opencv/opencv/3rdparty/lapack/dgelqf.c
A opencv/opencv/3rdparty/lapack/sgebrd.c
A opencv/opencv/3rdparty/lapack/sgebd2.c
A opencv/opencv/3rdparty/lapack/sdot.c
A opencv/opencv/3rdparty/lapack/dsytrf.c
A opencv/opencv/3rdparty/lapack/xerbla.c
A opencv/opencv/3rdparty/lapack/dsyr2k.c
A opencv/opencv/3rdparty/lapack/sorg2r.c
A opencv/opencv/3rdparty/lapack/slaed7.c
A opencv/opencv/3rdparty/lapack/dormbr.c
A opencv/opencv/3rdparty/lapack/sormtr.c
A opencv/opencv/3rdparty/lapack/sgeqrf.c
A opencv/opencv/3rdparty/lapack/dlabrd.c
A opencv/opencv/3rdparty/lapack/dlasq4.c
A opencv/opencv/3rdparty/lapack/slasd3.c
A opencv/opencv/3rdparty/lapack/dlar1v.c
A opencv/opencv/3rdparty/lapack/dgesdd.c
A opencv/opencv/3rdparty/lapack/dlauu2.c
A opencv/opencv/3rdparty/lapack/dlaed4.c
A opencv/opencv/3rdparty/lapack/dgemv.c
A opencv/opencv/3rdparty/lapack/slamch.c
A opencv/opencv/3rdparty/lapack/dlasd0.c
A opencv/opencv/3rdparty/lapack/dlarrd.c
A opencv/opencv/3rdparty/lapack/strsm.c
A opencv/opencv/3rdparty/lapack/dasum.c
A opencv/opencv/3rdparty/lapack/ssyrk.c
A opencv/opencv/3rdparty/lapack/strmv.c
A opencv/opencv/3rdparty/lapack/dbdsqr.c
A opencv/opencv/3rdparty/lapack/dlasd8.c
A opencv/opencv/3rdparty/lapack/slascl.c
A opencv/opencv/3rdparty/lapack/dlange.c
A opencv/opencv/3rdparty/lapack/ssyevr.c
A opencv/opencv/3rdparty/lapack/dormql.c
A opencv/opencv/3rdparty/lapack/sorgbr.c
A opencv/opencv/3rdparty/lapack/dpotri.c
A opencv/opencv/3rdparty/lapack/dgelsd.c
A opencv/opencv/3rdparty/lapack/dlas2.c
A opencv/opencv/3rdparty/lapack/slae2.c
A opencv/opencv/3rdparty/lapack/slauum.c
A opencv/opencv/3rdparty/lapack/slaed0.c
A opencv/opencv/3rdparty/lapack/slarfb.c
A opencv/opencv/3rdparty/lapack/slapy2.c
A opencv/opencv/3rdparty/lapack/dsytf2.c
A opencv/opencv/3rdparty/lapack/sgels.c
A opencv/opencv/3rdparty/lapack/dlals0.c
A opencv/opencv/3rdparty/lapack/slaebz.c
A opencv/opencv/3rdparty/lapack/slaed8.c
A opencv/opencv/3rdparty/lapack/strtri.c
A opencv/opencv/3rdparty/lapack/dlassq.c
A opencv/opencv/3rdparty/lapack/slatrd.c
A opencv/opencv/3rdparty/lapack/dlasq5.c
A opencv/opencv/3rdparty/lapack/s_cat.c
A opencv/opencv/3rdparty/lapack/slasd4.c
A opencv/opencv/3rdparty/lapack/dstebz.c
A opencv/opencv/3rdparty/lapack/slacpy.c
A opencv/opencv/3rdparty/lapack/sgetri.c
A opencv/opencv/3rdparty/lapack/slagts.c
A opencv/opencv/3rdparty/lapack/dlaed5.c
A opencv/opencv/3rdparty/lapack/dorm2l.c
A opencv/opencv/3rdparty/lapack/dlarfg.c
A opencv/opencv/3rdparty/lapack/dsyr2.c
A opencv/opencv/3rdparty/lapack/slarnv.c
A opencv/opencv/3rdparty/lapack/dlamrg.c
A opencv/opencv/3rdparty/lapack/slarf.c
A opencv/opencv/3rdparty/lapack/dlasd1.c
A opencv/opencv/3rdparty/lapack/dgesv.c
A opencv/opencv/3rdparty/lapack/dlarre.c
A opencv/opencv/3rdparty/lapack/dgetrf.c
A opencv/opencv/3rdparty/lapack/dlaev2.c
A opencv/opencv/3rdparty/lapack/dstemr.c
A opencv/opencv/3rdparty/lapack/pow_ri.c
A opencv/opencv/3rdparty/lapack/slasq1.c
A opencv/opencv/3rdparty/lapack/dlasr.c
A opencv/opencv/3rdparty/lapack/precomp.c
A opencv/opencv/3rdparty/lapack/ssterf.c
A opencv/opencv/3rdparty/lapack/slaed1.c
A opencv/opencv/3rdparty/lapack/slazq3.c
A opencv/opencv/3rdparty/lapack/dcopy.c
A opencv/opencv/3rdparty/lapack/slaed9.c
A opencv/opencv/3rdparty/lapack/dtrmm.c
A opencv/opencv/3rdparty/lapack/slarra.c
A opencv/opencv/3rdparty/lapack/dlanst.c
A opencv/opencv/3rdparty/lapack/COPYING
A opencv/opencv/3rdparty/lapack/dorglq.c
A opencv/opencv/3rdparty/lapack/dlasda.c
A opencv/opencv/3rdparty/lapack/dorgl2.c
A opencv/opencv/3rdparty/lapack/dlasq6.c
A opencv/opencv/3rdparty/lapack/ddot.c
A opencv/opencv/3rdparty/lapack/slasdt.c
A opencv/opencv/3rdparty/lapack/slasd5.c
A opencv/opencv/3rdparty/lapack/dlaed6.c
A opencv/opencv/3rdparty/lapack/sbdsdc.c
A opencv/opencv/3rdparty/lapack/idamax.c
A opencv/opencv/3rdparty/lapack/dlasdq.c
A opencv/opencv/3rdparty/lapack/dlasd2.c
A opencv/opencv/3rdparty/lapack/slasv2.c
A opencv/opencv/3rdparty/lapack/dlarrf.c
A opencv/opencv/3rdparty/lapack/dgetf2.c
A opencv/opencv/3rdparty/lapack/spotrf.c
A opencv/opencv/3rdparty/lapack/dswap.c
A opencv/opencv/3rdparty/lapack/slalsd.c
A opencv/opencv/3rdparty/lapack/ssytrd.c
A opencv/opencv/3rdparty/lapack/ssytd2.c
A opencv/opencv/3rdparty/lapack/dlasrt.c
A opencv/opencv/3rdparty/lapack/slaeda.c
A opencv/opencv/3rdparty/lapack/dlarrv.c
A opencv/opencv/3rdparty/lapack/dorgqr.c
A opencv/opencv/3rdparty/lapack/dlalsa.c
A opencv/opencv/3rdparty/lapack/f77_aloc.c
A opencv/opencv/3rdparty/lapack/slasq2.c
A opencv/opencv/3rdparty/lapack/slaswp.c
A opencv/opencv/3rdparty/lapack/slaed2.c
A opencv/opencv/3rdparty/lapack/dpotrs.c
A opencv/opencv/3rdparty/lapack/sormlq.c
A opencv/opencv/3rdparty/lapack/sorml2.c
A opencv/opencv/3rdparty/lapack/slazq4.c
A opencv/opencv/3rdparty/lapack/dgelq2.c
A opencv/opencv/3rdparty/lapack/dsytri.c
A opencv/opencv/3rdparty/lapack/slarrb.c
A opencv/opencv/3rdparty/lapack/slabad.c
A opencv/opencv/3rdparty/lapack/dgebd2.c
A opencv/opencv/3rdparty/lapack/dgebrd.c
A opencv/opencv/3rdparty/lapack/dtrsm.c
A opencv/opencv/3rdparty/lapack/slarft.c
A opencv/opencv/3rdparty/lapack/dsyrk.c
A opencv/opencv/3rdparty/lapack/dtrmv.c
A opencv/opencv/3rdparty/lapack/slartg.c
A opencv/opencv/3rdparty/lapack/slasd6.c
A opencv/opencv/3rdparty/lapack/slarrj.c
A opencv/opencv/3rdparty/lapack/dorg2r.c
A opencv/opencv/3rdparty/lapack/dlaed7.c
A opencv/opencv/3rdparty/lapack/strtrs.c
A opencv/opencv/3rdparty/lapack/sgeqr2.c
A opencv/opencv/3rdparty/lapack/sscal.c
A opencv/opencv/3rdparty/lapack/slarrr.c
A opencv/opencv/3rdparty/lapack/dormtr.c
A opencv/opencv/3rdparty/lapack/sgetrs.c
A opencv/opencv/3rdparty/lapack/dgeqrf.c
A opencv/opencv/3rdparty/lapack/slaisnan.c
A opencv/opencv/3rdparty/lapack/dlasd3.c
A opencv/opencv/3rdparty/lapack/spotf2.c
A opencv/opencv/3rdparty/lapack/sormqr.c
A opencv/opencv/3rdparty/lapack/strti2.c
A opencv/opencv/3rdparty/lapack/dlae2.c
A opencv/opencv/3rdparty/lapack/dlamch.c
A opencv/opencv/3rdparty/lapack/iparmq.c
A opencv/opencv/3rdparty/lapack/slaset.c
A opencv/opencv/3rdparty/lapack/dgels.c
A opencv/opencv/3rdparty/lapack/dlascl.c
A opencv/opencv/3rdparty/lapack/slasq3.c
A opencv/opencv/3rdparty/lapack/slansy.c
A opencv/opencv/3rdparty/lapack/slaed3.c
A opencv/opencv/3rdparty/lapack/dsyevr.c
A opencv/opencv/3rdparty/lapack/slaruv.c
A opencv/opencv/3rdparty/lapack/ilaenv.c
A opencv/opencv/3rdparty/lapack/dorgbr.c
A opencv/opencv/3rdparty/lapack/slagtf.c
A opencv/opencv/3rdparty/lapack/ssymv.c
A opencv/opencv/3rdparty/lapack/sorm2r.c
A opencv/opencv/3rdparty/lapack/pow_ii.c
A opencv/opencv/3rdparty/lapack/slarrc.c
A opencv/opencv/3rdparty/lapack/srot.c
A opencv/opencv/3rdparty/lapack/dlauum.c
A opencv/opencv/3rdparty/lapack/dlarf.c
A opencv/opencv/3rdparty/lapack/dlaed0.c
A opencv/opencv/3rdparty/lapack/dlarfb.c
A opencv/opencv/3rdparty/lapack/dlapy2.c
A opencv/opencv/3rdparty/lapack/slasd7.c
A opencv/opencv/3rdparty/lapack/slarrk.c
A opencv/opencv/3rdparty/lapack/dlaebz.c
A opencv/opencv/3rdparty/lapack/dlaed8.c
A opencv/opencv/3rdparty/lapack/snrm2.c
A opencv/opencv/3rdparty/lapack/saxpy.c
A opencv/opencv/3rdparty/lapack/sstein.c
A opencv/opencv/3rdparty/lapack/sgemm.c
A opencv/opencv/3rdparty/lapack/dtrtri.c
A opencv/opencv/3rdparty/lapack/slaneg.c
A opencv/opencv/3rdparty/lapack/dlatrd.c
A opencv/opencv/3rdparty/lapack/dlasd4.c
A opencv/opencv/3rdparty/lapack/dlacpy.c
A opencv/opencv/3rdparty/lapack/dlagts.c
A opencv/opencv/3rdparty/lapack/dgetri.c
A opencv/opencv/3rdparty/lapack/sgelqf.c
A opencv/opencv/3rdparty/lapack/pow_di.c
A opencv/opencv/3rdparty/lapack/ssteqr.c
A opencv/opencv/3rdparty/lapack/dlarnv.c
A opencv/opencv/3rdparty/lapack/ssyr2k.c
A opencv/opencv/3rdparty/lapack/sger.c
A opencv/opencv/3rdparty/lapack/sormbr.c
A opencv/opencv/3rdparty/lapack/slasq4.c
A opencv/opencv/3rdparty/lapack/slabrd.c
A opencv/opencv/3rdparty/lapack/slar1v.c
A opencv/opencv/3rdparty/lapack/sgesdd.c
A opencv/opencv/3rdparty/lapack/slauu2.c
A opencv/opencv/3rdparty/lapack/slaed4.c
A opencv/opencv/3rdparty/lapack/ieeeck.c
A opencv/opencv/3rdparty/lapack/dlasq1.c
A opencv/opencv/3rdparty/lapack/slasd0.c
A opencv/opencv/3rdparty/lapack/slarrd.c
A opencv/opencv/3rdparty/lapack/dsterf.c
A opencv/opencv/3rdparty/lapack/dsytrs.c
A opencv/opencv/3rdparty/lapack/dlaed1.c
A opencv/opencv/3rdparty/lapack/CMakeLists.txt
A opencv/opencv/3rdparty/lapack/slasd8.c
A opencv/opencv/3rdparty/lapack/sbdsqr.c
A opencv/opencv/3rdparty/lapack/dlazq3.c
A opencv/opencv/3rdparty/lapack/dlaed9.c
A opencv/opencv/3rdparty/lapack/dlarra.c
A opencv/opencv/3rdparty/lapack/slange.c
A opencv/opencv/3rdparty/lapack/dlasdt.c
A opencv/opencv/3rdparty/lapack/dlasd5.c
A opencv/opencv/3rdparty/lapack/sormql.c
A opencv/opencv/3rdparty/lapack/spotri.c
A opencv/opencv/3rdparty/lapack/sgemv.c
A opencv/opencv/3rdparty/lapack/sgelsd.c
A opencv/opencv/3rdparty/lapack/dsyr.c
A opencv/opencv/3rdparty/lapack/dbdsdc.c
A opencv/opencv/3rdparty/lapack/sasum.c
A opencv/opencv/3rdparty/lapack/dlasv2.c
A opencv/opencv/3rdparty/libjasper
A opencv/opencv/3rdparty/libjasper/jas_getopt.c
A opencv/opencv/3rdparty/libjasper/jpc_mqenc.c
A opencv/opencv/3rdparty/libjasper/jpc_tsfb.h
A opencv/opencv/3rdparty/libjasper/jas_init.c
A opencv/opencv/3rdparty/libjasper/jpc_enc.c
A opencv/opencv/3rdparty/libjasper/jpc_cs.c
A opencv/opencv/3rdparty/libjasper/jpc_t2dec.h
A opencv/opencv/3rdparty/libjasper/jas_string.c
A opencv/opencv/3rdparty/libjasper/jas_malloc.c
A opencv/opencv/3rdparty/libjasper/jpc_mqenc.h
A opencv/opencv/3rdparty/libjasper/jpc_enc.h
A opencv/opencv/3rdparty/libjasper/jpc_cs.h
A opencv/opencv/3rdparty/libjasper/jas_tvp.c
A opencv/opencv/3rdparty/libjasper/jpc_t1enc.c
A opencv/opencv/3rdparty/libjasper/jpc_t2cod.c
A opencv/opencv/3rdparty/libjasper/jpc_util.c
A opencv/opencv/3rdparty/libjasper/jpc_t1enc.h
A opencv/opencv/3rdparty/libjasper/jpc_t2cod.h
A opencv/opencv/3rdparty/libjasper/jpc_util.h
A opencv/opencv/3rdparty/libjasper/jp2_enc.c
A opencv/opencv/3rdparty/libjasper/jpc_qmfb.c
A opencv/opencv/3rdparty/libjasper/jas_version.c
A opencv/opencv/3rdparty/libjasper/jpc_mqdec.c
A opencv/opencv/3rdparty/libjasper/jpc_math.c
A opencv/opencv/3rdparty/libjasper/jas_seq.c
A opencv/opencv/3rdparty/libjasper/jas_iccdata.c
A opencv/opencv/3rdparty/libjasper/jpc_qmfb.h
A opencv/opencv/3rdparty/libjasper/jpc_flt.h
A opencv/opencv/3rdparty/libjasper/jpc_dec.c
A opencv/opencv/3rdparty/libjasper/jas_stream.c
A opencv/opencv/3rdparty/libjasper/jpc_mqdec.h
A opencv/opencv/3rdparty/libjasper/jpc_math.h
A opencv/opencv/3rdparty/libjasper/jpc_dec.h
A opencv/opencv/3rdparty/libjasper/CMakeLists.txt
A opencv/opencv/3rdparty/libjasper/jpc_t1dec.c
A opencv/opencv/3rdparty/libjasper/jas_tmr.c
A opencv/opencv/3rdparty/libjasper/jpc_mqcod.c
A opencv/opencv/3rdparty/libjasper/jpc_bs.c
A opencv/opencv/3rdparty/libjasper/LICENSE
A opencv/opencv/3rdparty/libjasper/jpc_t1dec.h
A opencv/opencv/3rdparty/libjasper/jpc_mqcod.h
A opencv/opencv/3rdparty/libjasper/jpc_bs.h
A opencv/opencv/3rdparty/libjasper/jpc_cod.h
A opencv/opencv/3rdparty/libjasper/jp2_dec.c
A opencv/opencv/3rdparty/libjasper/jpc_t1cod.c
A opencv/opencv/3rdparty/libjasper/jpc_t2enc.c
A opencv/opencv/3rdparty/libjasper/jp2_dec.h
A opencv/opencv/3rdparty/libjasper/jpc_t1cod.h
A opencv/opencv/3rdparty/libjasper/README
A opencv/opencv/3rdparty/libjasper/jpc_t2enc.h
A opencv/opencv/3rdparty/libjasper/jas_image.c
A opencv/opencv/3rdparty/libjasper/jpc_mct.c
A opencv/opencv/3rdparty/libjasper/jp2_cod.c
A opencv/opencv/3rdparty/libjasper/jas_debug.c
A opencv/opencv/3rdparty/libjasper/jpc_mct.h
A opencv/opencv/3rdparty/libjasper/jp2_cod.h
A opencv/opencv/3rdparty/libjasper/jpc_fix.h
A opencv/opencv/3rdparty/libjasper/jpc_tagtree.c
A opencv/opencv/3rdparty/libjasper/jpc_tsfb.c
A opencv/opencv/3rdparty/libjasper/jas_icc.c
A opencv/opencv/3rdparty/libjasper/jas_cm.c
A opencv/opencv/3rdparty/libjasper/jpc_tagtree.h
A opencv/opencv/3rdparty/libjasper/jpc_t2dec.c
A opencv/opencv/3rdparty/libpng
A opencv/opencv/3rdparty/libpng/pngerror.c
A opencv/opencv/3rdparty/libpng/pngrio.c
A opencv/opencv/3rdparty/libpng/pngwrite.c
A opencv/opencv/3rdparty/libpng/pngwtran.c
A opencv/opencv/3rdparty/libpng/pngpread.c
A opencv/opencv/3rdparty/libpng/pngset.c
A opencv/opencv/3rdparty/libpng/pngwio.c
A opencv/opencv/3rdparty/libpng/pngvcrd.c
A opencv/opencv/3rdparty/libpng/pngrutil.c
A opencv/opencv/3rdparty/libpng/pngwutil.c
A opencv/opencv/3rdparty/libpng/README
A opencv/opencv/3rdparty/libpng/pngread.c
A opencv/opencv/3rdparty/libpng/pngmem.c
A opencv/opencv/3rdparty/libpng/png.c
A opencv/opencv/3rdparty/libpng/pngget.c
A opencv/opencv/3rdparty/libpng/pngtest.c
A opencv/opencv/3rdparty/libpng/pnggccrd.c
A opencv/opencv/3rdparty/libpng/pngrtran.c
A opencv/opencv/3rdparty/libpng/pngtrans.c
A opencv/opencv/3rdparty/libpng/CMakeLists.txt
A opencv/opencv/3rdparty/readme.txt
A opencv/opencv/3rdparty/libjpeg
A opencv/opencv/3rdparty/libjpeg/jddctmgr.c
A opencv/opencv/3rdparty/libjpeg/jdatadst.c
A opencv/opencv/3rdparty/libjpeg/jerror.c
A opencv/opencv/3rdparty/libjpeg/jmemansi.c
A opencv/opencv/3rdparty/libjpeg/jchuff.c
A opencv/opencv/3rdparty/libjpeg/jdtrans.c
A opencv/opencv/3rdparty/libjpeg/jdhuff.c
A opencv/opencv/3rdparty/libjpeg/jfdctfst.c
A opencv/opencv/3rdparty/libjpeg/jcmaster.c
A opencv/opencv/3rdparty/libjpeg/jerror.h
A opencv/opencv/3rdparty/libjpeg/jdmaster.c
A opencv/opencv/3rdparty/libjpeg/jchuff.h
A opencv/opencv/3rdparty/libjpeg/jidctfst.c
A opencv/opencv/3rdparty/libjpeg/jdhuff.h
A opencv/opencv/3rdparty/libjpeg/transupp.c
A opencv/opencv/3rdparty/libjpeg/jcparam.c
A opencv/opencv/3rdparty/libjpeg/jcinit.c
A opencv/opencv/3rdparty/libjpeg/transupp.h
A opencv/opencv/3rdparty/libjpeg/jquant1.c
A opencv/opencv/3rdparty/libjpeg/jquant2.c
A opencv/opencv/3rdparty/libjpeg/jcphuff.c
A opencv/opencv/3rdparty/libjpeg/jdct.h
A opencv/opencv/3rdparty/libjpeg/jccolor.c
A opencv/opencv/3rdparty/libjpeg/jdatasrc.c
A opencv/opencv/3rdparty/libjpeg/CMakeLists.txt
A opencv/opencv/3rdparty/libjpeg/jmemmgr.c
A opencv/opencv/3rdparty/libjpeg/jcmarker.c
A opencv/opencv/3rdparty/libjpeg/jcsample.c
A opencv/opencv/3rdparty/libjpeg/jdsample.c
A opencv/opencv/3rdparty/libjpeg/jdmarker.c
A opencv/opencv/3rdparty/libjpeg/jfdctflt.c
A opencv/opencv/3rdparty/libjpeg/jcapistd.c
A opencv/opencv/3rdparty/libjpeg/jdapistd.c
A opencv/opencv/3rdparty/libjpeg/jinclude.h
A opencv/opencv/3rdparty/libjpeg/jidctflt.c
A opencv/opencv/3rdparty/libjpeg/jctrans.c
A opencv/opencv/3rdparty/libjpeg/jversion.h
A opencv/opencv/3rdparty/libjpeg/jfdctint.c
A opencv/opencv/3rdparty/libjpeg/jpegint.h
A opencv/opencv/3rdparty/libjpeg/jidctint.c
A opencv/opencv/3rdparty/libjpeg/jcprepct.c
A opencv/opencv/3rdparty/libjpeg/jutils.c
A opencv/opencv/3rdparty/libjpeg/README
A opencv/opencv/3rdparty/libjpeg/jdinput.c
A opencv/opencv/3rdparty/libjpeg/jdmerge.c
A opencv/opencv/3rdparty/libjpeg/jccoefct.c
A opencv/opencv/3rdparty/libjpeg/jdcoefct.c
A opencv/opencv/3rdparty/libjpeg/jcomapi.c
A opencv/opencv/3rdparty/libjpeg/jdphuff.c
A opencv/opencv/3rdparty/libjpeg/jcmainct.c
A opencv/opencv/3rdparty/libjpeg/jidctred.c
A opencv/opencv/3rdparty/libjpeg/jdmainct.c
A opencv/opencv/3rdparty/libjpeg/jcapimin.c
A opencv/opencv/3rdparty/libjpeg/jdpostct.c
A opencv/opencv/3rdparty/libjpeg/jdapimin.c
A opencv/opencv/3rdparty/libjpeg/jdcolor.c
A opencv/opencv/3rdparty/libjpeg/jmemsys.h
A opencv/opencv/3rdparty/libjpeg/jcdctmgr.c
A opencv/opencv/3rdparty/CMakeLists.txt
A opencv/opencv/3rdparty/ilmimf
A opencv/opencv/3rdparty/ilmimf/LICENSE
A opencv/opencv/3rdparty/ilmimf/README
A opencv/opencv/Makefile.am
A opencv/opencv/aclocal.m4
A opencv/opencv_extra
A opencv/opencv_extra/3d
A opencv/opencv_extra/3d/createsamples3d
A opencv/opencv_extra/3d/createsamples3d/createsamples3d.cpp
A opencv/opencv_extra/3d/createsamples3d/createsamplesfromvideo.cpp
A opencv/opencv_extra/3d/createsamples3d/createsamples3d.h
A opencv/opencv_extra/3d/createsamples3d/_camera.yml
A opencv/opencv_extra/3d/createsamples3d/calibration.cpp
A opencv/opencv_extra/3d/createsamples3d/createsamplesfromvideo.h
A opencv/opencv_extra/3d/createsamples3d/readme.txt
A opencv/opencv_extra/3d/createsamples3d/args.yml
A opencv/opencv_extra/3d/createsamples3d/CMakeLists.txt
A opencv/opencv_extra/3d/createsamples3d/calibration.h
A opencv/opencv_extra/3d/createsamples3d/makefile
A opencv/opencv_extra/testdata
A opencv/opencv_extra/testdata/python
A opencv/opencv_extra/testdata/python/images
A opencv/opencv_extra/testdata/python/images/baboon.jpg
A opencv/opencv_extra/testdata/python/images/baboon.png
A opencv/opencv_extra/testdata/python/images/baboon_256x256.gif
A opencv/opencv_extra/testdata/python/images/cvCreateTrackbar.jpg
A opencv/opencv_extra/testdata/python/images/cvWaitKey.jpg
A opencv/opencv_extra/testdata/python/images/baboon.tiff
A opencv/opencv_extra/testdata/python/images/cvSetMouseCallback.jpg
A opencv/opencv_extra/testdata/python/images/baboon.ppm
A opencv/opencv_extra/testdata/python/images/QCIF_00.bmp
A opencv/opencv_extra/testdata/python/images/baboon_256x256.bmp
A opencv/opencv_extra/testdata/python/images/QCIF_01.bmp
A opencv/opencv_extra/testdata/python/images/QCIF_20.bmp
A opencv/opencv_extra/testdata/python/images/QCIF_02.bmp
A opencv/opencv_extra/testdata/python/images/QCIF_21.bmp
A opencv/opencv_extra/testdata/python/images/QCIF_03.bmp
A opencv/opencv_extra/testdata/python/images/baboon_256x256.tif
A opencv/opencv_extra/testdata/python/images/QCIF_04.bmp
A opencv/opencv_extra/testdata/python/images/QCIF_22.bmp
A opencv/opencv_extra/testdata/python/images/QCIF_05.bmp
A opencv/opencv_extra/testdata/python/images/QCIF_23.bmp
A opencv/opencv_extra/testdata/python/images/QCIF_06.bmp
A opencv/opencv_extra/testdata/python/images/QCIF_24.bmp
A opencv/opencv_extra/testdata/python/images/baboon.gif
A opencv/opencv_extra/testdata/python/images/QCIF_07.bmp
A opencv/opencv_extra/testdata/python/images/QCIF_25.bmp
A opencv/opencv_extra/testdata/python/images/QCIF_08.bmp
A opencv/opencv_extra/testdata/python/images/QCIF_26.bmp
A opencv/opencv_extra/testdata/python/images/QCIF_09.bmp
A opencv/opencv_extra/testdata/python/images/QCIF_27.bmp
A opencv/opencv_extra/testdata/python/images/baboon_256x256.tiff
A opencv/opencv_extra/testdata/python/images/QCIF_28.bmp
A opencv/opencv_extra/testdata/python/images/QCIF_29.bmp
A opencv/opencv_extra/testdata/python/images/baboon.bmp
A opencv/opencv_extra/testdata/python/images/cvShowImage.jpg
A opencv/opencv_extra/testdata/python/images/QCIF_10.bmp
A opencv/opencv_extra/testdata/python/images/QCIF_11.bmp
A opencv/opencv_extra/testdata/python/images/baboon_256x256.jpg
A opencv/opencv_extra/testdata/python/images/QCIF_12.bmp
A opencv/opencv_extra/testdata/python/images/QCIF_13.bmp
A opencv/opencv_extra/testdata/python/images/QCIF_14.bmp
A opencv/opencv_extra/testdata/python/images/QCIF_15.bmp
A opencv/opencv_extra/testdata/python/images/baboon_256x256.png
A opencv/opencv_extra/testdata/python/images/baboon_256x256.sr
A opencv/opencv_extra/testdata/python/images/QCIF_16.bmp
A opencv/opencv_extra/testdata/python/images/QCIF_17.bmp
A opencv/opencv_extra/testdata/python/images/QCIF_18.bmp
A opencv/opencv_extra/testdata/python/images/QCIF_19.bmp
A opencv/opencv_extra/testdata/python/images/baboon_256x256.ppm
A opencv/opencv_extra/testdata/python/videos
A opencv/opencv_extra/testdata/python/videos/wmv9.avi
A opencv/opencv_extra/testdata/python/videos/qcif_Y8.avi
A opencv/opencv_extra/testdata/python/videos/3gp.3gp
A opencv/opencv_extra/testdata/python/videos/qcif_YV12.avi
A opencv/opencv_extra/testdata/python/videos/uncompressed.avi
A opencv/opencv_extra/testdata/python/videos/qcif_YV16.avi
A opencv/opencv_extra/testdata/python/videos/cinepak.avi
A opencv/opencv_extra/testdata/python/videos/divx.avi
A opencv/opencv_extra/testdata/python/videos/qcif_YUY2.avi
A opencv/opencv_extra/testdata/python/videos/qcif_RGB.avi
A opencv/opencv_extra/testdata/python/videos/qcif_RGBA.avi
A opencv/opencv_extra/testdata/python/videos/qcif_YVU9.avi
A opencv/opencv_extra/testdata/python/videos/qcif_UYVY.avi
A opencv/opencv_extra/testdata/python/videos/bmp32.avi
A opencv/opencv_extra/testdata/python/videos/bmp24.avi
A opencv/opencv_extra/testdata/python/videos/dv_pal_progressive.dv
A opencv/opencv_extra/testdata/python/videos/huffyuv.avi
A opencv/opencv_extra/testdata/python/videos/mpeg4.mp4
A opencv/opencv_extra/testdata/python/videos/dv_pal_progressive.avi
A opencv/opencv_extra/testdata/python/videos/indeo.avi
A opencv/opencv_extra/testdata/cv
A opencv/opencv_extra/testdata/cv/cameracalibration
A opencv/opencv_extra/testdata/cv/cameracalibration/BoardStereoL1.jpg
A opencv/opencv_extra/testdata/cv/cameracalibration/BoardStereoL2.jpg
A opencv/opencv_extra/testdata/cv/cameracalibration/BoardStereoL3.jpg
A opencv/opencv_extra/testdata/cv/cameracalibration/BoardStereoL4.jpg
A opencv/opencv_extra/testdata/cv/cameracalibration/BoardStereoL5.jpg
A opencv/opencv_extra/testdata/cv/cameracalibration/BoardStereoL6.jpg
A opencv/opencv_extra/testdata/cv/cameracalibration/BoardStereoR1.jpg
A opencv/opencv_extra/testdata/cv/cameracalibration/BoardStereoR2.jpg
A opencv/opencv_extra/testdata/cv/cameracalibration/BoardStereoR3.jpg
A opencv/opencv_extra/testdata/cv/cameracalibration/BoardStereoR4.jpg
A opencv/opencv_extra/testdata/cv/cameracalibration/BoardStereoR5.jpg
A opencv/opencv_extra/testdata/cv/cameracalibration/BoardStereoR6.jpg
A opencv/opencv_extra/testdata/cv/cameracalibration/calib1.dat
A opencv/opencv_extra/testdata/cv/cameracalibration/chess1.jpg
A opencv/opencv_extra/testdata/cv/cameracalibration/chess2.jpg
A opencv/opencv_extra/testdata/cv/cameracalibration/chess3.jpg
A opencv/opencv_extra/testdata/cv/cameracalibration/chess4.jpg
A opencv/opencv_extra/testdata/cv/cameracalibration/chess5.jpg
A opencv/opencv_extra/testdata/cv/cameracalibration/chess6.jpg
A opencv/opencv_extra/testdata/cv/cameracalibration/chess7.jpg
A opencv/opencv_extra/testdata/cv/cameracalibration/chess8.jpg
A opencv/opencv_extra/testdata/cv/cameracalibration/chess9.jpg
A opencv/opencv_extra/testdata/cv/cameracalibration/chessboard_list.dat
A opencv/opencv_extra/testdata/cv/cameracalibration/chess_corners1.dat
A opencv/opencv_extra/testdata/cv/cameracalibration/chess_corners2.dat
A opencv/opencv_extra/testdata/cv/cameracalibration/chess_corners3.dat
A opencv/opencv_extra/testdata/cv/cameracalibration/chess_corners4.dat
A opencv/opencv_extra/testdata/cv/cameracalibration/chess_corners5.dat
A opencv/opencv_extra/testdata/cv/cameracalibration/chess_corners6.dat
A opencv/opencv_extra/testdata/cv/cameracalibration/chess_corners7.dat
A opencv/opencv_extra/testdata/cv/cameracalibration/chess_corners8.dat
A opencv/opencv_extra/testdata/cv/cameracalibration/chess_corners9.dat
A opencv/opencv_extra/testdata/cv/cameracalibration/datafiles.txt
A opencv/opencv_extra/testdata/cv/snakes
A opencv/opencv_extra/testdata/cv/snakes/ring.bmp
A opencv/opencv_extra/testdata/cv/snakes/ring.txt
A opencv/opencv_extra/testdata/cv/snakes/square.bmp
A opencv/opencv_extra/testdata/cv/snakes/square.txt
A opencv/opencv_extra/testdata/cv/optflow
A opencv/opencv_extra/testdata/cv/optflow/lk_prev.dat
A opencv/opencv_extra/testdata/cv/optflow/lk_next.dat
A opencv/opencv_extra/testdata/cv/optflow/rock_1.bmp
A opencv/opencv_extra/testdata/cv/optflow/rock_2.bmp
A opencv/opencv_extra/testdata/ml
A opencv/opencv_extra/testdata/ml/protocol.txt
A opencv/opencv_extra/testdata/ml/adult.data
A opencv/opencv_extra/testdata/ml/mushroom.data
A opencv/opencv_extra/testdata/ml/ringnorm.data
A opencv/opencv_extra/testdata/ml/spambase.data
A opencv/opencv_extra/testdata/ml/housing.data
A opencv/opencv_extra/testdata/ml/letter.data
A opencv/opencv_extra/testdata/ml/vehicle.data
A opencv/opencv_extra/testdata/ml/automobile.data
A opencv/opencv_extra/testdata/ml/abalone.data
A opencv/opencv_extra/testdata/ml/validation.xml
A opencv/opencv_extra/testdata/ml/car.data
A opencv/opencv_extra/testdata/ml/poletelecomm.data
A opencv/opencv_extra/testdata/ml/twonorm.data
A opencv/opencv_extra/testdata/ml/waveform.data
Checked out revision 1982.
3. 다운로드 받은 OpenCV 확인
%% port search opencv
opencv @1.0.0 (graphics, science)
Intel(R) Open Source Computer Vision Library
opencv is a library that is mainly aimed at real time computer
vision. Some example areas would be Human-Computer Interaction
(HCI), Object Identification, Segmentation and Recognition, Face
Recognition, Gesture Recognition, Motion Tracking, Ego Motion,
Motion Understanding, Structure From Motion (SFM), and Mobile
Robotics.
Homepage: http://www.intel.com/technology/computing/opencv/
공식 위키의 안내대로 OpenCV를 Xcode에서 부를 수 있도록 Mac OS X용 frameworks를 만들기 위해,
생성된 opencv 폴더 아래에서 make_frameworks.sh가 opencv 폴더에 있음을 확인하고 실행을 시켰다.
%% ./make_frameworks.sh
실패. 빌딩 준비만 하다가 끝난 것이라고 한다.
실행 결과:
Building ppc version of the OpenCV framework
============================================
configure: WARNING: unrecognized options: --without-lapack
checking build system type... i386-pc-none
checking host system type... powerpc-apple-darwin9
checking target system type... powerpc-apple-darwin9
checking for a BSD-compatible install... /usr/bin/install -c
checking whether build environment is sane... yes
checking for a thread-safe mkdir -p... ../autotools/install-sh -c -d
checking for gawk... no
checking for mawk... no
checking for nawk... no
checking for awk... awk
checking whether make sets $(MAKE)... yes
checking for ppc-apple-darwin9-strip... no
checking for strip... strip
configure: WARNING: using cross tools not prefixed with host triplet
checking whether make sets $(MAKE)... (cached) yes
checking for style of include used by make... GNU
checking for C++ compiler default output file name... a.out
checking whether the C++ compiler works... yes
checking whether we are cross compiling... yes
checking for suffix of executables...
checking for suffix of object files... o
checking whether we are using the GNU C++ compiler... yes
checking whether g++-4.2 accepts -g... yes
checking dependency style of g++-4.2... gcc3
checking how to run the C++ preprocessor... g++-4.2 -E
checking whether we are using the GNU C++ compiler... (cached) yes
checking whether g++-4.2 accepts -g... (cached) yes
checking dependency style of g++-4.2... (cached) gcc3
checking for ppc-apple-darwin9-gcc... gcc-4.2
checking whether we are using the GNU C compiler... yes
checking whether gcc-4.2 accepts -g... yes
checking for gcc-4.2 option to accept ISO C89... none needed
checking dependency style of gcc-4.2... gcc3
checking for a sed that does not truncate output... /usr/bin/sed
checking for grep that handles long lines and -e... /usr/bin/grep
checking for egrep... /usr/bin/grep -E
checking for ld used by gcc-4.2... /usr/libexec/gcc/i686-apple-darwin9/4.2.1/ld
checking if the linker (/usr/libexec/gcc/i686-apple-darwin9/4.2.1/ld) is GNU ld... no
checking for /usr/libexec/gcc/i686-apple-darwin9/4.2.1/ld option to reload object files... -r
checking for BSD-compatible nm... nm
checking whether ln -s works... yes
checking how to recognize dependent libraries... pass_all
checking how to run the C preprocessor... gcc-4.2 -E
checking for ANSI C header files... yes
checking for sys/types.h... yes
checking for sys/stat.h... yes
checking for stdlib.h... yes
checking for string.h... yes
checking for memory.h... yes
checking for strings.h... yes
checking for inttypes.h... yes
checking for stdint.h... yes
checking for unistd.h... yes
checking dlfcn.h usability... yes
checking dlfcn.h presence... yes
checking for dlfcn.h... yes
checking how to run the C++ preprocessor... g++-4.2 -E
checking for ppc-apple-darwin9-g77... no
checking for ppc-apple-darwin9-xlf... no
checking for ppc-apple-darwin9-f77... no
checking for ppc-apple-darwin9-frt... no
checking for ppc-apple-darwin9-pgf77... no
checking for ppc-apple-darwin9-cf77... no
checking for ppc-apple-darwin9-fort77... no
checking for ppc-apple-darwin9-fl32... no
checking for ppc-apple-darwin9-af77... no
checking for ppc-apple-darwin9-xlf90... no
checking for ppc-apple-darwin9-f90... no
checking for ppc-apple-darwin9-pgf90... no
checking for ppc-apple-darwin9-pghpf... no
checking for ppc-apple-darwin9-epcf90... no
checking for ppc-apple-darwin9-gfortran... no
checking for ppc-apple-darwin9-g95... no
checking for ppc-apple-darwin9-xlf95... no
checking for ppc-apple-darwin9-f95... no
checking for ppc-apple-darwin9-fort... no
checking for ppc-apple-darwin9-ifort... no
checking for ppc-apple-darwin9-ifc... no
checking for ppc-apple-darwin9-efc... no
checking for ppc-apple-darwin9-pgf95... no
checking for ppc-apple-darwin9-lf95... no
checking for ppc-apple-darwin9-ftn... no
checking for g77... no
checking for xlf... no
checking for f77... no
checking for frt... no
checking for pgf77... no
checking for cf77... no
checking for fort77... no
checking for fl32... no
checking for af77... no
checking for xlf90... no
checking for f90... no
checking for pgf90... no
checking for pghpf... no
checking for epcf90... no
checking for gfortran... no
checking for g95... no
checking for xlf95... no
checking for f95... no
checking for fort... no
checking for ifort... no
checking for ifc... no
checking for efc... no
checking for pgf95... no
checking for lf95... no
checking for ftn... no
checking whether we are using the GNU Fortran 77 compiler... no
checking whether accepts -g... no
checking the maximum length of command line arguments... 196608
checking command to parse nm output from gcc-4.2 object... ok
checking for objdir... .libs
checking for ppc-apple-darwin9-ar... no
checking for ar... ar
checking for ppc-apple-darwin9-ranlib... no
checking for ranlib... ranlib
checking for ppc-apple-darwin9-strip... strip
checking for ppc-apple-darwin9-dsymutil... no
checking for dsymutil... dsymutil
checking for ppc-apple-darwin9-nmedit... no
checking for nmedit... nmedit
checking for -single_module linker flag... yes
checking for -exported_symbols_list linker flag... yes
checking if gcc-4.2 supports -fno-rtti -fno-exceptions... no
checking for gcc-4.2 option to produce PIC... -fno-common
checking if gcc-4.2 PIC flag -fno-common works... yes
checking if gcc-4.2 static flag -static works... no
checking if gcc-4.2 supports -c -o file.o... yes
checking whether the gcc-4.2 linker (/usr/libexec/gcc/i686-apple-darwin9/4.2.1/ld) supports shared libraries... yes
checking dynamic linker characteristics... darwin9 dyld
checking how to hardcode library paths into programs... immediate
checking whether stripping libraries is possible... yes
checking if libtool supports shared libraries... yes
checking whether to build shared libraries... yes
checking whether to build static libraries... no
configure: creating libtool
appending configuration tag "CXX" to libtool
checking for ld used by g++-4.2... /usr/libexec/gcc/i686-apple-darwin9/4.2.1/ld
checking if the linker (/usr/libexec/gcc/i686-apple-darwin9/4.2.1/ld) is GNU ld... no
checking whether the g++-4.2 linker (/usr/libexec/gcc/i686-apple-darwin9/4.2.1/ld) supports shared libraries... yes
checking for g++-4.2 option to produce PIC... -fno-common
checking if g++-4.2 PIC flag -fno-common works... yes
checking if g++-4.2 static flag -static works... no
checking if g++-4.2 supports -c -o file.o... yes
checking whether the g++-4.2 linker (/usr/libexec/gcc/i686-apple-darwin9/4.2.1/ld) supports shared libraries... yes
checking dynamic linker characteristics... darwin9 dyld
(cached) (cached) checking how to hardcode library paths into programs... immediate
appending configuration tag "F77" to libtool
checking for x86 cpuid output... unknown
checking for x86 cpuid 0x00000001 output... unknown
checking whether mmx is supported... ../configure: line 21664: 0xunknown: value too great for base (error token is "0xunknown")
Building i386 version of the OpenCV framework
=============================================
configure: WARNING: unrecognized options: --without-lapack
checking build system type... i386-pc-none
checking host system type... i386-apple-darwin9
checking target system type... i386-apple-darwin9
checking for a BSD-compatible install... /usr/bin/install -c
checking whether build environment is sane... yes
checking for a thread-safe mkdir -p... ../autotools/install-sh -c -d
checking for gawk... no
checking for mawk... no
checking for nawk... no
checking for awk... awk
checking whether make sets $(MAKE)... yes
checking for i386-apple-darwin9-strip... no
checking for strip... strip
configure: WARNING: using cross tools not prefixed with host triplet
checking whether make sets $(MAKE)... (cached) yes
checking for style of include used by make... GNU
checking for C++ compiler default output file name... a.out
checking whether the C++ compiler works... yes
checking whether we are cross compiling... yes
checking for suffix of executables...
checking for suffix of object files... o
checking whether we are using the GNU C++ compiler... yes
checking whether g++-4.2 accepts -g... yes
checking dependency style of g++-4.2... gcc3
checking how to run the C++ preprocessor... g++-4.2 -E
checking whether we are using the GNU C++ compiler... (cached) yes
checking whether g++-4.2 accepts -g... (cached) yes
checking dependency style of g++-4.2... (cached) gcc3
checking for i386-apple-darwin9-gcc... gcc-4.2
checking whether we are using the GNU C compiler... yes
checking whether gcc-4.2 accepts -g... yes
checking for gcc-4.2 option to accept ISO C89... none needed
checking dependency style of gcc-4.2... gcc3
checking for a sed that does not truncate output... /usr/bin/sed
checking for grep that handles long lines and -e... /usr/bin/grep
checking for egrep... /usr/bin/grep -E
checking for ld used by gcc-4.2... /usr/libexec/gcc/i686-apple-darwin9/4.2.1/ld
checking if the linker (/usr/libexec/gcc/i686-apple-darwin9/4.2.1/ld) is GNU ld... no
checking for /usr/libexec/gcc/i686-apple-darwin9/4.2.1/ld option to reload object files... -r
checking for BSD-compatible nm... nm
checking whether ln -s works... yes
checking how to recognize dependent libraries... pass_all
checking how to run the C preprocessor... gcc-4.2 -E
checking for ANSI C header files... yes
checking for sys/types.h... yes
checking for sys/stat.h... yes
checking for stdlib.h... yes
checking for string.h... yes
checking for memory.h... yes
checking for strings.h... yes
checking for inttypes.h... yes
checking for stdint.h... yes
checking for unistd.h... yes
checking dlfcn.h usability... yes
checking dlfcn.h presence... yes
checking for dlfcn.h... yes
checking how to run the C++ preprocessor... g++-4.2 -E
checking for i386-apple-darwin9-g77... no
checking for i386-apple-darwin9-xlf... no
checking for i386-apple-darwin9-f77... no
checking for i386-apple-darwin9-frt... no
checking for i386-apple-darwin9-pgf77... no
checking for i386-apple-darwin9-cf77... no
checking for i386-apple-darwin9-fort77... no
checking for i386-apple-darwin9-fl32... no
checking for i386-apple-darwin9-af77... no
checking for i386-apple-darwin9-xlf90... no
checking for i386-apple-darwin9-f90... no
checking for i386-apple-darwin9-pgf90... no
checking for i386-apple-darwin9-pghpf... no
checking for i386-apple-darwin9-epcf90... no
checking for i386-apple-darwin9-gfortran... no
checking for i386-apple-darwin9-g95... no
checking for i386-apple-darwin9-xlf95... no
checking for i386-apple-darwin9-f95... no
checking for i386-apple-darwin9-fort... no
checking for i386-apple-darwin9-ifort... no
checking for i386-apple-darwin9-ifc... no
checking for i386-apple-darwin9-efc... no
checking for i386-apple-darwin9-pgf95... no
checking for i386-apple-darwin9-lf95... no
checking for i386-apple-darwin9-ftn... no
checking for g77... no
checking for xlf... no
checking for f77... no
checking for frt... no
checking for pgf77... no
checking for cf77... no
checking for fort77... no
checking for fl32... no
checking for af77... no
checking for xlf90... no
checking for f90... no
checking for pgf90... no
checking for pghpf... no
checking for epcf90... no
checking for gfortran... no
checking for g95... no
checking for xlf95... no
checking for f95... no
checking for fort... no
checking for ifort... no
checking for ifc... no
checking for efc... no
checking for pgf95... no
checking for lf95... no
checking for ftn... no
checking whether we are using the GNU Fortran 77 compiler... no
checking whether accepts -g... no
checking the maximum length of command line arguments... 196608
checking command to parse nm output from gcc-4.2 object... ok
checking for objdir... .libs
checking for i386-apple-darwin9-ar... no
checking for ar... ar
checking for i386-apple-darwin9-ranlib... no
checking for ranlib... ranlib
checking for i386-apple-darwin9-strip... strip
checking for i386-apple-darwin9-dsymutil... no
checking for dsymutil... dsymutil
checking for i386-apple-darwin9-nmedit... no
checking for nmedit... nmedit
checking for -single_module linker flag... yes
checking for -exported_symbols_list linker flag... yes
checking if gcc-4.2 supports -fno-rtti -fno-exceptions... no
checking for gcc-4.2 option to produce PIC... -fno-common
checking if gcc-4.2 PIC flag -fno-common works... yes
checking if gcc-4.2 static flag -static works... no
checking if gcc-4.2 supports -c -o file.o... yes
checking whether the gcc-4.2 linker (/usr/libexec/gcc/i686-apple-darwin9/4.2.1/ld) supports shared libraries... yes
checking dynamic linker characteristics... darwin9 dyld
checking how to hardcode library paths into programs... immediate
checking whether stripping libraries is possible... yes
checking if libtool supports shared libraries... yes
checking whether to build shared libraries... yes
checking whether to build static libraries... no
configure: creating libtool
appending configuration tag "CXX" to libtool
checking for ld used by g++-4.2... /usr/libexec/gcc/i686-apple-darwin9/4.2.1/ld
checking if the linker (/usr/libexec/gcc/i686-apple-darwin9/4.2.1/ld) is GNU ld... no
checking whether the g++-4.2 linker (/usr/libexec/gcc/i686-apple-darwin9/4.2.1/ld) supports shared libraries... yes
checking for g++-4.2 option to produce PIC... -fno-common
checking if g++-4.2 PIC flag -fno-common works... yes
checking if g++-4.2 static flag -static works... no
checking if g++-4.2 supports -c -o file.o... yes
checking whether the g++-4.2 linker (/usr/libexec/gcc/i686-apple-darwin9/4.2.1/ld) supports shared libraries... yes
checking dynamic linker characteristics... darwin9 dyld
(cached) (cached) checking how to hardcode library paths into programs... immediate
appending configuration tag "F77" to libtool
checking for x86 cpuid output... unknown
checking for x86 cpuid 0x00000001 output... unknown
checking whether mmx is supported... ../configure: line 21664: 0xunknown: value too great for base (error token is "0xunknown")
Creating universal Framework
=============================================
cp: build_ppc/OpenCV.framework: No such file or directory
lipo: can't open input file: build_ppc/OpenCV.framework/OpenCV (No such file or directory)
Done!
5. Xcode에서 OpenCV frameworks 추가하기
frameworks에는 public과 private이 있는데, OpenCV는 private framework이다.
(Mac의 public frameworks들은 /System/Library/Framework 에 있다.)
5-1. OpenCV 프레임웍 추가
4-4의 시도가 실패했으므로 (이를 바로잡기보다 우선은 편하게),
아래 링크에서 미리 built된 맥용 OpenCV frameworks를 다운로드 한다. (또는 두번째 링크에서 1.2버전 바로 받기 )
Institut für Nachrichtentechnik – OpenCV - Universal Binary Frameworks for MacOS X
.dmg 파일을 실행시켜 마운트된 이미지에서 OpenCV.framework 폴더를
/Library/Frameworks 에 넣는다.
5-2. Xcode 프로젝트에 프레임웍 삽입 (Xcode 3.1 기준)
Xcode를 열고 새 프로젝트 Command Line Utility / C++ Tool 을 만들고,
(자동으로 프로젝트와 동일명의 target 이 생성됨)
왼쪽 바 Groups & Files에서 프로젝트를 오른쪽 마우스 클릭하여 Add > Existing Frameworks 선택한다.
탐색창이 뜨면 /Library/Frameworks/OpenCV.framework 를 찾아 추가한다.
A framework is a hierarchical directory that encapsulates shared
resources, such as a dynamic shared library, nib files, image files,
localized strings, header files, and reference documentation in a
single package.
A framework is also a bundle and its contents can be accessed using Core Foundation Bundle Services or the Cocoa NSBundle class.
Frameworks can include a wider variety of resource types than libraries.
08-08-16 20:42 - log1.txt가 FA AF 20 AA로 시작하지 않으면, log2.txt에 한 번에 3개씩 (6개가 아니라) 저장된다. 이때 한 주기의 16번(17번째) byte부터 읽는 것이 아니라 무조건 처음에 들어온 데이터로부터 16번(17번째) byte를 읽기 시작한다.
08-08-17 02:22
Microsoft Visual C++ Debug Library
Debug Assertion Failed!
Program: ...\SGLS.exe File: wincore.cpp Line: 958
For information on how your program can cause an assertion failure, see the Visual C++ documentation on asserts. (Press Retry to debug the aaplication)
183p Pointers are also called address variables because they contain the addresses of other variables.
184p Pointers can be used as a quick and simple way to access arrays. (...) Pointers can be used to create new variables and complex data structures such as linked lists and trees.
185p The operator ampersand (&) returns the address of a thing which is a pointer. The operator asterisk (*) returns the object to which a pointer points.
Operator - Meaning * - Dereference (given a pointer, get the thing referenced) & - Address of (given a thing, point to it)
The operator ampersand (&) returns the address of a thing which is a pointer. The operator asterisk (*) returns the object to which a pointer points.
int *thing_ptr; // declare a pointer to a thing thing_ptr = &thing; // point to the thing *thing_ptr = 5; // set "thing" to 5 // The expression &thing is a pointer to a thing. The variable thing is an object // thing_ptr points to any integer. It may or may not point to the specific variable thing.
The & (address of operator) gets the address of an object (a pointer).
The * (dereference operator) tells C to look at the data pointed to, not hte pointer itself.
Instead of having to move a lot of data around, we can declare an array of pointers and then sort the pointers.
Command-Line Arguments
main (int argc, char *argv[]) {
The parameter argc is the number of arguments on the command line (including the program name). The array argv contains the actual arguments.
(reminding...) 터미널에서, 말씀하신대로 "./V2008122-01 input.txt"라고 치면 다음과 같이 나옵니다.
argc=2
argv[0]=./V2008122-01
argv[1]=input.txt
서 교수님: argv[0] = 실행프로그램 이름; 1번째는 항상 실행프로그램의 패스/이름 이 들어갑니다.
이번에는 argv[1] 에 들어갈 두 번째 값을 주었기 때문에 그 값이 프린트 된 것입니다. command-line arguments는 shell 프로그램이 fileio 함수를 호출할 때 매개변수로 주는 것이고, 좀 더 엄밀하게는 OS 가 main 함수를 호출할 때 주는 것입니다.
// formats files for printing // usage: print [options] file(s)
#include <stdio.h> #include <stdlib.h>
int verbose = 0; // verbose mode (default = false) char *out_file = "print.out"; //output filename char *program_name; // name of the program for erros int line_max = 66; // number of lines per page
999:~/cintro/ch13/eg12 lym$ ./ch13eg12 Verbose 0 Lines 66 Input printf.in Output print.out 999:~/cintro/ch13/eg12 lym$ ./ch13eg12 i am tired Verbose 0 Lines 66 Input i Output print.out Verbose 0 Lines 66 Input am Output print.out Verbose 0 Lines 66 Input tired Output print.out 999:~/cintro/ch13/eg12 lym$ ./ch13eg12 -v -l128 -0title xfile yfile zfile Bad option -0title Usage is ./ch13eg12 [options] [file-list] Options -v verbose -l<number> Number of line -o<name> Set output filename 999:~/cintro/ch13/eg12 lym$ ./ch13eg12 -v -l128 -otitle xfile yfile zfile Verbose 1 Lines 128 Input xfile Output title Verbose 1 Lines 128 Input yfile Output title Verbose 1 Lines 128 Input zfile Output title
208p A pointer does not create any new space for data, but just refers to data that is created elsewhere.
http://www.cplusplus.com/doc/tutorial/pointers.html The identifier of an array is equivalent to the address of its first
element, as a pointer is equivalent to the address of the first element
that it points to, so in fact they are the same concept.
Provides step-by-step instructions for learning COCOA, discussing such topics as Objective-C, controls, helper objects, archiving, Nib files and NSWindowController, and creating interface builder palettes.
NeXTSTEP came with a set of libraries and tools to enable programmers
to deal with the window manager in an elegant manner. The libraries
were called frameworks. In 1993, the frameworks and tools were revised and renamed OpenStep, which was itself later renamed Cocoa.
Cocoa enables your application to receive events from the window server and draw to the screen.
Programming with the frameworks is done in a language called Objective-C.
4p Tools
Mac OS X Developer Tools (Xcode, Interface Builder) GNU C compiler (gcc) GNU debugger (gdb)
An object takes up memory and has variables inside it.
Classes are structures that can create objects. Classes specify the variables that the object has, and they are responsible for allocating memory for the object. We say that the object is an instance of the class that created it. To call a method, you send the object a message.
6p Frameworks
A framework is a collection of classes that are intended to be used together. The classes are compiled together into a reusable library of code. Any related resources are put into a directory with the library. The directory is renamed with the extensioin .framework. You can find the built-in frameworks for your machine in /System/Library/Frameworks.
All Cocoa applications use two of these frameworks: Foundation and AppKit.
ref. Steve Oualline, Practical C Programmin, 292-293p
root node leaves
"Recursion is extremely useful with trees. Our rules for recursion are: 1. The function must make things simpler. This rule is satisfied by trees, because as you descend the hierarchy there is less to search. 2. There must be some endpoint. A tree offers two endpoints, either you find a match, or you reach a null node.
The basic elements of a program are the data declarations, functions, and comments.
main() 함수는 첫번째로 호출되는 함수이며, 이 main 함수가 다른 함수들을 직접 또는 간접으로 호출한다.
return(0);는 프로그램이 정상적으로 (Status=0) 존재했었음을 OS에게 보고하기 위해 쓰인다. : return value가 클수록 error가 심각하다는 뜻이다.
Variables Each variable has a variable type. A variable must be defined in a declaration statement just before the main() line at the top of a program.
Assignment statements The general form of the assignment statement is: variable = expression; The = is used for assignment.
printf Function printf : a standard function to output our message Print formatted data to stdout Writes
to the standard output (stdout) a sequence of data formatted as the
format argument specifies. After the format parameter, the function
expects at least as many additional arguments as specified in format. The format tags follow this prototype: %[flags][width][.precision][length]specifier
: 표준 입출력 함수- 표준 입출력 장치를 통해 데이터를 입력하거나 출력하는 기능을 갖고 있는 함수 - 표준 입출력 함수를 사용하려면 #include <stdio.h>를 기술해 줘야 한다. [형식] printf(" 출력양식 ", 인수1,인수2...); - 서식문자열에는 모든 문자를 사용할 수 있으며 변환문자와 제어문자를 제외하고는 화면에 그대로 출력 - 인수와 변환문자는 일대일 대응해야 하며 반드시 인수의 자료형과 문자의 자료형은 일치해야 한다. ex) printf("%d + %d= %d\n",10,20,30); 출력결과 10+20=30
stdout Standard output stream : the default destination of regular output for applications. It is
usually directed to the output device of the standard console
(generally, the screen).
cf. library fuctions
%d : integer conversion specification
parameter list
The general form of the printf statement is: printf(format, expression-1, expression-2, ...); where format is the string describing what to point.
1 How to Think Like a Computer Scientist Learning with Python (2nd Edition) by Jeffrey Elkner, Allen B. Downey and Chris Meyers illustrated by Udit Bhatnager and Chris Schmeelk
-> 너무나 친절한 설명. 컴퓨터 프로그래밍 언어에 대한 개념을 처음 잡을 때 힘들게 정리했던 것들이 1장에 깔끔하게 요약되어 있고. @.@ 진도 진짜 천천히 나간다. 자연계라면 좀 지루할 정도. 손 놓고 있는 동안 다 잊어 버렸을까 걱정했는데 이거 한 번 보면 될 듯. 파이썬 아니, 코딩 처음 공부할 때 여기 알았으면 진짜 편했을텐데. ㅜㅜ
2 Python Tutorial Guido van Rossum Python Software Foundation
-> 지금 보면 좀 나으려나? 설명이 압축적이라 막상 코딩을 짤 때에는 의외로 큰 도움이 되지 못했었다. 코딩에 대한 것이 아니라 언어 자체에 대한 설명이기 때문이다. 나한텐 어렵다. 내겐 필요 없는 내용도 많다. 그래도 필독. 일종의 사전이라고 생각한다. (사전 본다고 글이 써지는 건 아니잖아? ^^;)
-> 그래도 중급 이상 되기 전에는 안 사. ㅋ 오호. Jython이라... Jython is an implementation of the Python programming language written
in Java, allowing Python programs to integrate seamlessly with any Java
code.


 VideoSource_OSX.cc
 invalid-file
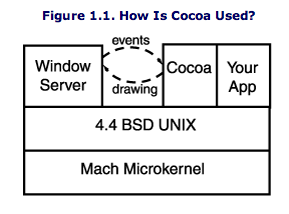

 invalid-file